
Commands
In this RHCSA9 Exam Series: Resetting the Root Password article, we will review how to change or reset the root password in RHEL9. There’s a


In this section of the RHCSA9 exam series, we will review the lab exercises from previous articles and compare results.
Before we begin, we must announce this disclaimer:
This is not the official RHCSA9 exam results or review process and is only designed to give you (“the reader”) an idea of what knowledge, tasks, and skills you will need in order to successfully pass the RHCSA9 exam. It is ultimately up to you how well you do. Study the labs many times until you become comfortable on the keyboard with completing all of the RHCSA exam objectives with an emphasis on the articles outlined (below):
**NOTE: We will review each bullet in the lab instructions for each section and compare our results**

Photo by admingeek from Infotechys
# mkdir -p /opt/next_project_files
The -p option stands for parent or in this case ignore if the parent directory exists and just create any missing directories. This command will simply create next_project_files under the /opt directory.
There are a few way to accomplish this task. We can simply create each one of the 20 files using the touch command (below) and by entering each filename. However, this is not working efficiently and time management is an important part of the RHCSA exam.
# cd /opt/next_project_files
# touch file1.txt file2.txt file3.txt file4.txt ...
Instead of typing each filename, we could use the curly braces {} to quickly create multiple files of the same extension (below).
# cd /opt/next_project_files
# touch file{1..20}.txt
					# ls -l
total 60
-rw-r--r--. 1 root root 0 Jul 30 20:26 file10.txt
-rw-r--r--. 1 root root 0 Jul 30 20:26 file11.txt
-rw-r--r--. 1 root root 0 Jul 30 20:26 file12.txt
-rw-r--r--. 1 root root 0 Jul 30 20:26 file13.txt
-rw-r--r--. 1 root root 0 Jul 30 20:26 file14.txt
-rw-r--r--. 1 root root 0 Jul 30 20:26 file15.txt
-rw-r--r--. 1 root root 0 Jul 30 20:26 file16.txt
-rw-r--r--. 1 root root 0 Jul 30 20:26 file17.txt
-rw-r--r--. 1 root root 0 Jul 30 20:26 file18.txt
-rw-r--r--. 1 root root 0 Jul 30 20:26 file19.txt
-rw-r--r--. 1 root root 0 Jul 30 20:29 file1.txt
-rw-r--r--. 1 root root 0 Jul 30 20:26 file20.txt
-rw-r--r--. 1 root root 0 Jul 30 20:28 file2.txt
-rw-r--r--. 1 root root 0 Jul 30 20:29 file3.txt
-rw-r--r--. 1 root root 0 Jul 30 20:48 file4.txt
-rw-r--r--. 1 root root 0 Jul 30 20:53 file5.txt
-rw-r--r--. 1 root root 0 Jul 30 21:00 file6.txt
-rw-r--r--. 1 root root 0 Jul 31 16:01 file7.txt
-rw-r--r--. 1 root root 0 Jul 30 20:26 file8.txt
-rw-r--r--. 1 root root 0 Jul 30 20:26 file9.txt
This method is more advanced and involves using a for loop (below).
# cd /opt/next_project_files
# for i in {1..20}; do touch file$i.txt; done
We can assign a range of numbers (in this case, numbers between 1 and 20) to variable i and pass it through a for loop that will touch a new file$i.txt with each iteration until 20 files are created. Of the three methods, the second option is your best bet to accomplish this task efficiently.
df -Ph command into the first three(3) text files (e.g. file1-3.txt)
					# df -Ph > file1.txt
# df -Ph > file2.txt
# df -Ph > file3.txt
Next, we can redirect the contents of df -Ph to the first three text files using the command highlighted above.
					# ls /etc > file4.txt
# ls /etc > file5.txt
# ls /etc > file6.txt
# ls /etc > file7.txt
# ls /etc > file8.txt
Using the ls command, we can list all of the files and sub-directories under /etc and the > symbol redirects those contents under /etc to file4-8.txt
					# ls /usr/local > file9.txt
# ls /usr/local > file10.txt
Next, we’ll repeat the same steps but with the /usr/local directory and redirect its contents to file9.txt and file10.txt (above).
					# mv file4.txt systemfile4.data
# mv file5.txt systemfile5.data
# mv file6.txt systemfile6.data
# mv file7.txt systemfile7.data
# mv file8.txt systemfile8.data
# mv file9.txt systemfile9.data
# mv file10.txt systemfile10.data
Using the mv command, we can rename filenames as shown (above) as well as, move files around the directory structure.
systemfile4.datasystemfile5.datasystemfile6.data
					# cat systemfile4.data >> file4.txt
# cat systemfile5.data >> file4.txt
# cat systemfile6.data >> file4.txt
The >> redirect symbol appends or adds additional content to an existing file (above).
Using the head command, we can display portions of a file’s content. By default, the head command will display the first 10 lines of content from a file.
# head file4.txt
					adjtime
aliases
alternatives
anacrontab
audit
authselect
bash_completion.d
bashrc
binfmt.d
chrony.conf
To display the first line of text in a file, apply the -n flag followed by a number (below)
					# head -n1 file4.txt
adjtime
To redirect that output to file5.txt, use the > redirect symbol (below)
# head -n1 file4.txt > file5.txt
# cat systemfile9.data | wc -l >> file5.txt
Using the wc command, we can pipe (represented by the | symbol) the output of systemfile9.data to file5.txt. In this instance, we are using the >> redirect symbol to add content (or append) to already existing data in file5.txt (above).
Firstly, we will grep for anything in systemfile6.data with the .conf keyword.
# grep .conf systemfile6.data
					chrony.conf
dracut.conf
dracut.conf.d
gather_stats.conf
host.conf
kdump.conf
krb5.conf
krb5.conf.d
ld.so.conf
ld.so.conf.d
libaudit.conf
libuser.conf
locale.conf
logrotate.conf
makedumpfile.conf.sample
man_db.conf
mke2fs.conf
nsswitch.conf
nsswitch.conf.bak
pkgconfig
resolv.conf
rsyncd.conf
rsyslog.conf
sestatus.conf
sudo.conf
sudo-ldap.conf
sysconfig
sysctl.conf
updatedb.conf
vconsole.conf
xattr.conf
yum.conf
Next, we’ll use the > redirect to populate file6.txt with that list.
# grep .conf systemfile6.data > file6.txt
# cat file6.txt
					chrony.conf
dracut.conf
dracut.conf.d
gather_stats.conf
host.conf
kdump.conf
krb5.conf
krb5.conf.d
ld.so.conf
ld.so.conf.d
libaudit.conf
libuser.conf
locale.conf
logrotate.conf
makedumpfile.conf.sample
man_db.conf
mke2fs.conf
nsswitch.conf
nsswitch.conf.bak
pkgconfig
resolv.conf
rsyncd.conf
rsyslog.conf
sestatus.conf
sudo.conf
sudo-ldap.conf
sysconfig
sysctl.conf
updatedb.conf
vconsole.conf
xattr.conf
yum.conf
As we’ve covered in a previous task, the wc command with the -l flag will display what we need here.
					# cat file6.txt | wc -l
32
# cat file6.txt | wc -l > file7.txt
The word count output will vary depending on what you have installed on your machine. The second command line (above) shows how we redirect that output to file7.txt.
					# pwd
/opt/next_project_files
# mkdir modified
Using the mkdir command, simply create a new directory (modified) under /opt/next_project_files
The following four(4) tasks will be completed under the newly created modified directory.
Using the find command, search your machine for all files with a .data extension.
# find / -name "*.data"
					/sys/module/failover/sections/.data
/sys/module/iTCO_wdt/sections/.data
/sys/module/nf_conntrack/sections/.data
/sys/module/libahci/sections/.data
/sys/module/net_failover/sections/.data
/sys/module/irqbypass/sections/.data
/opt/next_project_files/systemfile4.data
/opt/next_project_files/systemfile5.data
/opt/next_project_files/systemfile6.data
/opt/next_project_files/systemfile7.data
/opt/next_project_files/systemfile8.data
/opt/next_project_files/systemfile9.data
/opt/next_project_files/systemfile10.data
As you can see (above), all .data files on the machine are displayed to the terminal–including the systemfile*.data files we previously created. Next, redirect the resulting output to file8.txt.
					# pwd
/opt/next_project_files/modified
# find / -name "*.data" > file8.txt
It is always good practice to verify that you’re in the correct present working directory (pwd), before proceeding with redirecting the output.
Run the following command (below) to locate all files with setuid applied on your machine.
# find / -perm -4000
					find: ‘/proc/37531/task/37531/fd/6’: No such file or directory
find: ‘/proc/37531/task/37531/fdinfo/6’: No such file or directory
find: ‘/proc/37531/fd/5’: No such file or directory
find: ‘/proc/37531/fdinfo/5’: No such file or directory
/usr/bin/chage
/usr/bin/gpasswd
/usr/bin/newgrp
/usr/bin/su
/usr/bin/mount
/usr/bin/umount
/usr/bin/crontab
/usr/bin/passwd
/usr/bin/sudo
/usr/sbin/grub2-set-bootflag
/usr/sbin/pam_timestamp_check
/usr/sbin/unix_chkpwd
/usr/sbin/userhelper
Notice that although we are presented with a list of files (above), there’s no way to tell by observation that the files listed have the setuid setting. By using the exec command, we can execute additional commands with find to further examine the output (below).
# find / -perm -4000 -exec ls -lh {} \;
					find: ‘/proc/37536/task/37536/fd/6’: No such file or directory
find: ‘/proc/37536/task/37536/fdinfo/6’: No such file or directory
find: ‘/proc/37536/fd/5’: No such file or directory
find: ‘/proc/37536/fdinfo/5’: No such file or directory
-rwsr-xr-x. 1 root root 74K Dec 3 2021 /usr/bin/chage
-rwsr-xr-x. 1 root root 77K Dec 3 2021 /usr/bin/gpasswd
-rwsr-xr-x. 1 root root 42K Dec 3 2021 /usr/bin/newgrp
-rwsr-xr-x. 1 root root 57K Feb 24 05:25 /usr/bin/su
-rwsr-xr-x. 1 root root 48K Feb 24 05:25 /usr/bin/mount
-rwsr-xr-x. 1 root root 36K Feb 24 05:25 /usr/bin/umount
-rwsr-xr-x. 1 root root 53K Aug 9 2021 /usr/bin/crontab
-rwsr-xr-x. 1 root root 32K Aug 10 2021 /usr/bin/passwd
---s--x--x. 1 root root 182K Aug 26 2021 /usr/bin/sudo
-rwsr-xr-x. 1 root root 16K Jun 3 14:26 /usr/sbin/grub2-set-bootflag
-rwsr-xr-x. 1 root root 16K Dec 2 2021 /usr/sbin/pam_timestamp_check
-rwsr-xr-x. 1 root root 24K Dec 2 2021 /usr/sbin/unix_chkpwd
-rws--x--x. 1 root root 45K Dec 9 2021 /usr/sbin/userhelper
Now we can see the setuid setting as represented by -s for the owner also referred to as the user. By adding the > redirect to the end of the above find command, we can populate file9.txt with that output (below).
# find / -perm -4000 -exec ls -lh {} \; > file9.txt
					find: ‘/proc/37616/task/37616/fd/6’: No such file or directory
find: ‘/proc/37616/task/37616/fdinfo/6’: No such file or directory
find: ‘/proc/37616/fd/5’: No such file or directory
find: ‘/proc/37616/fdinfo/5’: No such file or directory
Also, notice that the error output of missing files are display and not redirected to file9.txt. In order to resolve this issue, add the 2>&1 expression to move that stderr output to stdout and away from your terminal display (below).
# find / -perm -4000 -exec ls -lh {} \; > file9.txt 2>&1
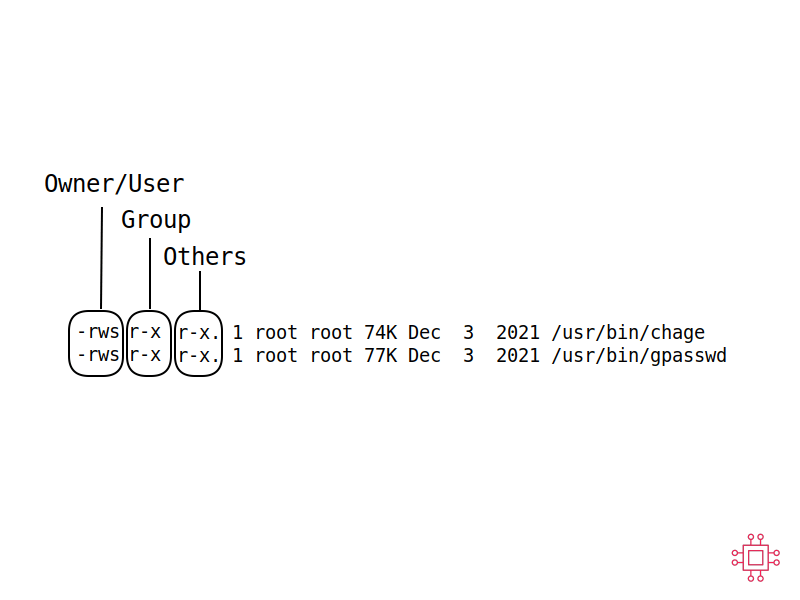
Photo by admingeek from Infotechys
The same command would apply when searching for all setgid files. The -2000 option represents the setgid permission (below).
					# find / -perm -2000 -exec ls -lh {} \; > file10.txt
# cat file10.txt
					total 0
total 0
total 0
total 4.0K
drwxr-sr-x+ 2 root systemd-journal 4.0K Jul 29 17:58 0f57f6e10ddd4a66a8af4a6ac3301005
total 34M
-rw-r-----+ 1 root systemd-journal 6.3M Jul 28 15:28 system@0005e4e2968449be-301c284e990c1685.journal~
-rw-r-----+ 1 root systemd-journal 6.3M Jul 28 15:40 system@0005e4e32932786f-910abe0b012c39f8.journal~
-rw-r-----+ 1 root systemd-journal 4.0M Jul 29 17:58 system@64780c39fec14edda9a4a9094704777f-0000000000000001-0005e4e31fcb44fe.journal
-rw-r-----+ 1 root systemd-journal 3.9M Jul 20 19:01 system@acbc7ed45af14e748a60aafd87b264ee-0000000000000001-0005e3e18d9ff155.journal
-rw-r-----+ 1 root systemd-journal 6.3M Aug 5 00:05 system.journal
-rw-r-----+ 1 root systemd-journal 594K Jul 20 19:01 user-1000@2d55cc553c304005aa8cb5ce04b6eb32-0000000000000431-0005e3e1a0040282.journal
-rw-r-----+ 1 root systemd-journal 282K Jul 29 17:58 user-1000@2d55cc553c304005aa8cb5ce04b6eb32-00000000000012fe-0005e4ee75bcfe3e.journal
-rw-r-----+ 1 root systemd-journal 6.3M Aug 4 21:11 user-1000.journal
-rwxr-sr-x. 1 root tty 24K Feb 24 05:25 /usr/bin/write
-rwxr-sr-x. 1 root screen 485K Jan 4 2022 /usr/bin/screen
-rwx--s--x. 1 root slocate 41K Aug 10 2021 /usr/bin/locate
-rwx--s--x. 1 root utmp 16K Aug 10 2021 /usr/libexec/utempter/utempter
-r-xr-sr-x. 1 root ssh_keys 326K Feb 22 07:42 /usr/libexec/openssh/ssh-keysign
It is implied that we use the >> redirect here to append the contents of three text files into one. The following command (below) is one way to do this.
					# cat file8.txt >> file11.txt
# cat file9.txt >> file11.txt
# cat file10.txt >> file11.txt
Simply cat file11.txt and pipe | it’s contents to word count wc -l and then redirect > that output to file12.txt
# cat file11.txt | wc -l > file12.txt
This is another instance where the pwd command is useful to verify where we are in the directory tree. Once we’re in the right directory, we can simply issue the rm command to remove file11.txt and file12.txt.
					# pwd
/opt/next_project_files/modified
# cd ..
					# pwd
/opt/next_project_files/modified
					# rm file11.txt
rm: remove regular empty file 'file11.txt'? y
# rm -f file12.txt
Notice that we can add the -f flag to the rm command to force a removal without the being prompted.
Firstly, run a long listing ls -l of the contents in the next_project_files directory. This will allow us to identify all the empty files.
					# pwd
/opt/next_project_files
					total 58
# ls -l
-rw-r--r--. 1 root root 0 Jul 30 20:26 file13.txt
-rw-r--r--. 1 root root 0 Jul 30 20:26 file14.txt
-rw-r--r--. 1 root root 0 Jul 30 20:26 file15.txt
-rw-r--r--. 1 root root 0 Jul 30 20:26 file16.txt
-rw-r--r--. 1 root root 0 Jul 30 20:26 file17.txt
-rw-r--r--. 1 root root 0 Jul 30 20:26 file18.txt
-rw-r--r--. 1 root root 0 Jul 30 20:26 file19.txt
-rw-r--r--. 1 root root 419 Jul 30 20:29 file1.txt
-rw-r--r--. 1 root root 0 Jul 30 20:26 file20.txt
-rw-r--r--. 1 root root 419 Jul 30 20:28 file2.txt
-rw-r--r--. 1 root root 419 Jul 30 20:29 file3.txt
-rw-r--r--. 1 root root 1586 Aug 3 10:43 file4.txt
-rw-r--r--. 1 root root 1586 Aug 3 10:43 file5.txt
-rw-r--r--. 1 root root 414 Aug 4 21:57 file6.txt
-rw-r--r--. 1 root root 3 Aug 4 22:11 file7.txt
drwxr-xr-x. 2 root root 94 Aug 2 12:37 modified
-rw-r--r--. 1 root root 55 Jul 30 20:31 systemfile10.data
-rw-r--r--. 1 root root 1586 Jul 30 20:30 systemfile4.data
-rw-r--r--. 1 root root 1586 Jul 30 20:30 systemfile5.data
-rw-r--r--. 1 root root 1586 Jul 30 20:30 systemfile6.data
-rw-r--r--. 1 root root 1586 Jul 30 20:31 systemfile7.data
-rw-r--r--. 1 root root 1586 Jul 30 20:31 systemfile8.data
-rw-r--r--. 1 root root 55 Jul 30 20:31 systemfile9.data
Next, remove all of the empty files using the rm command. In the interest of time, running the rm command for each file is inefficient.
# rm -f file13.txt file14.txt file15.txt ...
The following rm command (below) will work and is faster.
# rm -f file{13..20}.txt
Now a listing of the next_project_files directory should only show files with content.
# ls -l
					total 56
-rw-r--r--. 1 root root 419 Jul 30 20:29 file1.txt
-rw-r--r--. 1 root root 419 Jul 30 20:28 file2.txt
-rw-r--r--. 1 root root 419 Jul 30 20:29 file3.txt
-rw-r--r--. 1 root root 1586 Aug 3 10:43 file4.txt
-rw-r--r--. 1 root root 1586 Aug 3 10:43 file5.txt
-rw-r--r--. 1 root root 414 Aug 4 21:57 file6.txt
-rw-r--r--. 1 root root 3 Aug 4 22:11 file7.txt
drwxr-xr-x. 2 root root 94 Aug 2 12:37 modified
-rw-r--r--. 1 root root 55 Jul 30 20:31 systemfile10.data
-rw-r--r--. 1 root root 1586 Jul 30 20:30 systemfile4.data
-rw-r--r--. 1 root root 1586 Jul 30 20:30 systemfile5.data
-rw-r--r--. 1 root root 1586 Jul 30 20:30 systemfile6.data
-rw-r--r--. 1 root root 1586 Jul 30 20:31 systemfile7.data
-rw-r--r--. 1 root root 1586 Jul 30 20:31 systemfile8.data
-rw-r--r--. 1 root root 55 Jul 30 20:31 systemfile9.data
Finally, move all files with a .txt extension to the modified directory.
					root@node1.infotechys.example.com: /opt/next_project_files
# mv *.txt modified
					# root@node1.infotechys.example.com: /opt/next_project_files
# ls -lh
					total 32K
drwxr-xr-x. 2 root root 4.0K Aug 5 12:06 modified
-rw-r--r--. 1 root root 55 Jul 30 20:31 systemfile10.data
-rw-r--r--. 1 root root 1.6K Jul 30 20:30 systemfile4.data
-rw-r--r--. 1 root root 1.6K Jul 30 20:30 systemfile5.data
-rw-r--r--. 1 root root 1.6K Jul 30 20:30 systemfile6.data
-rw-r--r--. 1 root root 1.6K Jul 30 20:31 systemfile7.data
-rw-r--r--. 1 root root 1.6K Jul 30 20:31 systemfile8.data
-rw-r--r--. 1 root root 55 Jul 30 20:31 systemfile9.data
					root@node1.infotechys.example.com: /opt/next_project_files
# ls -lh modified
					total 52K
-rw-r--r--. 1 root root 1.4K Aug 5 01:10 file10.txt
-rw-r--r--. 1 root root 4.3K Aug 5 01:12 file11.txt
-rw-r--r--. 1 root root 3 Aug 2 12:37 file12.txt
-rw-r--r--. 1 root root 419 Jul 30 20:29 file1.txt
-rw-r--r--. 1 root root 419 Jul 30 20:28 file2.txt
-rw-r--r--. 1 root root 419 Jul 30 20:29 file3.txt
-rw-r--r--. 1 root root 1.6K Aug 3 10:43 file4.txt
-rw-r--r--. 1 root root 1.6K Aug 3 10:43 file5.txt
-rw-r--r--. 1 root root 414 Aug 4 21:57 file6.txt
-rw-r--r--. 1 root root 3 Aug 4 22:11 file7.txt
-rw-r--r--. 1 root root 2.3K Aug 4 23:10 file8.txt
-rw-r--r--. 1 root root 774 Aug 5 01:11 file9.txt
As you can see (above), all (.txt) files have been moved successfully to the modified directory.
Use the tar command with the -cvzf option to create a new archive .tar file with verbosity and archive the contents of the next_project_files directory. Also, the z option will apply the gzip compression to the projects.tgz file (below).
					# pwd
/opt
# tar -cvzf projects.tgz
					next_project_files/
next_project_files/
next_project_files/systemfile4.data
next_project_files/systemfile5.data
next_project_files/systemfile6.data
next_project_files/systemfile7.data
next_project_files/systemfile8.data
next_project_files/systemfile9.data
next_project_files/systemfile10.data
next_project_files/modified/
next_project_files/modified/file8.txt
next_project_files/modified/file9.txt
next_project_files/modified/file10.txt
next_project_files/modified/file11.txt
next_project_files/modified/file12.txt
next_project_files/modified/file1.txt
next_project_files/modified/file2.txt
next_project_files/modified/file3.txt
next_project_files/modified/file4.txt
next_project_files/modified/file5.txt
next_project_files/modified/file6.txt
next_project_files/modified/file7.txt
The final four(4) tasks will be completed as part of creating a new user on your machine called testuser.
Using the useradd command, to create the new user and verify it has been created with the id command. Of course, there are many other ways to verify user account creation (e.g. cat /etc/passwd).
					# useradd testuser
# id testuser
uid=1001(testuser) gid=1001(testuser) groups=1001(testuser)
The testuser account was created successfully and a home directory (/home/testuser) was generated for this user by default.
# ls -lh /home
					total 0
drwx------. 5 admin admin 157 Jul 29 21:03 admin
drwx------. 2 testuser testuser 135 Aug 2 13:18 testuser
Using the cp command, copy the projects.tgz file to the testuser home directory.
# cp /opt/projects.tgz /home/testuser/
					# ls -lh /home/testuser
total 4.0K
-rw-r--r--. 1 root root 2.9K Aug 5 12:58 projects.tgz
Notice: The projects.tgz file is owned by root because you executed the copy as the root user. Therefore, we’ll need to change the ownership of the file so it is owned by testuser.
					# chown -v testuser:testuser /home/testuser/projects.tgz
changed ownership of '/home/testuser/projects.tgz' from root:root to testuser:testuser
Using the chown command with the verbose flag -v will output the result of the ownership change (above). Now we can see the change has been made when we running another listing (below).
# ls -lh /home/testuser
					total 4.0K
-rw-r--r--. 1 testuser testuser 2.9K Aug 5 12:58 projects.tgz
In order to complete this task, we first become the testuser and issue the umask command for the current umask setting.
					# su - testuser
[testuser@node1 ~]$ umask
0022
[testuser@node1 ~]$ ls -l
					total 4
-rw-r--r--. 1 testuser testuser 2929 Aug 5 12:58 projects.tgz
-rw-r--r--. 1 testuser testuser 0 Aug 5 13:15 testfile.txt
By default, the umask setting is 0022 or 022–represented as read and write (-rw-) permissions assigned to the owner or user, and only read permissions assigned to the group (-r--) and others(-r--). The octal representation for -rw-r--r-- is 0644.
However, the instruction denotes a umask setting that would assign read and write permissions to the owner and group. This requires that we set umask to 007.
[testuser@node1 ~]$ umask 007
[testuser@node1 ~]$ touch testfile2.txt
[testuser@node1 ~]$ ls -lh
					total 4.0K
-rw-r--r--. 1 testuser testuser 2.9K Aug 5 12:58 projects.tgz
-rw-rw----. 1 testuser testuser 0 Aug 5 21:16 testfile2.txt
-rw-r--r--. 1 testuser testuser 0 Aug 5 13:15 testfile.txt
					[testuser@node1 ~]$ umask
0007
You can see the umask change was made successfully as the newly created testfile2.txt file, shows read and write permissions for the user and group ONLY.
					[testuser@node1 ~]$ exit
logout
					[testuser@node1 ~]$ umask
0022
Notice: Upon exiting the testuser account, your umask setting returns to the default 022. In order to make the umask setting persistent, you must add it to your .bashrc file (below).
[testuser@node1 ~]$ echo "umask 007" >> .bashrc
					[testuser@node1 ~]$ exit
logout
					[testuser@node1 ~]$ umask
0007
To complete this final task, run the chmod command. The octal representation for user(u)=rw, group(g)=read, and others(o)=none is 0640.
					[testuser@node1 ~]$ chmod 640 projects.tgz
[testuser@node1 ~]$ ls -lh
					total 4
-rw-r-----. 1 testuser testuser 2929 Aug 5 12:58 projects.tgz
-rw-rw----. 1 testuser testuser 0 Aug 5 21:16 testfile2.txt
-rw-r--r--. 1 testuser testuser 0 Aug 5 13:15 testfile.txt
You can also run the same command in symbolic mode (below).
[testuser@node1 ~]$ chmod o-r projects.tgz
Congratulations! You’ve just completed the Lab Results and Review section of the RHCSA9 exam series. Bookmark this page as it will be updated frequently with the latest RHCSA exam tips and topics. Was this article helpful to you? If so, leave us some feedback in the comments section. We’d love to hear from you.
Related Posts
In this RHCSA9 Exam Series: Resetting the Root Password article, we will review how to change or reset the root password in RHEL9. There’s a

Are you preparing for the RHCSA 9 exam and want to master the essential skill of shell scripting? Discover 10 practical shell scripts that can

In this article, we will review a scenario that may appear on the RHCSA9 exam. The RHCSA9 exam series articles are designed to increase your