Commands
Are you looking to set up a Kubernetes development environment with Vagrant quickly and efficiently? Look no further! In this guide, we’ll walk through how

This blog post covers setting up a Kubernetes cluster on Ubuntu 23.10. Follow our step-by-step guide to set up a robust and scalable Kubernetes environment with practical examples and troubleshooting tips.
Kubernetes has become the de facto standard for container orchestration, providing powerful tools to deploy, manage, and scale containerized applications. Setting up a Kubernetes cluster on Ubuntu 23.10 can significantly enhance your development and deployment workflows. This comprehensive guide will walk you through the steps to install and configure a Kubernetes cluster on Ubuntu 23.10, ensuring a smooth and efficient setup.
Kubernetes, often abbreviated as K8s, is a powerful open-source platform for managing containerized workloads and services. It provides a robust set of features that make it an essential tool for modern DevOps practices:
|
Before we begin, ensure you have the following prerequisites:
/etc/hosts file:
					# Kubernetes Cluster
192.168.1.243 	master.naijalabs.net   master   # Replace with your actual hostname and IP address
192.168.1.244 	worker1.naijalabs.net  worker1  # Replace with your actual hostname and IP address
192.168.1.245 	worker2.naijalabs.net  worker2  # Replace with your actual hostname and IP address
For demonstration purposes, we’ve configured our Ubuntu servers as follows:
| Hostname | RAM | Cores | OS |
| master.naijalabs.net | 4 | 2 | Ubuntu 23.10 (Mantic Minotaur) |
| worker1.naijalabs.net | 4 | 2 | Ubuntu 23.10 (Mantic Minotaur) |
| worker2.naijalabs.net | 4 | 2 | Ubuntu 23.10 (Mantic Minotaur) |
First, update the package lists and upgrade the existing packages on all your nodes.
sudo apt update && sudo apt upgrade -y
Docker is the container runtime for Kubernetes. Install Docker on all your nodes.
sudo apt install docker.io -y
Start and enable Docker:
sudo systemctl enable --now docker
Verify the Installation:
docker --version
Docker version 24.0.7, build 24.0.7-0ubuntu2~23.10.1
Kubernetes requires swap to be disabled. Turn off swap and remove any swap entries in /etc/fstab.
sudo swapoff -a
sudo sed -i '/\/swap.img\s\+none\s\+swap\s\+sw\s\+0\s\+0/s/^/#/' /etc/fstab
This is an ideal point to perform a reboot.
sudo systemctl reboot
Once the system is back online, execute the following command to verify that swap has been disabled.
free -m | tail -n 1
Swap: 0 0 0
Configure the required kernel parameters to ensure Kubernetes runs optimally:
					sudo tee /etc/modules-load.d/containerd.conf <<EOF
overlay
br_netfilter
EOF
sudo modprobe overlay
sudo modprobe br_netfilter
By loading these modules, you’re setting up your servers for Kubernetes installation, helping them handle networking and load balancing within the cluster. Next, as the root user on each node, create a configuration file to make sure these modules load at boot:
					sudo tee /etc/sysctl.d/kubernetes.conf <<EOF
net.bridge.bridge-nf-call-ip6tables = 1
net.bridge.bridge-nf-call-iptables = 1
net.ipv4.ip_forward = 1
EOF
Reload the changes:
sudo sysctl --system
Install kubeadm, kubelet, and kubectl on all nodes.
sudo apt-get install -y curl gnupg2 software-properties-common apt-transport-https ca-certificates curl
NOTE: As of recent updates, the apt-key utility is deprecated. You should use the /etc/apt/trusted.gpg.d directory to manage your keyrings. Here’s how you can add a GPG key and repository securely without using apt-key.
First, download the GPG key:
curl -fsSL https://pkgs.k8s.io/core:/stable:/v1.30/deb/Release.key | sudo gpg --dearmor -o /etc/apt/keyrings/kubernetes-apt-keyring.gpg
Next, add the Kubernetes APT repository, specifying the signed-by option to use the key from the keyring:
sudo echo 'deb [signed-by=/etc/apt/keyrings/kubernetes-apt-keyring.gpg] https://pkgs.k8s.io/core:/stable:/v1.30/deb/ /' | sudo tee /etc/apt/sources.list.d/kubernetes.list
deb [signed-by=/etc/apt/keyrings/kubernetes-apt-keyring.gpg] https://pkgs.k8s.io/core:/stable:/v1.30/deb/ /
Ensure all packages are up-to-date.
sudo apt update
					...
Get:2 https://prod-cdn.packages.k8s.io/repositories/isv:/kubernetes:/core:/stable:/v1.30/deb  InRelease [1,186 B]
Get:6 https://prod-cdn.packages.k8s.io/repositories/isv:/kubernetes:/core:/stable:/v1.30/deb  Packages [5,226 B]
Fetched 6,412 B in 1s (4,785 B/s)
Reading package lists... Done
Building dependency tree... Done
Reading state information... Done
All packages are up to date.
Finally, update the package lists and install kubeadm, kubelet, and kubectl:
sudo apt-get update ; sudo apt-get install -y kubelet kubeadm kubectl
Holding the Kubernetes packages (kubelet, kubeadm, and kubectl) ensures that they won’t be automatically upgraded, which can sometimes cause compatibility issues with your existing cluster setup. Run the following command:
sudo apt-mark hold kubelet kubeadm kubectl
					kubelet set on hold.
kubeadm set on hold.
kubectl set on hold.
Run the following command to verify the install:
kubeadm version
kubeadm version: &version.Info{Major:"1", Minor:"30", GitVersion:"v1.30.2", GitCommit:"39683505b630ff2121012f3c5b16215a1449d5ed", GitTreeState:"clean", BuildDate:"2024-06-11T20:27:59Z", GoVersion:"go1.22.4", Compiler:"gc", Platform:"linux/amd64"}
In Ubuntu, you can use ufw (Uncomplicated Firewall). Here are the equivalent commands to open the necessary ports for Kubernetes using ufw (on each node):
					sudo ufw allow 6443/tcp
sudo ufw allow 2379:2380/tcp
sudo ufw allow 10250/tcp
sudo ufw allow 10251/tcp
sudo ufw allow 10252/tcp
sudo ufw allow 10255/tcp
sudo ufw allow 5473/tcp
After adding these rules, enable the firewall (if it isn’t already enabled) and reload the rules to apply the changes:
					sudo ufw enable
sudo ufw reload
NOTE: If you received this message (below). Make sure to allow your SSH port to avoid blocking remote access to your machine.
					Command may disrupt existing ssh connections. Proceed with operation (y|n)? y
Firewall is active and enabled on system startup
Firewall reloaded
sudo ufw allow 22/tcp; sudo ufw reload
| Port(s) | Description |
|---|---|
| 6443 | Kubernetes API server |
| 2379-2380 | etcd server client API |
| 10250 | Kubelet API |
| 10251 | kube-scheduler |
| 10252 | kube-controller-manager |
| 10255 | Read-only Kubelet API |
| 5473 | ClusterControlPlaneConfig API |
These commands configure the firewall on Ubuntu to allow the necessary communication for various Kubernetes components, ensuring that your cluster operates smoothly.
Run the following command to build out the containerd configuration file:
sudo sh -c "containerd config default > /opt/containerd/config.toml" ; cat /opt/containerd/config.toml
Open the containerd config file and set the SystemdCgroup variable to true (SystemdCgroup = true):
sudo vim /opt/containerd/config.toml
SystemdCgroup = true
Save and quit the file. Then, reload the configuration file and restart containerd.
sudo systemctl daemon-reload && sudo systemctl restart containerd.service
First, open the kubelet configuration file. You can do this by running:
sudo vim /etc/default/kubelet
In this file, add a line to set the cgroup driver. Just paste this line at the end:
KUBELET_EXTRA_ARGS="--cgroup-driver=cgroupfs"
Save the file and exit the text editor. Also, for the changes to take effect, you need to reload the configuration and restart kubelet. Run this command:
sudo systemctl daemon-reload && sudo systemctl enable --now kubelet
No need to stress about any kubelet errors right now. Once you join the worker nodes to the Kubernetes cluster with the provided join command, the kubelet service on each worker node will kick in and start talking to the control plane automatically. The kubelet’s job is to manage the containers on the node and make sure they run according to what the Kubernetes control plane dictates.
NOTE: Up until this point of the installation process, we’ve installed and configured Kubernetes components on all nodes. From this point onward, we will focus on the master node.
Now that you’ve set up your cluster nodes, it’s time to get Kubernetes running on the master node. Here’s how to do it:
1. Edit the Docker configuration |
Next, open the Docker daemon configuration file by running:
sudo nano /etc/docker/daemon.json
Add the following configuration block to this file:
					{
  "exec-opts": ["native.cgroupdriver=systemd"],
  "log-driver": "json-file",
  "log-opts": {
    "max-size": "100m"
  },
  "storage-driver": "overlay2"
}
This sets up Docker to work better with Kubernetes. After adding this block, save the file and exit the editor. Then, reload the configuration and restart docker.
sudo systemctl daemon-reload && sudo systemctl restart docker
2. Edit the kubeadm configuration file |
Open the kubeadm configuration file:
sudo vim /usr/lib/systemd/system/kubelet.service.d/10-kubeadm.conf
Add this line to the file (under the last Environment entry):
Environment="KUBELET_EXTRA_ARGS=--fail-swap-on=false"
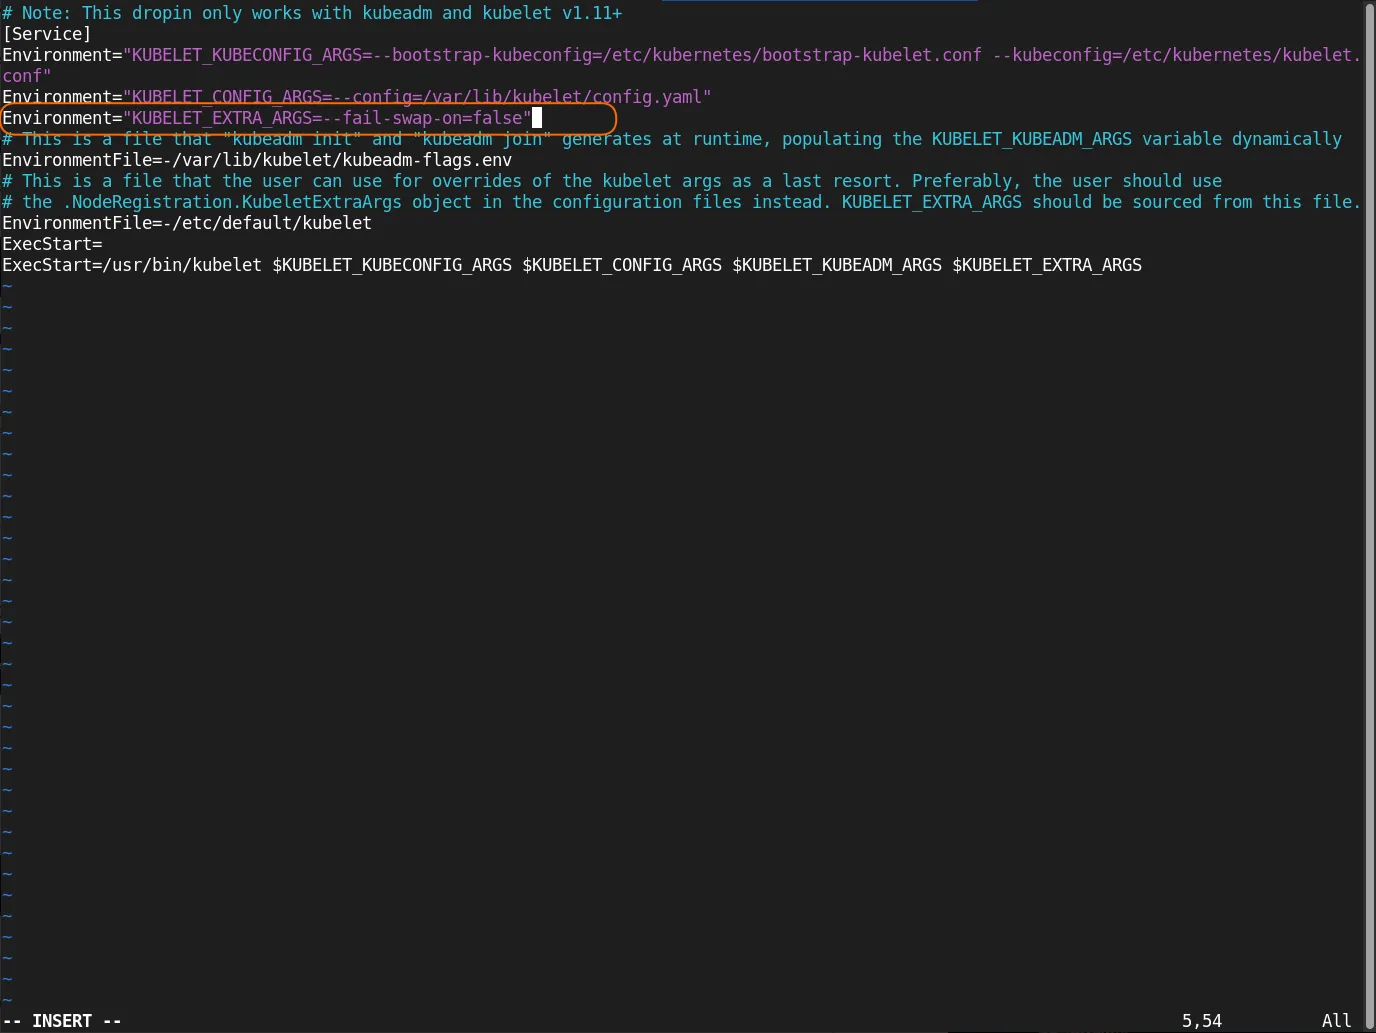
Photo by admingeek from Infotechys
Save the file and exit. Then, reload the configuration and restart the kubelet.
sudo systemctl daemon-reload && sudo systemctl restart kubelet
3. Initializing Kubernetes Control Plane |
Proceed with initializing the Kubernetes control plane on the master node. Run the following command:
sudo kubeadm config images pull
					[config/images] Pulled registry.k8s.io/kube-apiserver:v1.30.2
[config/images] Pulled registry.k8s.io/kube-controller-manager:v1.30.2
[config/images] Pulled registry.k8s.io/kube-scheduler:v1.30.2
[config/images] Pulled registry.k8s.io/kube-proxy:v1.30.2
[config/images] Pulled registry.k8s.io/coredns/coredns:v1.11.1
[config/images] Pulled registry.k8s.io/pause:3.9
[config/images] Pulled registry.k8s.io/etcd:3.5.12-0
This step is typically performed before initializing the Kubernetes cluster to ensure that all required images are available locally and can be used without relying on an external registry during cluster setup. Next, run the following command:
sudo kubeadm init --pod-network-cidr=10.244.0.0/16
					Your Kubernetes control-plane has initialized successfully!

To start using your cluster, you need to run the following as a regular user:

  mkdir -p $HOME/.kube
  sudo cp -i /etc/kubernetes/admin.conf $HOME/.kube/config
  sudo chown $(id -u):$(id -g) $HOME/.kube/config

Alternatively, if you are the root user, you can run:

  export KUBECONFIG=/etc/kubernetes/admin.conf

You should now deploy a pod network to the cluster.
Run "kubectl apply -f [podnetwork].yaml" with one of the options listed at:
  https://kubernetes.io/docs/concepts/cluster-administration/addons/

Then you can join any number of worker nodes by running the following on each as root:

kubeadm join 192.168.1.243:6443 --token 4xuevo.18r48crs8esypteq \
	--discovery-token-ca-cert-hash sha256:8ab1eedb69eea68ad59103384cc7043a58185738a74ef93f393fd6ec54288454
This command sets up the Kubernetes control plane on the master node. The --pod-network-cidr flag defines the IP address range for the pod network.
4. Set Up kubeconfig File |
Set up the kubeconfig file to enable communication with the Kubernetes cluster. Run the following commands:
mkdir -p $HOME/.kube
sudo cp -i /etc/kubernetes/admin.conf $HOME/.kube/config
sudo chown $(id -u):$(id -g) $HOME/.kube/config
5. Deploy Pod Network |
To enable networking between pods across the cluster, deploy a pod network.
There are several pod network solutions available for Kubernetes, each with its own characteristics and compatibility requirements. Some popular pod network providers include:
|
The choice of pod network depends on factors such as scalability, performance requirements, network policies, and integration with existing infrastructure. For this demonstration, we’ll utilize the Flannel node network manager to create a pod network (on the master node).
kubectl apply -f https://github.com/flannel-io/flannel/releases/latest/download/kube-flannel.yml
					namespace/kube-flannel created
serviceaccount/flannel created
clusterrole.rbac.authorization.k8s.io/flannel created
clusterrolebinding.rbac.authorization.k8s.io/flannel created
configmap/kube-flannel-cfg created
daemonset.apps/kube-flannel-ds created
Untaint the node:
kubectl taint nodes --all node-role.kubernetes.io/control-plane-
node/master.naijalabs.net untainted
This concludes the master node configuration. Our next step is to integrate the worker nodes into the cluster using the details obtained during the initialization phase.
Repeat the following steps on each worker node:
1. Generate Join Token |
In the event you need to, you can generate the kubeadm join information with the following command (Otherwise, skip to Step 2.):
sudo kubeadm token create --print-join-command
2. Execute Join on Worker Nodes |
You can join any number of worker nodes by running the following on each as root (or with sudo prefix):
sudo kubeadm join <MASTER_IP>:<MASTER_PORT> --token <TOKEN> --discovery-token-ca-cert-hash <DISCOVERY_TOKEN_CA_CERT_HASH>
Run the following command on each worker node as the root user or with the sudo prefix.
Replace <MASTER_IP>, <MASTER_PORT>, <TOKEN>, and <DISCOVERY_TOKEN_CA_CERT_HASH> with the appropriate values from the join command generated on the master node (or in our example below – Your entry will be different):
sudo kubeadm join 192.168.1.243:6443 --token 4xuevo.18r48crs8esypteq --discovery-token-ca-cert-hash sha256:8ab1eedb69eea68ad59103384cc7043a58185738a74ef93f393fd6ec54288454
					[preflight] Running pre-flight checks
[preflight] Reading configuration from the cluster...
[preflight] FYI: You can look at this config file with 'kubectl -n kube-system get cm kubeadm-config -o yaml'
[kubelet-start] Writing kubelet configuration to file "/var/lib/kubelet/config.yaml"
[kubelet-start] Writing kubelet environment file with flags to file "/var/lib/kubelet/kubeadm-flags.env"
[kubelet-start] Starting the kubelet
[kubelet-check] Waiting for a healthy kubelet. This can take up to 4m0s
[kubelet-check] The kubelet is healthy after 2.503038677s
[kubelet-start] Waiting for the kubelet to perform the TLS Bootstrap

This node has joined the cluster:
* Certificate signing request was sent to apiserver and a response was received.
* The Kubelet was informed of the new secure connection details.

Run 'kubectl get nodes' on the control-plane to see this node join the cluster.
3. Verify Node Status |
Switch to the master node and enter the following command to check the status of the nodes:
kubectl get nodes
					NAME                    STATUS   ROLES           AGE     VERSION
master.naijalabs.net    Ready    control-plane   16m     v1.30.2
worker1.naijalabs.net   Ready    <none>          4m11s   v1.30.2
worker2.naijalabs.net   Ready    <none>          3m      v1.30.2
This command will list all the nodes in the cluster, including the master node and the new worker nodes. The worker nodes should show a status of “Ready,” meaning they’ve successfully joined the cluster and are ready to handle workloads.
kubectl get po -A
					NAMESPACE      NAME                                           READY   STATUS    RESTARTS   AGE
kube-flannel   kube-flannel-ds-fsdvz                          1/1     Running   0          7m3s
kube-flannel   kube-flannel-ds-j8mzj                          1/1     Running   0          5m52s
kube-flannel   kube-flannel-ds-lfsk4                          1/1     Running   0          18m
kube-system    coredns-7db6d8ff4d-9trj9                       1/1     Running   0          19m
kube-system    coredns-7db6d8ff4d-kz67l                       1/1     Running   0          19m
kube-system    etcd-master.naijalabs.net                      1/1     Running   0          19m
kube-system    kube-apiserver-master.naijalabs.net            1/1     Running   0          19m
kube-system    kube-controller-manager-master.naijalabs.net   1/1     Running   0          19m
kube-system    kube-proxy-4jdc4                               1/1     Running   0          19m
kube-system    kube-proxy-kpnnd                               1/1     Running   0          5m52s
kube-system    kube-proxy-phkxb                               1/1     Running   0          7m3s
kube-system    kube-scheduler-master.naijalabs.net            1/1     Running   0          19m
kubectl get po -A will list the pods from all namespaces in the cluster.
kubectl describe nodes
					Name:               master.naijalabs.net
Roles:              control-plane
Labels:             beta.kubernetes.io/arch=amd64
                    beta.kubernetes.io/os=linux
                    kubernetes.io/arch=amd64
                    kubernetes.io/hostname=master.naijalabs.net
                    kubernetes.io/os=linux
                    node-role.kubernetes.io/control-plane=
                    node.kubernetes.io/exclude-from-external-load-balancers=
Annotations:        flannel.alpha.coreos.com/backend-data: {"VNI":1,"VtepMAC":"3a:0b:cb:45:88:d2"}
                    flannel.alpha.coreos.com/backend-type: vxlan
                    flannel.alpha.coreos.com/kube-subnet-manager: true
                    flannel.alpha.coreos.com/public-ip: 192.168.1.243
                    kubeadm.alpha.kubernetes.io/cri-socket: unix:///var/run/containerd/containerd.sock
                    node.alpha.kubernetes.io/ttl: 0
                    volumes.kubernetes.io/controller-managed-attach-detach: true
CreationTimestamp:  Wed, 19 Jun 2024 12:06:16 -0400
Taints:             <none>
Unschedulable:      false
Lease:
  HolderIdentity:  master.naijalabs.net
  AcquireTime:     <unset>
  RenewTime:       Wed, 19 Jun 2024 12:26:56 -0400
Conditions:
  Type                 Status  LastHeartbeatTime                 LastTransitionTime                Reason                       Message
  ----                 ------  -----------------                 ------------------                ------                       -------
  NetworkUnavailable   False   Wed, 19 Jun 2024 12:08:02 -0400   Wed, 19 Jun 2024 12:08:02 -0400   FlannelIsUp                  Flannel is running on this node
  MemoryPressure       False   Wed, 19 Jun 2024 12:23:19 -0400   Wed, 19 Jun 2024 12:06:16 -0400   KubeletHasSufficientMemory   kubelet has sufficient memory available
  DiskPressure         False   Wed, 19 Jun 2024 12:23:19 -0400   Wed, 19 Jun 2024 12:06:16 -0400   KubeletHasNoDiskPressure     kubelet has no disk pressure
  PIDPressure          False   Wed, 19 Jun 2024 12:23:19 -0400   Wed, 19 Jun 2024 12:06:16 -0400   KubeletHasSufficientPID      kubelet has sufficient PID available
  Ready                True    Wed, 19 Jun 2024 12:23:19 -0400   Wed, 19 Jun 2024 12:07:58 -0400   KubeletReady                 kubelet is posting ready status
Addresses:
  InternalIP:  192.168.1.243
  Hostname:    master.naijalabs.net
Capacity:
  cpu:                2

...omitted for brevity...
The kubectl describe nodes command provides detailed information about the nodes in a Kubernetes cluster, including their status, capacity, conditions, and resource usage.
Well Done! You’ve successfully set up a Kubernetes cluster on Ubuntu 23.10. Now that your cluster is up and running, you can start deploying and managing containerized applications with ease. Kubernetes is a powerful tool that can streamline your development and deployment workflows, so feel free to dive in and explore all it has to offer.
In this guide, we covered the basics to get you started on Ubuntu 23.10, but there’s still so much more to discover. Keep experimenting, stay curious, and continue learning! The Kubernetes Documentation is an excellent resource. Happy clustering!😊
Did you find this article helpful? Your feedback means a lot to us! Please share your thoughts in the comments section below.
Related Posts
Are you looking to set up a Kubernetes development environment with Vagrant quickly and efficiently? Look no further! In this guide, we’ll walk through how
Learn how to install a Kubernetes cluster on RHEL 9 | CentOS 9. Explore step-by-step instructions, best practices, and considerations for smooth deployment and operation.
In this guide, we’ll walk you through the process of deploying WordPress on Kubernetes, leveraging its benefits to ensure your website runs smoothly and efficiently.