HOWTO
Troubleshooting made easy: Learn fixes and solutions for common Docker errors in this comprehensive guide. Enhance your container management skills and ensure seamless deployments. Table


In this guide, we’ll walk you through the process of setting up a Caddy server using Podman, empowering you to host your websites with confidence.
Amidst the dynamic realm of web hosting and server administration, prioritizing efficiency, security, and user-friendliness is essential. Enter Caddy, an influential web server renowned for its seamless integration of automatic HTTPS. When coupled with the robust containerization capabilities of Podman, deploying a Caddy server becomes a straightforward endeavor.
Caddy is renowned for its simplicity and automation, offering features like HTTPS by default, automatic SSL certificate issuance and renewal, and easy configuration with its Caddyfile. Podman, on the other hand, provides a secure and lightweight container runtime environment, similar to Docker but with added benefits like rootless containers and seamless integration with systemd.
By combining Caddy and Podman, you get the best of both worlds: a highly capable web server with automated HTTPS, running securely within a lightweight container.
Before diving into the setup process, ensure that you have Podman installed on your system. You can install Podman on most Linux distributions using your package manager. Additionally, make sure you have a basic understanding of Caddy and its configuration options.
💡NOTE: Ensure you possess a fully-qualified domain name (FQDN) linked to a Public IP address. Caddy seamlessly installs Letsencrypt certificates during its deployment process. Without a public domain or IP address association, Caddy’s functionality will be compromised. |
$ sudo dnf install podman
$ sudo apt install podman
We’ve configured our Linux server with the following settings:
| Fully-qualified domain name (FQDN) | websrv1.naijalabs.net |
| Public IP address | 23.92.19.127 |
| RAM | 4 GB |
| Cores | 2 |
| Operating System | CentOS Stream release 9 |
First, create a directory to hold your Caddy configuration and html files:
$ mkdir html; mkdir caddy-config ; cd caddy-config
Next, create a Caddyfile within this directory. This file will define how Caddy serves your websites. Here’s a simple example:
$ vim Caddyfile
Replace websrv1.naijalabs.net with your actual domain name and adjust the configuration as needed for your specific use case.
					https://websrv1.naijalabs.net {
    root * /var/www
    encode gzip
    file_server
}
Append the following entry to the /etc/sysctl.conf file.
net.ipv4.ip_unprivileged_port_start=80
Save and exit the file. Then, run the following command to apply the change:
$ sudo sysctl -p /etc/sysctl.conf
Adding the net.ipv4.ip_unprivileged_port_start=80 entry will resolve a common issue with podman. Since podman is a rootless container, ports below 1024 are not accessible. Ports below 1024 are considered privileged ports and can only be bound to by processes with root privileges.
🛑 NOTE: Skipping this step will result in this error (below) when running the Caddy Container |
Error: rootlessport cannot expose privileged port 80, you can add 'net.ipv4.ip_unprivileged_port_start=80' to /etc/sysctl.conf (currently 1024), or choose a larger port number (>= 1024): listen tcp 0.0.0.0:80: bind: permission denied
Finally, enable traffic on ports 80 and 443 by configuring the firewall with the following commands:
					$ sudo firewall-cmd --permanent --add-port=80/tcp --add-port=443/tcp
$ sudo firewall-cmd --reload
Now, it’s time to run the Caddy container using Podman:
					$ podman run -d \
    --name caddy-server \
    --restart=always \
    -v $(pwd)/caddy-config/Caddyfile:/etc/caddy/Caddyfile:Z \
    -v ~/html:/var/www:Z \
    -p 80:80 \
    -p 443:443 \
    docker.io/caddy
|
|
|
|
|
|
|
|
|
With these commands, your Caddy server should now be up and running, serving your website over HTTPS.
Ensure the operational status of our Caddy container by executing the following commands:
$ podman ps
					CONTAINER ID  IMAGE                           COMMAND               CREATED         STATUS         PORTS                                     NAMES
9f1c1ecc27ab  docker.io/library/caddy:latest  caddy run --confi...  47 minutes ago  Up 47 minutes  0.0.0.0:80->80/tcp, 0.0.0.0:443->443/tcp  caddy-server
We can verify that the container is functioning properly. Additionally, the image below displays the output of the podman logs command, demonstrating that Caddy has successfully obtained Letsencrypt certificates.
$ podman logs caddy-server
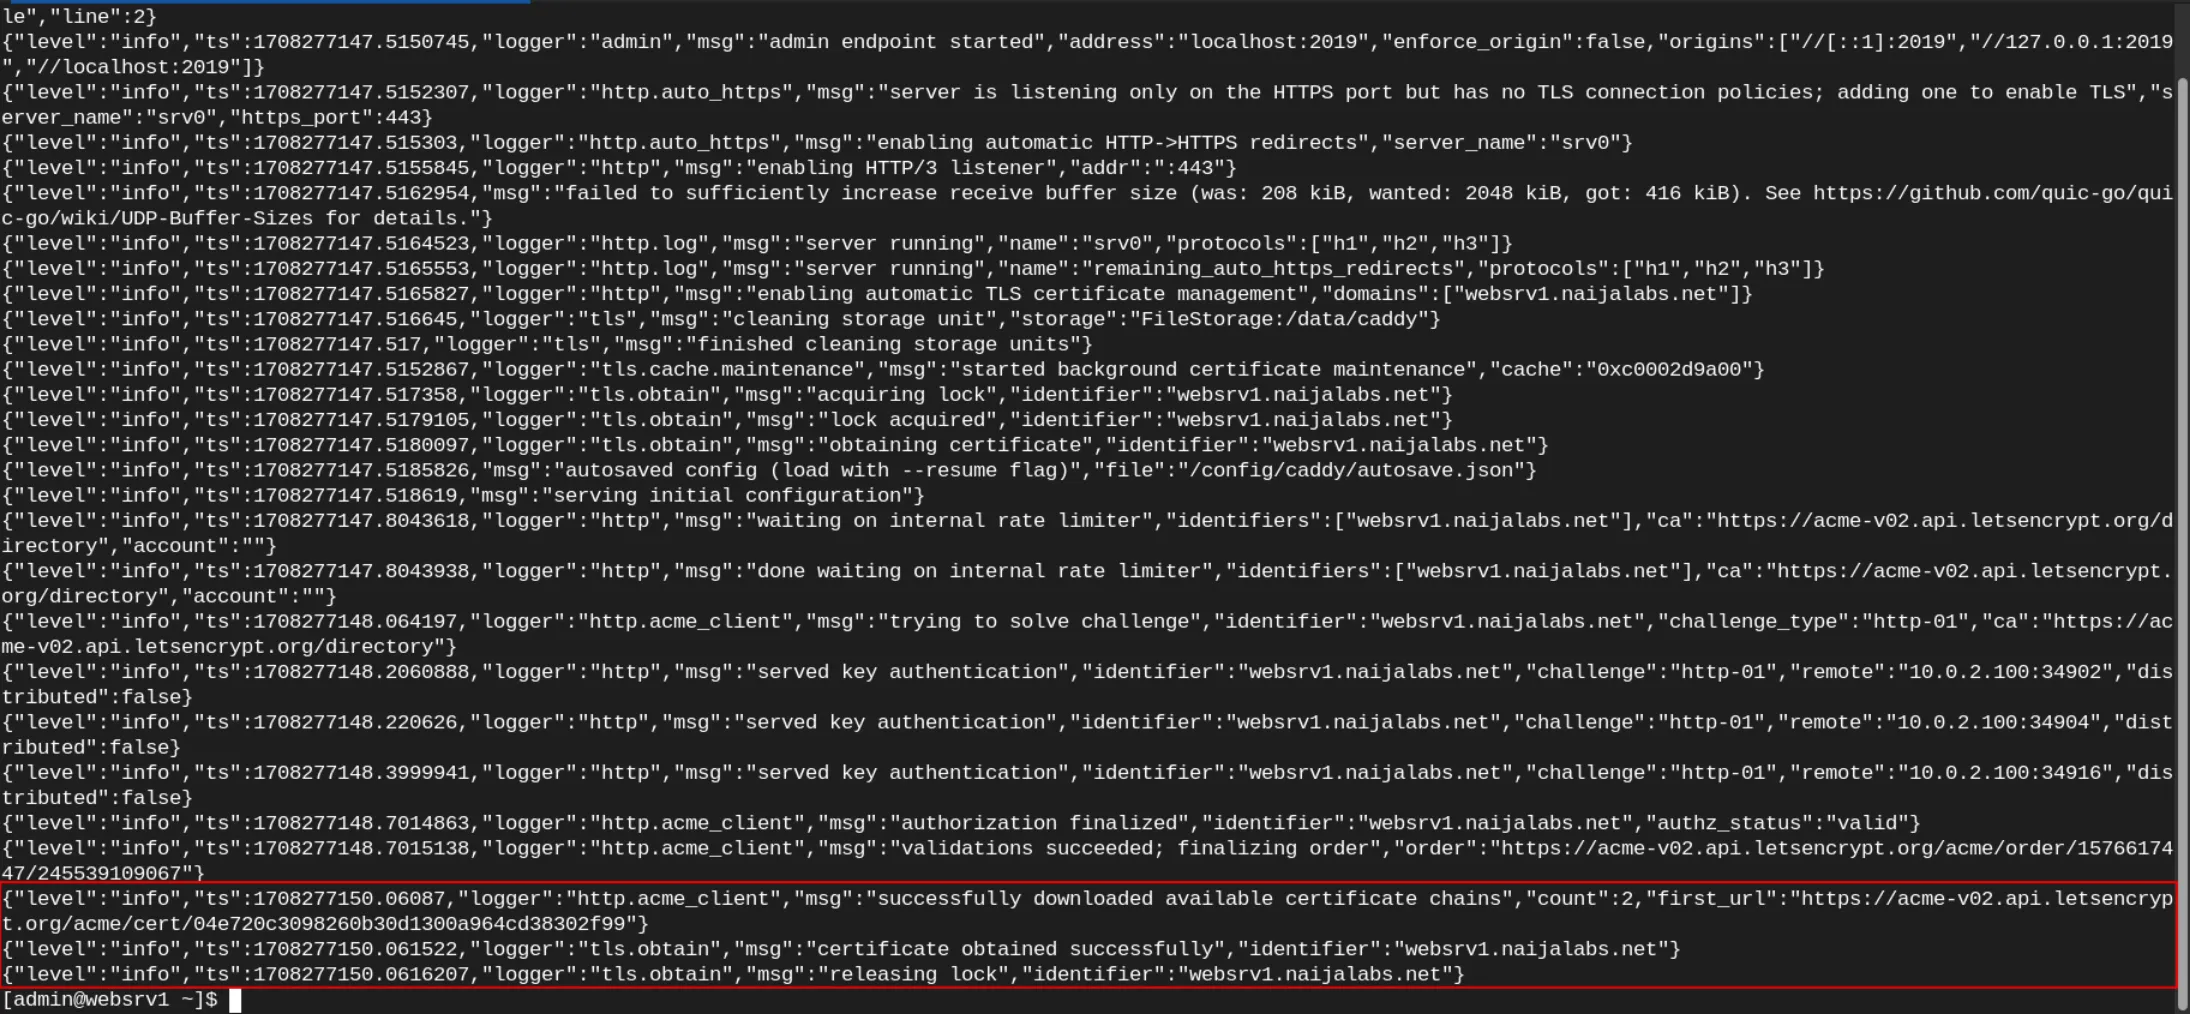
Photo by admingeek from Infotechys
Finally, enter your URL in the browser (https://yourdomain.com).
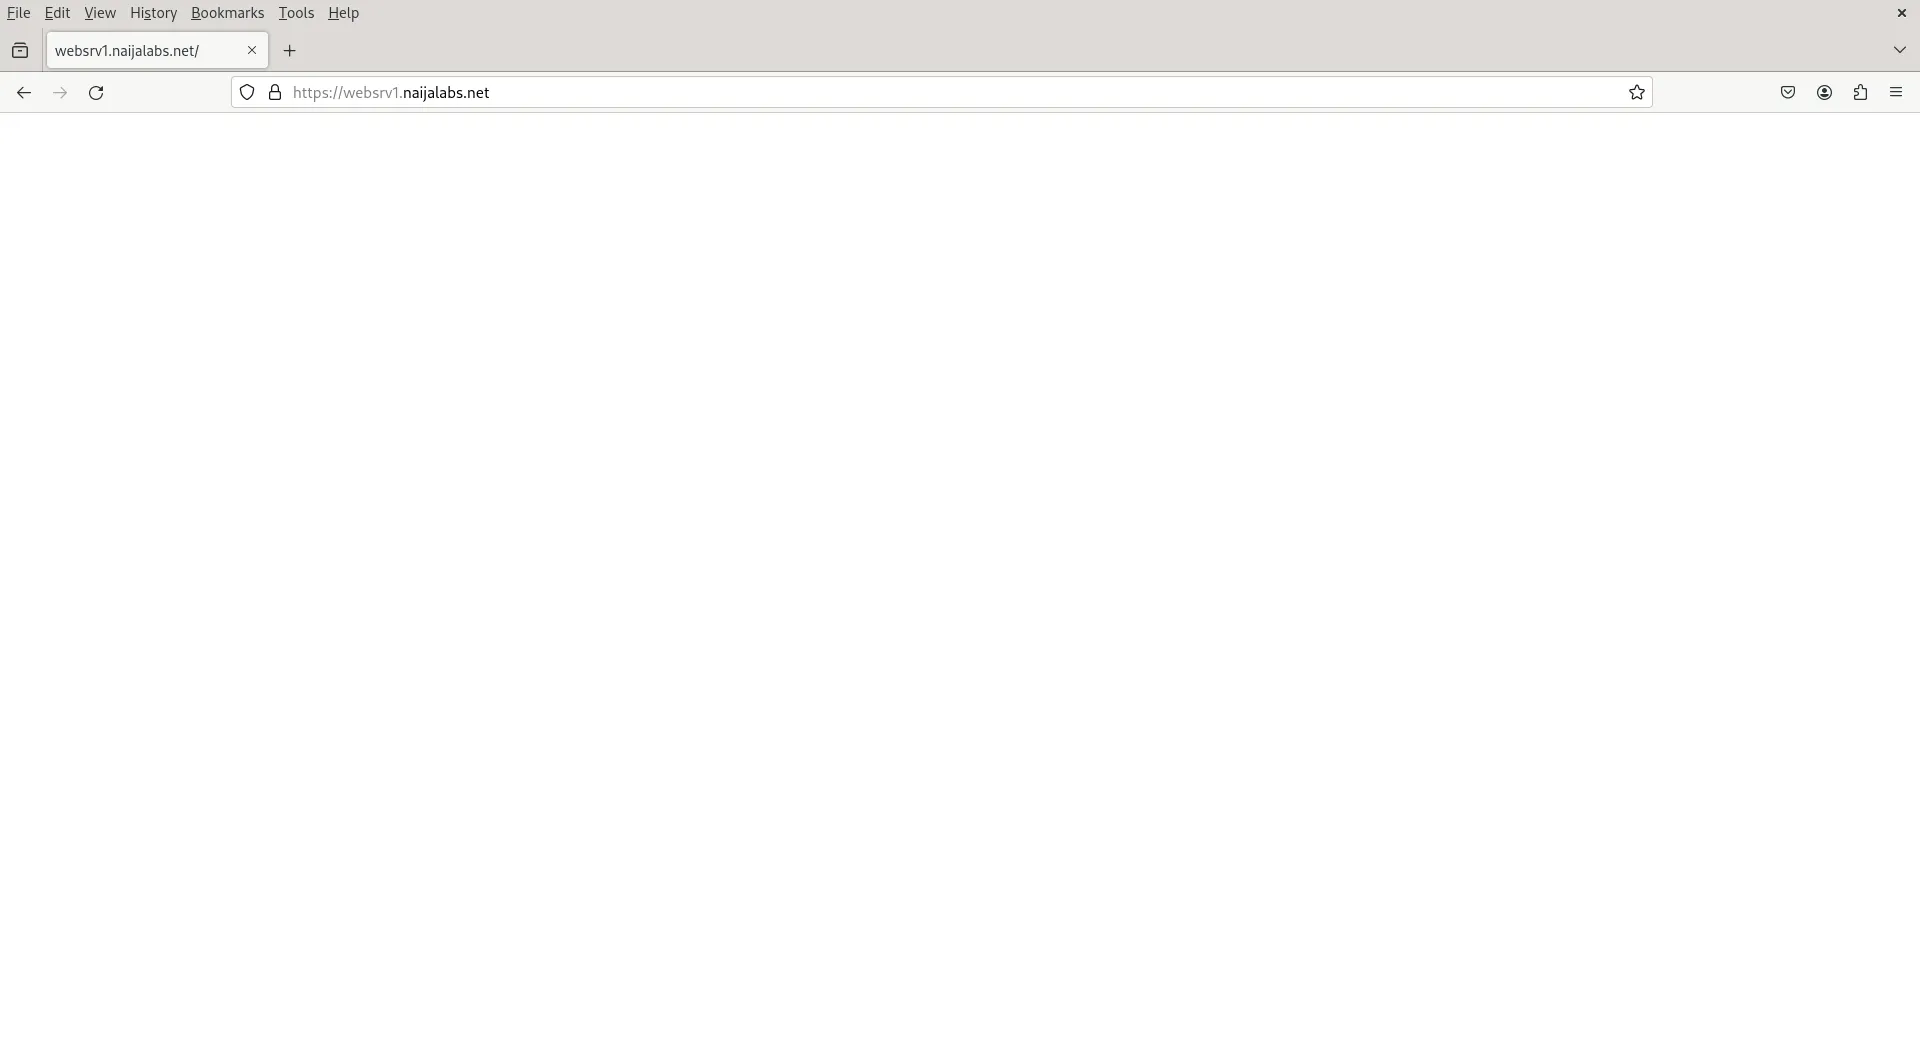
Photo by admingeek from Infotechys
A blank page is to be expected, since we have not provided any html files for Caddy to serve. Copy and paste the contents (below) into a ~/html/index.html file.
					<!DOCTYPE html>
<html lang="en">
<head>
    <meta charset="UTF-8">
    <meta name="viewport" content="width=device-width, initial-scale=1.0">
    <title>Login Page</title>
    <style>
        body {
            font-family: Arial, sans-serif;
            background-color: #f4f4f4;
        }
        .container {
            width: 300px;
            margin: 0 auto;
            margin-top: 100px;
            background-color: #fff;
            padding: 20px;
            border-radius: 5px;
            box-shadow: 0px 0px 10px rgba(0, 0, 0, 0.1);
        }
        h2 {
            text-align: center;
        }
        label {
            display: block;
            margin-bottom: 5px;
        }
        input[type="text"], input[type="password"] {
            width: calc(100% - 12px);
            padding: 5px;
            margin-bottom: 10px;
            border: 1px solid #ccc;
            border-radius: 3px;
        }
        input[type="submit"] {
            width: 100%;
            padding: 8px;
            border: none;
            background-color: #007bff;
            color: #fff;
            border-radius: 3px;
            cursor: pointer;
        }
        input[type="submit"]:hover {
            background-color: #0056b3;
        }
    </style>
</head>
<body>
    <div class="container">
        <h2>Login</h2>
        <form action="login.php" method="POST">
            <label for="username">Username:</label>
            <input type="text" id="username" name="username" required>
            <label for="password">Password:</label>
            <input type="password" id="password" name="password" required>
            <input type="submit" value="Login">
        </form>
    </div>
</body>
</html>
This code creates a simple login page with fields for username and password, along with a submit button. The form action is set to “login.php”, so you would need to create a server-side script (e.g., PHP) to handle the form submission and validate the login credentials. Save and exit the file. Then, restart the container.
$ podman restart caddy-server
Congratulations! Your Caddy instance should now display a basic non-functional login page!
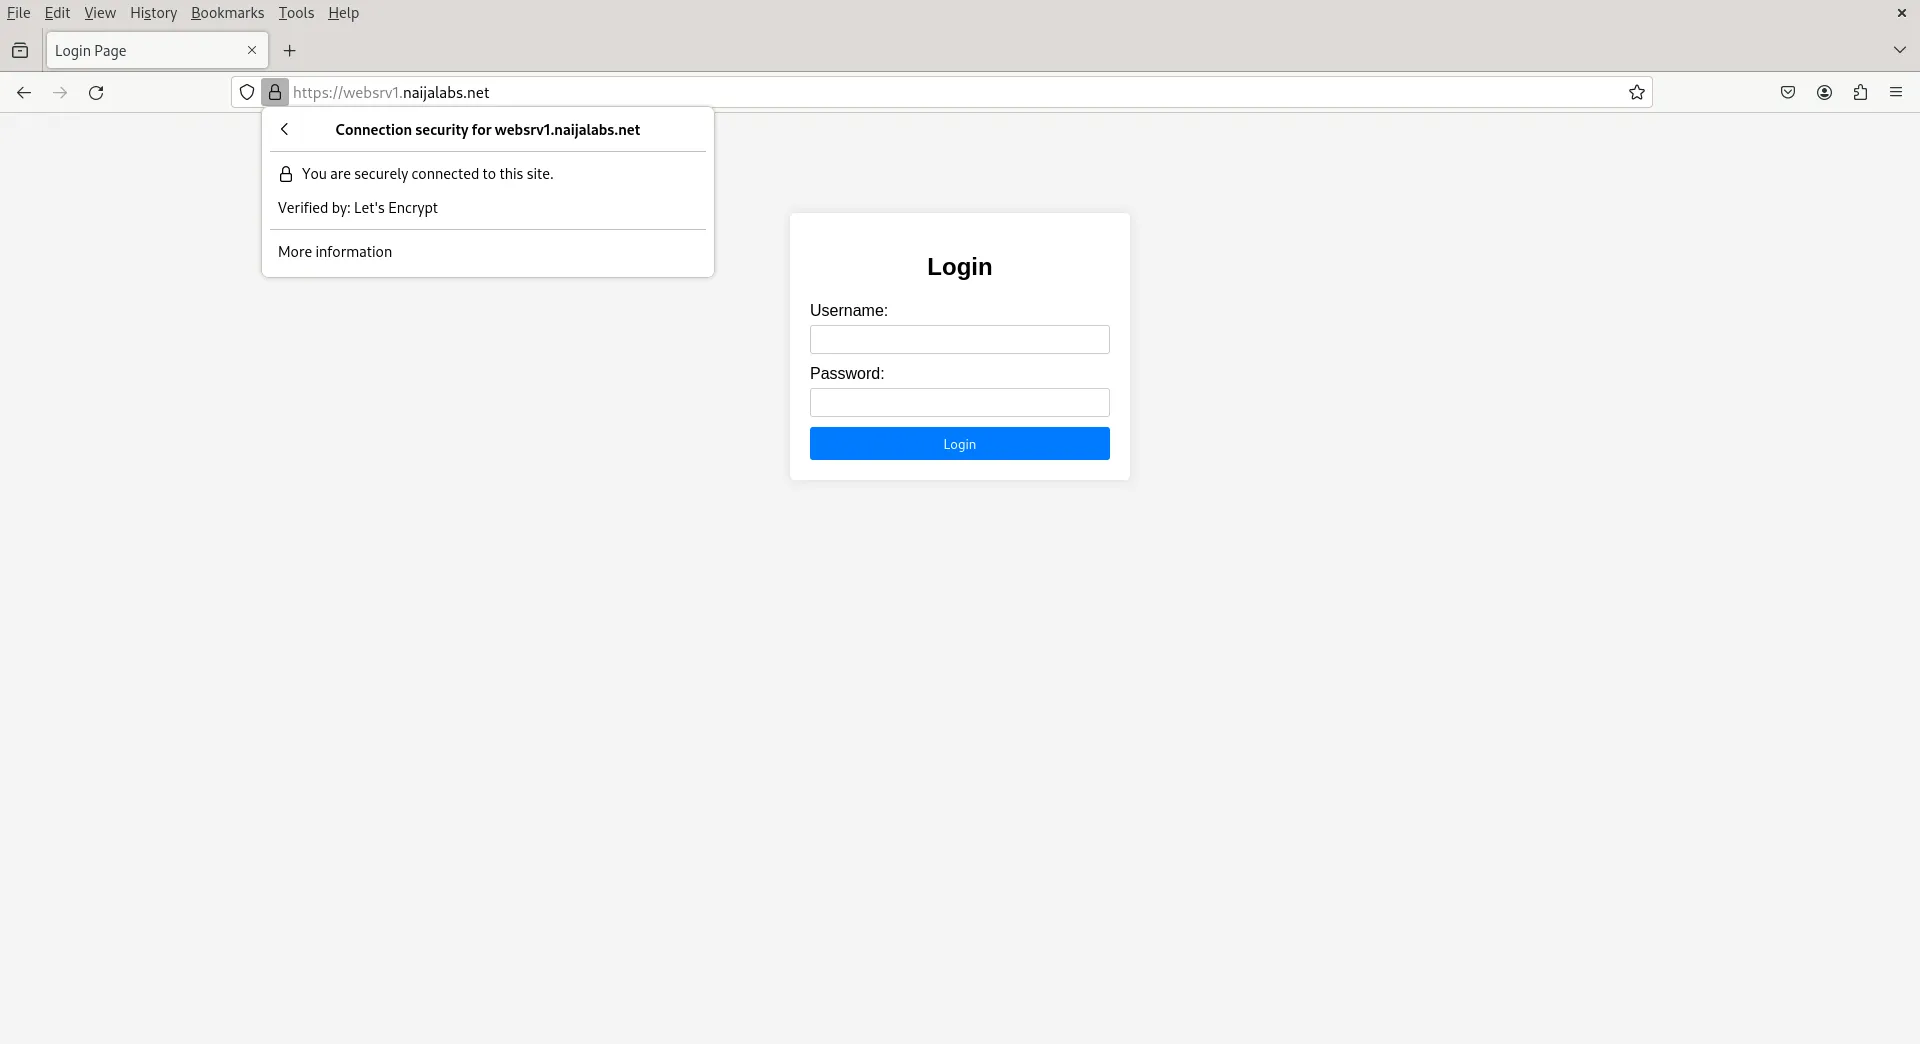
Photo by admingeek from Infotechys
While the basic setup outlined above will get you up and running with a functional Caddy server, there are many advanced configuration options you can explore to customize your setup further.
TLS Configuration |
Caddy’s default behavior includes automatic HTTPS setup using Let’s Encrypt certificates. However, you can customize TLS settings to meet specific requirements. For example, you might want to enforce specific protocols or cipher suites, or use custom certificates.
					yourwebsite.com {
    tls {
        protocols tls1.2 tls1.3
        ciphers TLS_ECDHE_RSA_WITH_AES_256_GCM_SHA384
        key_type rsa2048
        # Add more TLS options as needed
    }
    # Other site configuration...
}
Reverse Proxy |
If you’re running multiple services on different ports or hosts, you can use Caddy as a reverse proxy to route traffic accordingly. This allows you to host multiple sites on a single server or container and manage them all through the same Caddy instance.
					yourwebsite.com {
    reverse_proxy localhost:8080
}
Load Balancing |
For high-traffic websites or applications, Caddy offers built-in load balancing features. You can distribute incoming requests across multiple backend servers to ensure optimal performance and reliability.
					yourwebsite.com {
    reverse_proxy 10.0.0.1:8080 10.0.0.2:8080 10.0.0.3:8080 {
        lb_policy round_robin
    }
}
Middleware |
Caddy supports various middleware plugins to add functionality such as authentication, rate limiting, logging, and more. These plugins can be easily integrated into your Caddyfile to enhance your server’s capabilities.
					yourwebsite.com {
    basicauth /secret username password
    rate_limit /api 10 1m
    log {
        output file /var/log/access.log
    }
    # Other site configuration...
}
Monitoring and Management |
Once your Caddy server is up and running, it’s essential to monitor its performance and manage it effectively. Tools like Prometheus and Grafana can be integrated to collect metrics and visualize server health. Additionally, Caddy’s built-in admin API allows you to dynamically configure and monitor your server programmatically.
Setting up a Caddy server using Podman offers a straightforward yet powerful solution for hosting websites. By leveraging Caddy’s automation and Podman’s containerization capabilities, you can ensure your websites are served securely and efficiently.
In this guide, we’ve covered the basics of setting up a Caddy server using Podman, from installing Podman to running the Caddy container with a basic configuration. As you become more familiar with Caddy and Podman, you can explore additional features and configurations to tailor your setup to your specific needs.
Did you find this article helpful? Your feedback is invaluable to us! Feel free to share this post with those who may benefit, and let us know your thoughts in the comments section below.
Troubleshooting made easy: Learn fixes and solutions for common Docker errors in this comprehensive guide. Enhance your container management skills and ensure seamless deployments. Table
In this article, we compare and contrast both container platforms and ultimately decide whether to docker or not to podman. Table of Contents Introduction When
Looking for a container management tool that integrates seamlessly with systemd? Podman containers with systemd support allow you to easily create, run, manage, and deploy