
Coding
Learn how to automate adding hosts to Zabbix using Bash script. This comprehensive guide covers script functions, examples, and best practices to streamline your IT


Learn how to use Ansible to automate the maintenance of a security warning banner in Zabbix. Step-by-step instructions, CLI examples, and best practices for ensuring security compliance across your infrastructure.
In today’s world, maintaining robust security is paramount. For organizations using Zabbix, an open-source monitoring software, ensuring that a security warning banner is displayed on login screens is a common practice. This banner serves as a legal notice, reminding users that their activity on the system is being monitored and that unauthorized access is prohibited.
While Zabbix provides a wide array of functionalities for monitoring servers, networks, and applications, it doesn’t come with an out-of-the-box solution for managing such banners. That’s where automation tools like Ansible come in. By leveraging Ansible playbooks and roles, administrators can ensure the banner is consistently maintained across all nodes in a Zabbix environment, without manual intervention.
In this post, we’ll guide you through the process of using Ansible to automate the management of a security warning banner in Zabbix. We will also cover best practices, including file management, templating, and ensuring compliance, all while optimizing for SEO with clear and actionable instructions.
Importance of Security Banners |
Before diving into the technical details, it’s important to understand why security banners matter:
|
|
|
💡Security warning banners in applications are a Security Technical Implementation Guide (STIG) requirement. Specifically, STIGs, issued by the Defense Information Systems Agency (DISA), mandate that applications display security banners to inform users of legal and security policies before authentication. For example, the Application Security and Development STIG and the Web Server STIG both require login banners to align with DoD security policies (such as NIST 800-53 AC-8). |
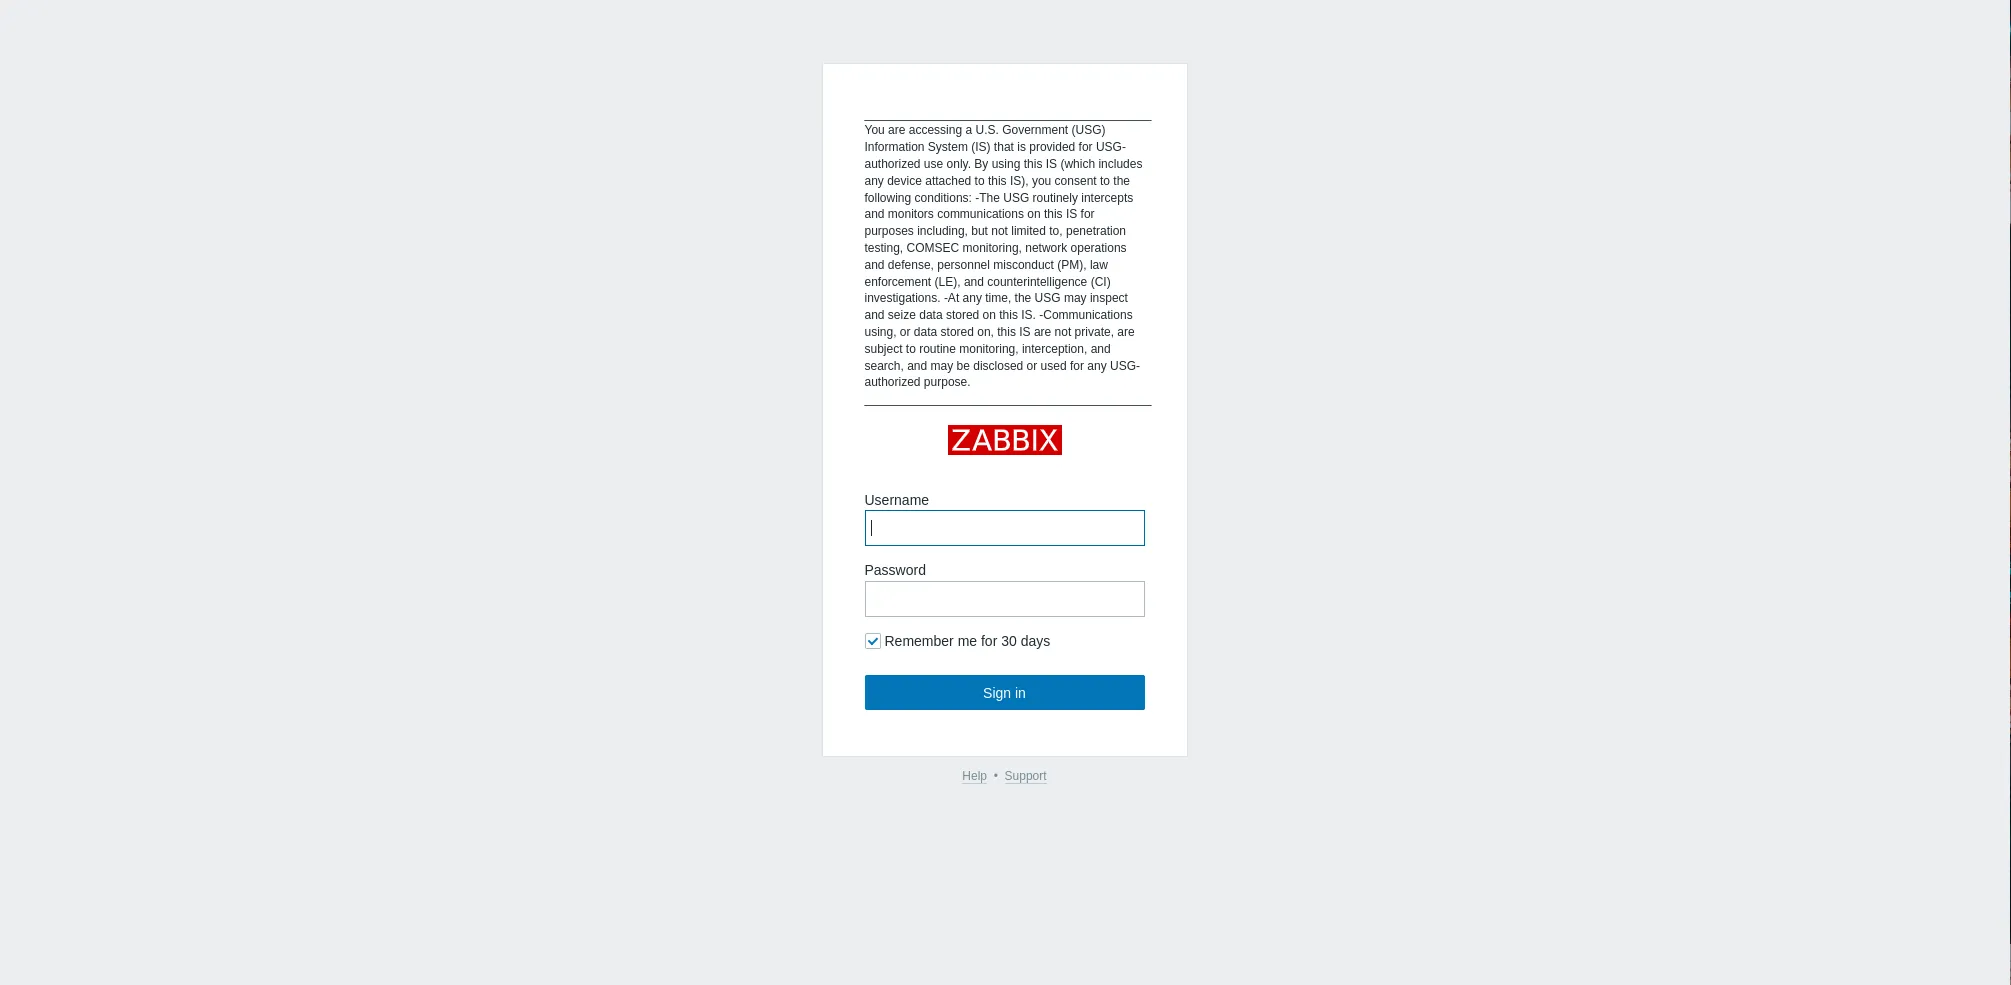
Photo by admingeek from Infotechys
Benefits of Automation |
|
|
|
Before we begin with the automation process, ensure that you have the following in place:
| Requirement | Description |
|---|---|
| Zabbix Installed | You should have a working Zabbix installation. |
| Ansible Installed | Ansible needs to be set up on your local machine or a designated control node. It will interact with your Zabbix servers over SSH. |
| Basic Knowledge of YAML & Jinja2 | Familiarity with YAML (for Ansible playbooks) and Jinja2 templating will be useful. |
For demonstration purposes, we’ve configured our Linux servers as follows (2 virtual machines (VMs), 1 ansible control server, 1 zabbix server installed):
| Hostnames | RAM (GB) | Cores | Operating System (OS) |
| ansible-ctl.dev.naijalabs.net (192.168.1.100) | 4 | 2 | CentOS Stream release 9 |
| zbx-node1.dev.naijalabs.net (192.168.1.156) | 4 | 2 | Red Hat Enterprise Linux release 9.5 (Plow) |
We will break down the setup into several components:
|
|
|
|

Photo by admingeek from Infotechys
On your ansible control node, create a directory to work from called warning-banners and navigate to it:
mkdir -p warning-banners && cd warning-banners
Next, run the following command to create the directory structure for the maintain_banner role.
ansible-galaxy init maintain_banner
- Role maintain_banner was created successfully
To view the directory structure, run the following command:
tree
By default, you output should look similar to:
					.
└── maintain_banner
    ├── defaults
    │   └── main.yml
    ├── files
    ├── handlers
    │   └── main.yml
    ├── meta
    │   └── main.yml
    ├── README.md
    ├── tasks
    │   └── main.yml
    ├── templates
    ├── tests
    │   ├── inventory
    │   └── test.yml
    └── vars
        └── main.yml

9 directories, 8 files
With the foundational structure in place, we can now move forward with the next steps.
Step 2: Configure the Ansible Inventory |
Ansible requires an inventory file that defines the hosts to target. In our case, we want to apply the security banner to all Zabbix servers. Here’s an example inventory configuration (first, we’ll open the tests/inventory file with our preferred text-editor):
vim tests/inventory
Then, copy and paste the following content (adjust to your environment settings, save and quit the file):
					[zabbix_servers]
zbx-node1.dev.naijalabs.net ansible_host=192.168.1.156 ansible_ssh_user=admin
The inventory file specifies that the Zabbix server zbx-node1.dev.naijalabs.net (with the IP 192.168.1.156) should be managed, and Ansible will connect using the admin SSH user.
Step 3: Create the banner content |
Create the files/banner.txt file, ensuring it contains the warning message you want to display. For this example, we will use text sourced from the Defense Logistics Agency (DLA) web page, following the Department of Defense (DoD) security warning banner guidelines.
vim files/banner.txt
					___________________________________________

You are accessing a U.S. Government (USG) Information System (IS) that is provided for USG-authorized use only.

By using this IS (which includes any device attached to this IS), you consent to the following conditions:

-The USG routinely intercepts and monitors communications on this IS for purposes including, but not limited to, penetration testing, COMSEC monitoring, network operations and defense, personnel misconduct (PM), law enforcement (LE), and counterintelligence (CI) investigations.

-At any time, the USG may inspect and seize data stored on this IS.

-Communications using, or data stored on, this IS are not private, are subject to routine monitoring, interception, and search, and may be disclosed or used for any USG-authorized purpose.
___________________________________________
Step 4: Define the Tasks for Banner Maintenance |
In the tasks/main.yml file, we define the steps to check if the banner file exists, copy the banner file, and modify the Zabbix PHP files to include the banner.
vim tasks/main.yml
					---
- name: Check if banner.txt exists
  stat:
    path: /usr/share/zabbix/banner.txt
  register: banner_file

- name: Copy banner.txt if it does not exist
  copy:
    src: files/banner.txt
    dest: /usr/share/zabbix/banner.txt
    owner: zabbix
    group: zabbix
    mode: '0644'
  when: not banner_file.stat.exists

- name: Read the general.login.php file
  slurp:
    src: /usr/share/zabbix/include/views/general.login.php
  register: php_file

- name: Check if modifications already exist
  set_fact:
    changes_needed: >-
      {{ not (
        "// Read banner content from file" in (php_file.content | b64decode) and
        "(new CDIV($bannerContent))->addClass(ZBX_STYLE_SIGN_IN_TXT)," in (php_file.content | b64decode)
      ) }}

- name: Insert lines in the correct places
  copy:
    dest: /usr/share/zabbix/include/views/general.login.php
    content: |
      {% set lines = php_file.content | b64decode | split('\n') %}
      {% for line in lines %}
      {% if "(new CDiv(makeLogo(LOGO_TYPE_NORMAL)))->addClass(ZBX_STYLE_SIGNIN_LOGO)," in line %}
      {{ ' ' * (line | length - line.lstrip() | length) }}                     // Add the security banner text from the file here
      {{ ' ' * (line | length - line.lstrip() | length) }}                     (new CDIV($bannerContent))->addClass(ZBX_STYLE_SIGN_IN_TXT),
      {{ ' ' * (line | length - line.lstrip() | length) }}                     (new CLabel(_('')))->addClass(ZBX_STYLE_SIGN_IN_TXT),
      {{ ' ' * (line | length - line.lstrip() | length) }}                     // End of code snippet
      {{ line }}
      {% else %}
      {{ line }}
      {% endif %}
      {% if '$error = null;' in line %}
      {{ ' ' * (line | length - line.lstrip() | length) }}// Read banner content from file
      {{ ' ' * (line | length - line.lstrip() | length) }}$bannerFilePath = '/usr/share/zabbix/banner.txt';
      {{ ' ' * (line | length - line.lstrip() | length) }}$bannerContent = file_exists($bannerFilePath) ? file_get_contents($bannerFilePath) : _('Default banner message not available.');
      {{ ' ' * (line | length - line.lstrip() | length) }}// End of code snippet
      {% endif %}
      {% endfor %}
  when: php_file.content is defined and changes_needed
This script will:
|
|
|
|
Step 5: Test the Role |
Before running the playbook in a production environment, it’s important to test it. You can use the tests/test.yml playbook to simulate changes and ensure everything is working correctly.
vim tests/test.yml
					---
- name: Maintain Security Warning Banner
  hosts: all
  become: yes
  roles:
    - maintain_banner
Step 6: Running the Playbook |
Once everything is set up, you can dry-run the playbook with the following command:
ansible-playbook -i tests/inventory tests/test.yml -K --check
BECOME password:
Enter your sudo credentials to continue:
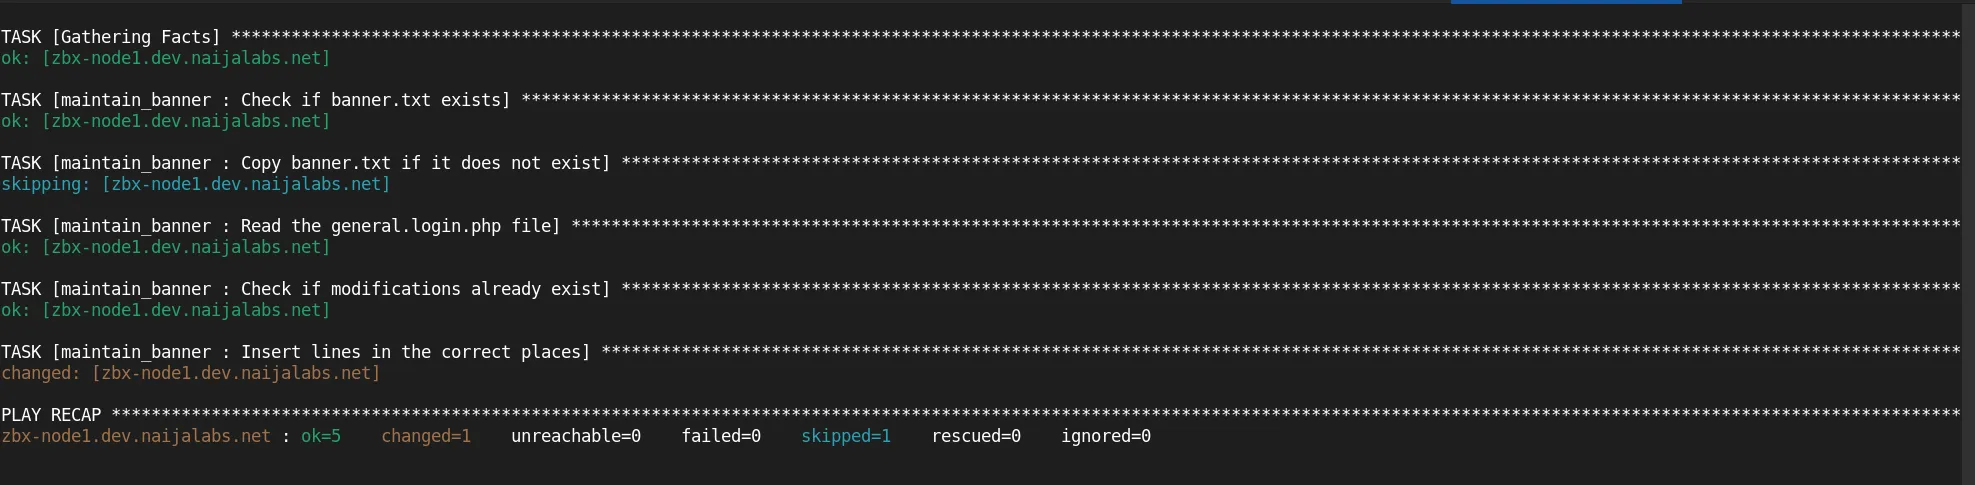
Photo by admingeek from Infotechys
If the playbook completes without errors, run it again without the --check option to execute the actual changes.
ansible-playbook -i tests/inventory tests/test.yml -K
👀NOTE: In some cases (depending on your role structure), you may need to explicitly define the path to the role for the playbook to execute successfully. |
ANSIBLE_ROLES_PATH=~/warning-banners ansible-playbook -i tests/inventory tests/test.yml -K
Step 7: Verify |
Upon completion, verify the change was made successfully by accessing the web interface at: https://<zabbix-server-hostname-or-IP-address>/zabbix
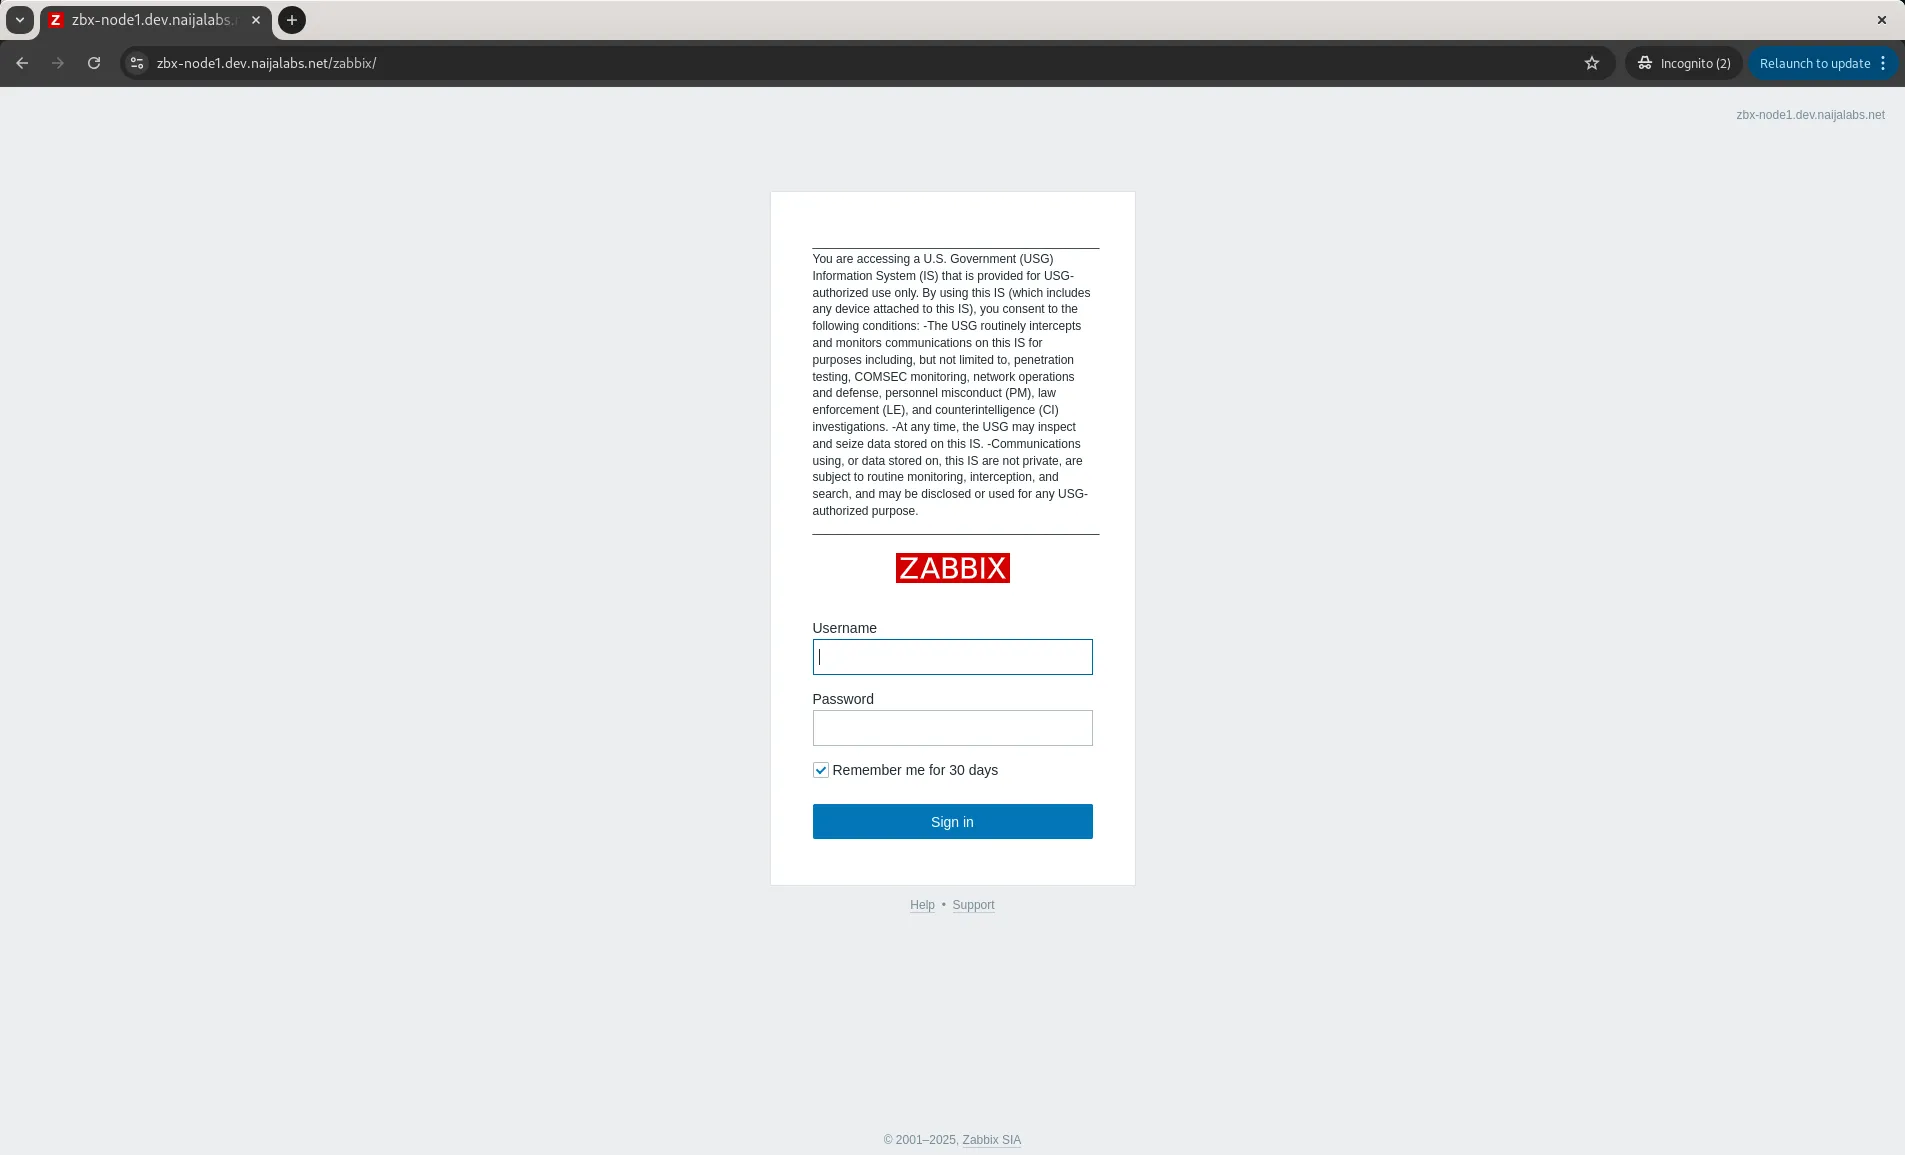
Photo by admingeek from Infotechys
Regularly Update the Banner |
Ensure that your banner message is regularly updated to reflect any legal or compliance changes. Automation ensures that the updated banner is consistently deployed to all Zabbix servers.
Backup Configuration Files |
Before making changes to critical files like general.login.php, consider backing them up. Ansible offers modules like copy with backup options to easily restore previous configurations if something goes wrong.
Use Variables for Easy Customization |
You can define variables for paths, file names, and even the banner content, which allows you to easily update configurations without modifying the playbook code. For example (create a vars/main.yml file and populate it with the following):
					# Path to the banner text file
banner_file_path: "/usr/share/zabbix/banner.txt"

# Path to the Zabbix login PHP file
php_file_path: "/usr/share/zabbix/include/views/general.login.php"
This enhances the modularity of your role, allowing you to reference variables directly in tasks/main.yml for greater flexibility and reusability.
Automating the management of a security warning banner in Zabbix using Ansible is an excellent way to ensure compliance, consistency, and efficiency. By following the steps outlined in this post, you can ensure that your Zabbix servers display the necessary legal and security warnings to all users.
With a modular role structure and the power of Ansible, maintaining the banner across a large fleet of servers becomes an effortless task. Take advantage of these automation benefits to secure your infrastructure and save time.
Did you find this article helpful? Your feedback is invaluable to us! Feel free to share it with others who may benefit and leave your thoughts in the comments section below.
Learn how to automate adding hosts to Zabbix using Bash script. This comprehensive guide covers script functions, examples, and best practices to streamline your IT

Learn how to enable Gmail notifications in Zabbix with our step-by-step guide. Improve your IT monitoring by ensuring timely alerts and effective incident management. Perfect

In this article, we will explore how to implement security warning banners in Zabbix to enhance compliance and user awareness. This step-by-step guide covers creating