Commands
In this step-by-step guide, we will show you how to install MySQL 8.0 on RHEL 9 or CentOS 9, ensuring a smooth setup for your database

Learn how to automate mysql_secure_installation via Ansible roles for MySQL 8.4. Secure your MySQL installation at scale with this step-by-step guide.
MySQL 8.4 is one of the most popular open-source relational database management systems (RDBMS) used globally for its scalability, reliability, and performance. After installing MySQL, securing the installation is essential to protect your system from unauthorized access and potential vulnerabilities. Typically, this is done manually using the mysql_secure_installation script.
In a production environment, automating this process is essential to ensure consistency and reliability, especially when you are working with multiple MySQL instances. Ansible, a powerful automation tool, can help automate the mysql_secure_installation script using Ansible roles. In this blog post, we will explain how to automate mysql_secure_installation using Ansible roles for MySQL 8.4, focusing on security best practices, scalability, and ease of management.
Introduction to MySQL 8.4 and Ansible Roles |
MySQL 8.4 is an enhanced version of the MySQL database, featuring improved performance, security, and functionality. Whether you’re working with MySQL in cloud environments or on-premise systems, securing the installation after the database server is set up is vital for minimizing vulnerabilities.
On the other hand, Ansible is a robust automation tool that simplifies the configuration management process. Ansible roles allow for reusable, modular code that can be easily applied to multiple servers or tasks. Using Ansible roles for MySQL automation ensures that the same steps are performed consistently on every server.
By automating the mysql_secure_installation script, you can:
mysql_secure_installation?Automating mysql_secure_installation with Ansible roles provides several advantages over manual execution:
| Key Aspect | Description |
|---|---|
| Consistency | Ensures uniform application of security measures (e.g., disabling remote root access, setting strong passwords) across all MySQL instances in your infrastructure. |
| Efficiency | Executes configuration tasks across multiple hosts simultaneously, drastically reducing the time it would take to manually configure each MySQL instance. |
| Scalability | Simplifies managing and scaling MySQL configurations as your infrastructure grows through Ansible roles. |
| Repeatability | Creates repeatable processes for provisioning MySQL instances, which is especially valuable in environments with frequent MySQL provisioning needs. |
Environment Settings |
For this tutorial, we’ve configured our Linux machines as follows:
| Hostname | IP Address | RAM | Cores | OS |
|---|---|---|---|---|
| control.dev.naijalabs.net (Ansible Controller Node) | 192.168.1.21 | 4 | 2 | CentOS Stream release 9 |
| mysql-server1.dev.naijalabs.net | 192.168.1.232 | 4 | 2 | Red Hat Enterprise Linux release 9.5 (Plow) |
| mysql-server2.dev.naijalabs.net | 192.168.1.233 | 4 | 2 | AlmaLinux release 9.5 (Teal Serval) |
| mysql-server3.dev.naijalabs.net | 192.168.1.234 | 4 | 2 | Rocky Linux release 9.5 (Blue Oynx) |
| mysql-server4.dev.naijalabs.net | 192.168.1.235 | 4 | 2 | CentOS Stream release 9 |
Setting Up Ansible for MySQL 8.4 Automation |
Before diving into creating the roles, ensure you have Ansible set up and configured to interact with your target systems. Here’s how you can get started with Ansible:
Install Ansible |
Run the following command to install Ansible on your control node (the system from which you’ll be running Ansible commands):
sudo apt update -y && sudo apt install ansible -y
For CentOS/RHEL systems:
sudo yum update -y && sudo yum install ansible -y
For CentOS/RHEL 8+ systems:
sudo dnf update -y && sudo dnf install ansible -y
Now, let’s create an Ansible role for automating mysql_secure_installation on MySQL 8.4. We’ll begin by creating a directory to house the new role, navigating to that directory, and then, creating the role:
Directory Structure |
First, let’s create the directory structure for the role:
mkdir -p mysql-84-secure && cd mysql-84-secure && ansible-galaxy init mysql_secure_install
- Role mysql_secure_install was created successfully
This command creates a directory structure like this:
					.
└── mysql_secure_install
    ├── defaults
    │   └── main.yml
    ├── files
    ├── handlers
    │   └── main.yml
    ├── meta
    │   └── main.yml
    ├── README.md
    ├── tasks
    │   └── main.yml
    ├── templates
    ├── tests
    │   ├── inventory
    │   └── test.yml
    └── vars
        └── main.yml

9 directories, 8 files
Create an Inventory File |
Define the target MySQL servers in the inventory file at mysql_secure_install/tests/inventory. This file lists the systems you want to manage:
					[mysql_db_servers]
mysql-server1.dev.naijalabs.net  ansible_host=192.168.1.232 ansible_ssh_user=admin
mysql-server2.dev.naijalabs.net  ansible_host=192.168.1.233 ansible_ssh_user=admin
mysql-server3.dev.naijalabs.net  ansible_host=192.168.1.234 ansible_ssh_user=admin
mysql-server4.dev.naijalabs.net  ansible_host=192.168.1.235 ansible_ssh_user=admin
Test Connectivity |
Run a basic Ansible ping test to ensure that you can communicate with your target systems:
ansible -i mysql_secure_install/tests/inventory mysql_db_servers -m ping
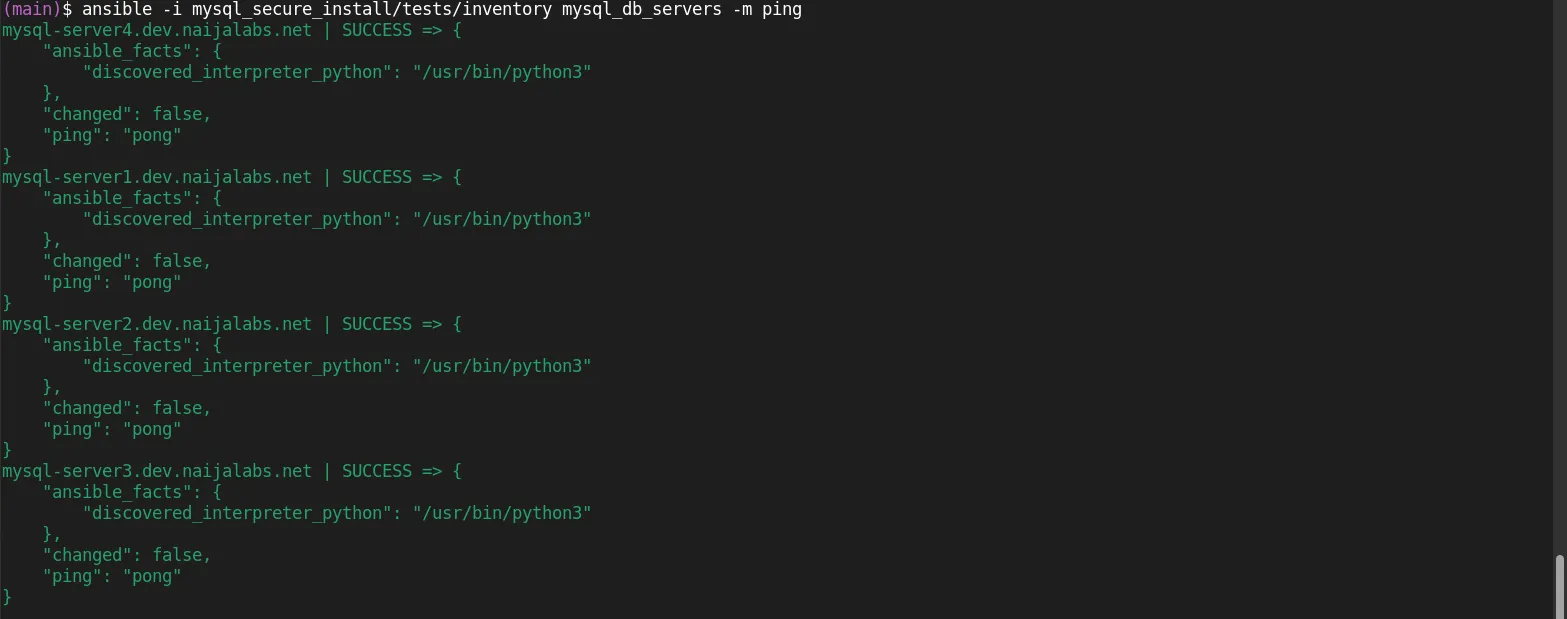
Photo by admingeek from Infotechys
When managing sensitive information such as passwords, it’s important to ensure that these details are stored securely. Ansible Vault allows you to encrypt sensitive variables, such as the MySQL root password, and ensures that they are not exposed in plaintext in your playbooks or configuration files.
To use Ansible Vault for password management, follow these steps:
Create an Encrypted Password File |
You can use Ansible Vault to encrypt your MySQL root password (and other sensitive variables) by creating a separate file for it. Run the following command to create an encrypted vault file:
ansible-vault create mysql_secure_install/vars/secretpass.yml
This will open your default text editor where you can define the variables. For example:
mysql_root_password: "i56wRm\Z0Dvb)TnV"
When you save and close the file, Ansible Vault will encrypt it. You’ll be prompted for a password to encrypt and decrypt the file. This ensures the password is securely stored. Replace mysql_root_password with your actual password that is similar in length and complexity.
Reference the Vault File in Your Playbook |
In the defaults/main.yml file of your MySQL role, reference any pertinent variables we’re using with the execption of sensitive data (e.g. passwords).
vim mysql_secure_install/defaults/main.yml
					---
# defaults file for mysql_secure_install
mysql_install_repository: "mysql84-community-release-el9-1.noarch.rpm"
mysql_db_version: "8.4" # Modify repository package and release to install different versions
Save and quit the file. Then, store the password used to encrypt the vault.yml in a file called .vaultpass.
vim .vault_pass
I've-g@t-the-key5
Run the Playbook with Vault Password |
When you run your actual playbook (in the later sections), you will need to specify the vault password. You can do this by either entering it manually or by using a password file:
ansible-playbook -i /path/to/inventory /path/to/playbook.yml --ask-vault-pass
Alternatively, you can use a password file for automation:
ansible-playbook -i /path/to/inventory /path/to/playbook.yml --vault-password-file .vault_pass
By leveraging Ansible Vault in this way, you can ensure that sensitive data like passwords is stored securely while still maintaining the automation and flexibility of your playbooks.
In the tasks/main.yml file, define the tasks required to automate the install the MySQL database across the various flavors of Linux and debian-based servers in inventory:
vim mysql_secure_install/tasks/main.yml
Add the following content to the file (save and exit the file):
					---
# tasks file for mysql_secure_install

- name: Install MySQL {{ mysql_db_version }} packages and dependencies
  include_tasks: install_mysql_db.yml

- name: Execute MySQL {{ mysql_db_version }} Secure Installation tasks
  include_tasks: secure_mysql_db.yml
tasks/install_mysql_db.yml |
Rinse and repeat for the tasks/install_mysql_db.yml file.
vim mysql_secure_install/tasks/install_mysql_db.yml
					---
- name: Download and install the MySQL {{ mysql_db_version }} repository package
  shell: |
    {% if ansible_facts['distribution'] == 'RedHat' or ansible_facts['distribution'] == 'AlmaLinux' or ansible_facts['distribution'] == 'Rocky' %}
      sudo dnf install -y https://dev.mysql.com/get/{{ mysql_install_repository }}
      sudo dnf install -y mysql-community-server mysql-community-devel
    {% elif ansible_facts['distribution'] == 'CentOS' %}
      sudo dnf install -y https://dev.mysql.com/get/{{ mysql_install_repository }}
      sudo dnf install -y mysql-community-server mysql-community-devel
    {% endif %}

- name: Install MySQL {{ mysql_db_version }} Community Server
  package:
    name: mysql-community-server
    state: present
  when: ansible_facts['distribution'] in ['RedHat', 'CentOS', 'AlmaLinux', 'Rocky']

- name: Install python3-PyMySQL
  package:
    name: python3-PyMySQL
    state: present
  when: ansible_facts['distribution'] in ['RedHat', 'CentOS', 'AlmaLinux', 'Rocky']

- name: Start MySQL {{ mysql_db_version }} service
  service:
    name: mysqld
    state: started
    enabled: yes
  when: ansible_facts['distribution'] in ['RedHat', 'CentOS', 'AlmaLinux', 'Rocky']

- name: Get temporary root password from log
  command: "sudo grep 'temporary password' /var/log/mysqld.log"
  register: temp_root_password
  when: ansible_facts['distribution'] in ['RedHat', 'CentOS', 'AlmaLinux', 'Rocky']

- name: Extract the temporary password using regex
  set_fact:
    temp_password: "{{ (temp_root_password.stdout | regex_search('generated for root@localhost: (.+)', '\\1'))[0] }}"
  when: temp_root_password.stdout is defined

- name: Check if /root/.my.cnf exists
  stat:
    path: /root/.my.cnf
  register: my_cnf_file

- name: Update MySQL {{ mysql_db_version }} root Password
  shell: |
    mysql -u root -p"{{ temp_password }}" --connect-expired-password -e "ALTER USER 'root'@'localhost' IDENTIFIED BY '{{ mysql_root_password }}';"
  when: my_cnf_file.stat.exists == False

- name: Create the MySQL (/root/.my.cnf) config file
  copy:
    dest: /root/.my.cnf
    content: |
      [client]
      user=root
      password={{ mysql_root_password }}
  when: ansible_facts['distribution'] in ['RedHat', 'CentOS', 'AlmaLinux', 'Rocky']

- name: Restart MySQL {{ mysql_db_version }} service
  service:
    name: mysqld
    state: restarted
    enabled: yes
  when: ansible_facts['distribution'] in ['RedHat', 'CentOS', 'AlmaLinux', 'Rocky']
Important Note: Make sure to maintain the correct indentation when copying and pasting content. Incorrect indentation will lead to errors in execution!!
| Section | Description |
|---|---|
| Download and install the MySQL repository package | Downloads and installs the MySQL repository package for the appropriate distribution (RedHat, AlmaLinux, Rocky, CentOS) using dnf. |
| Install MySQL Community Server and python3-PyMySQL | Installs the mysql-community-server package using the package module, ensuring MySQL is installed on supported distributions (RedHat, CentOS, AlmaLinux, Rocky). In addition, python3-PyMySQL is installed to allow Ansible to interact with the database. |
| Start MySQL service | Starts the MySQL service (mysqld) and ensures it is enabled to start on boot for supported distributions. |
| Get temporary root password from log | Retrieves the temporary root password from the MySQL logs (/var/log/mysqld.log) using the command module. This is the password generated during MySQL installation. |
| Extract the temporary password using regex | Uses a regular expression to extract the generated root password from the command output and stores it in a variable (temp_password). |
| Check if /root/.my.cnf exists | Uses the stat module to check if the /root/.my.cnf file exists, which stores MySQL root credentials for future access. |
| Update MySQL root Password | Updates the MySQL root password using the shell module. This command alters the root password if the .my.cnf file doesn’t exist. |
| Create MySQL config file | Creates the /root/.my.cnf file with the new root password using the copy module. This file will store MySQL credentials for the root user. |
| Restart MySQL service | Restarts the MySQL service (mysqld) to apply configuration changes, ensuring that MySQL is running with the new settings. |
tasks/secure_mysql_db.yml |
Again, repeat for the tasks/secure_mysql_db.yml file.
vim mysql_secure_install/tasks/secure_mysql_db.yml
					---
- name: Remove anonymous MySQL users
  mysql_user:
    name: ''
    host: '%'
    state: absent
    login_user: root
    login_password: "{{ mysql_root_password }}"

- name: Remove test database
  mysql_db:
    name: test
    state: absent
    login_user: root
    login_password: "{{ mysql_root_password }}"

- name: Flush MySQL privileges
  mysql_query:
    query: "FLUSH PRIVILEGES;"
    login_user: root
    login_password: "{{ mysql_root_password }}"

- name: Ensure MySQL is running
  service:
    name: mysqld
    state: started
    enabled: yes
| Section | Description |
|---|---|
| Remove anonymous MySQL users | Removes any anonymous MySQL users by setting their state to absent. It uses the mysql_user module to delete all users with empty usernames. |
| Remove test database | Deletes the test database by setting its state to absent using the mysql_db module. This is a security step to remove unused databases. |
| Flush MySQL privileges | Executes the FLUSH PRIVILEGES; SQL query using the mysql_query module. This ensures any changes to MySQL users and databases take effect immediately. |
| Ensure MySQL is running | Ensures that the MySQL service (mysqld) is started and enabled to run on boot using the service module, making sure MySQL is operational. |
Let’s create a mysql_secure_install.yml file in the role’s root directory.
vim mysql_secure_install.yml
					---
- name: Installing and Securing MySQL {{ mysql_db_version }} Database
  hosts: mysql_db_servers
  vars_files:
    - mysql_secure_install/vars/secretpass.yml
  become: true
  roles:
    - mysql_secure_install
Your directory structure should now include the following:
					.
├── mysql_secure_install
│   ├── defaults
│   │   └── main.yml
│   ├── files
│   ├── handlers
│   │   └── main.yml
│   ├── meta
│   │   └── main.yml
│   ├── README.md
│   ├── tasks
│   │   ├── install_mysql_db.yml
│   │   ├── main.yml
│   │   └── secure_mysql_db.yml
│   ├── templates
│   ├── tests
│   │   ├── inventory
│   │   └── test.yml
│   └── vars
│       ├── main.yml
│       └── secretpass.yml
└── mysql_secure_install.yml

9 directories, 12 files
If you’ve been following this tutorial step by step, your directory structure should now resemble the one shown above. Once you’ve confirmed this, you’re ready to execute the playbook using the following command:
ansible-playbook -i mysql_secure_install/tests/inventory mysql_secure_install.yml --vault-password-file .vault_pass -K
BECOME password:
You’ll be prompted to enter your user account’s sudo password (-K) to proceed:
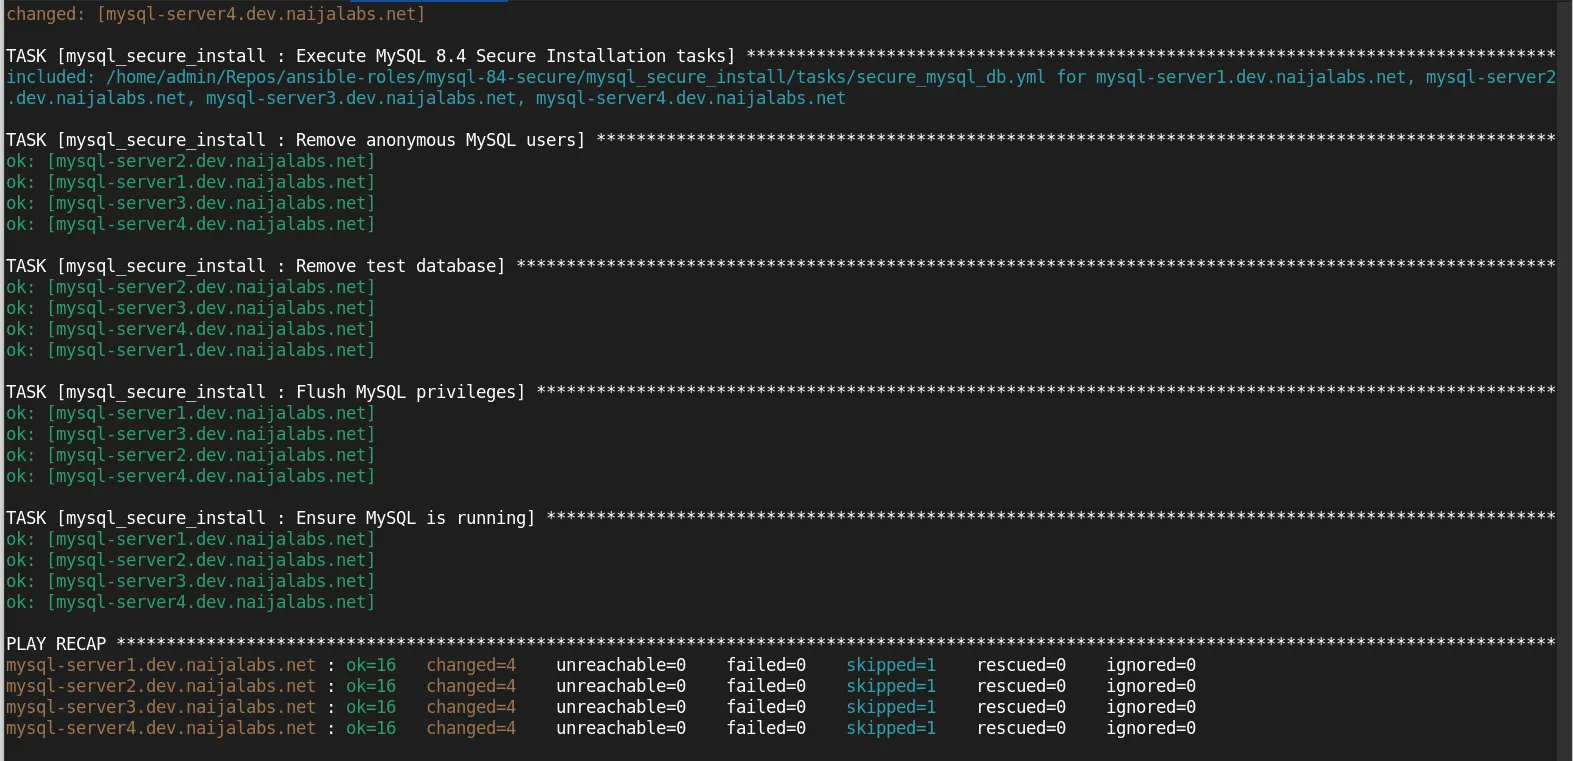
Photo by admingeek from Infotechys
Once the process is complete, you can log into any of your database servers to confirm that the tasks were executed successfully. For example, in the case below, we’re verifying whether the test database has been removed.
sudo mysql -u root -p
Enter password:
					Welcome to the MySQL monitor.  Commands end with ; or \g.
Your MySQL connection id is 12
Server version: 8.4.4 MySQL Community Server - GPL

Copyright (c) 2000, 2025, Oracle and/or its affiliates.

Oracle is a registered trademark of Oracle Corporation and/or its
affiliates. Other names may be trademarks of their respective
owners.

Type 'help;' or '\h' for help. Type '\c' to clear the current input statement.

mysql> SHOW DATABASES;
+--------------------+
| Database           |
+--------------------+
| information_schema |
| mysql              |
| performance_schema |
| sys                |
+--------------------+
4 rows in set (0.01 sec)

mysql>
With these tasks in place, the MySQL installation and securing process is automated and works seamlessly across Red Hat Enterprise Linux (RHEL), AlmaLinux, Rocky Linux, and CentOS. By checking the underlying distribution and using conditional logic in Ansible, we ensure compatibility with different Linux flavors and their respective package managers. The playbook is flexible, idempotent, and ensures a consistent and secure MySQL setup, without any errors across different environments.
Did you find this article useful? Your feedback is invaluable to us! Please feel free to share this post as well as your thoughts in the comments section below.
In this step-by-step guide, we will show you how to install MySQL 8.0 on RHEL 9 or CentOS 9, ensuring a smooth setup for your database
In this article, we will review how to install MySQL on Fedora 37, providing step-by-step instructions to ensure a smooth installation process. Table of Contents
Are you looking to set up MySQL on your RHEL 9 or CentOS 9 server? Follow these detailed steps to install MySQL on RHEL 9 or