
Commands
In this comprehensive guide, we’ll walk you through the process of installing Dogtag CA on CentOS 9, ensuring your system is equipped with the necessary

Learn how to configure OpenVPN Server on Ubuntu 24.04 for secure remote access. Step-by-step guide with configuration examples, firewall setup, and troubleshooting tips.
OpenVPN is one of the most widely used VPN technologies due to its robust encryption, high security, and ease of configuration. It allows secure communication over the internet by tunneling traffic through an encrypted connection, masking your IP address, and providing private browsing.
Ubuntu 24.04, being one of the most popular Linux distributions, is an ideal environment to host an OpenVPN server. By setting up OpenVPN on Ubuntu, you can ensure secure communication between client devices and your server over an unsecured network, such as the internet.
Prerequisites |
Before you start, ensure that the following requirements are met:
|
|
|
|
Ensure your server is updated by running:
sudo apt update && sudo apt upgrade -y && sudo systemctl reboot
To begin, you’ll need to install the necessary software for OpenVPN on your Ubuntu 24.04 server. Follow these steps:
Install OpenVPN and Easy-RSA |
Easy-RSA is a tool that simplifies the process of creating and managing SSL certificates for OpenVPN. First, update the package list and install OpenVPN and Easy-RSA:
sudo apt update && sudo apt install -y openvpn openvpn-systemd-resolved easy-rsa
Once installed, you can begin configuring OpenVPN.
Ensure you are logged in as the root user before continuing with the remaining steps of this procedure.
Create the OpenVPN Directory Structure |
To configure OpenVPN, you need to create a directory to store certificates, configuration files, and other related files:
sudo make-cadir /etc/openvpn/easy-rsa
Configure Easy-RSA |
Navigate to the newly-created directory:
cd /etc/openvpn/easy-rsa
Initiallize the public key infrastructure:
./easyrsa init-pki
					Notice
------
'init-pki' complete; you may now create a CA or requests.

Your newly created PKI dir is:
* /etc/openvpn/easy-rsa/pki

Using Easy-RSA configuration:
* /etc/openvpn/easy-rsa/vars
Run the following command to create a Certificate Authority (CA):
./easyrsa build-ca
Enter and confirm a CA Key Passphrase:
					Using Easy-RSA 'vars' configuration:
* /etc/openvpn/easy-rsa/vars

Using SSL:
* openssl OpenSSL 3.0.13 30 Jan 2024 (Library: OpenSSL 3.0.13 30 Jan 2024)

Enter New CA Key Passphrase:

Confirm New CA Key Passphrase:
Provide a common name or press the [Enter] key to proceed with the default name [Easy-RSA CA]:
					.....+.+........+................+.....+....+...+.........+.....+....+..+.......+...+............+.....+......+.+.....+++++++++++++++++++++++++++++++++++++++++++++++++++++++++++++++++*.....+.+......+++++++++++++++++++++++++++++++++++++++++++++++++++++++++++++++++*.......+.+...+...+...+...........+.+..+..........+...+..+......+......+..............................+...+...+...+...............+.+.....+.+...+...........+.+..+.+........................+..+....+.........+..+....+..+.......+.....+...+....+...............+...+...+...+...........+.........+......+.+..+............+.+..............+.+...+..+...............+....+......+..+...+.......+.....+............+.+..+..........+...+..+...+...+.+++++++++++++++++++++++++++++++++++++++++++++++++++++++++++++++++
..........+...........+...+....+......+..+....+.....+.........+....+...+++++++++++++++++++++++++++++++++++++++++++++++++++++++++++++++++*....+........+....+..+...+.......+++++++++++++++++++++++++++++++++++++++++++++++++++++++++++++++++*.+......+...........+...+.......+......+..+.+......+......+.....+...+.+...........+...+......+...+.......+...+........+..........+...+.........+...........+..........+.................+.......+...+...+..+.......+..+....+......+.........+.....+.+........+...+............+.+.....+.......+.....+.........+.+.....+....+...+..+.+..............+....+...........+..........+...............+..............+.+...........+...+.......+..+..........+...+.....+............+.+.........+..+...................+..+...+.........+.+...............+......+.....+.+.....+....+.....+......+..........+...+.....................+.......................+.......+........+...+...+............+...+.+.....+.........+.......+..+...+.......+......+.................+....+.....+.+.........+.....+...+.+..+.......+..+.........+......+......+...+....+........+....+...............+........+.......+......+........+.........+.+..+...+....+...+..+...........................+.............+......+..+.............+.....+.......+...+............+..+...+...+.+........+...+...+......+.........+....+...............+........+..........+...+...........+.+.........+......+..+..........+..+...+..........+..+....+++++++++++++++++++++++++++++++++++++++++++++++++++++++++++++++++
-----
You are about to be asked to enter information that will be incorporated
into your certificate request.
What you are about to enter is what is called a Distinguished Name or a DN.
There are quite a few fields but you can leave some blank
For some fields there will be a default value,
If you enter '.', the field will be left blank.
-----
Common Name (eg: your user, host, or server name) [Easy-RSA CA]:
This will create a CA certificate under /etc/openvpn/easy-rsa/pki.
					Notice
------
CA creation complete. Your new CA certificate is at:
* /etc/openvpn/easy-rsa/pki/ca.crt
Generate Server Certificate and Key |
Run the following command to generate the OpenVPN server certificate (replace openvpn.dev.naijalabs.net with your actual FQDN):
./easyrsa gen-req openvpn.dev.naijalabs.net nopass
					...omitted for brevity...
You are about to be asked to enter information that will be incorporated
into your certificate request.
What you are about to enter is what is called a Distinguished Name or a DN.
There are quite a few fields but you can leave some blank
For some fields there will be a default value,
If you enter '.', the field will be left blank.
-----
Common Name (eg: your user, host, or server name) [openvpn.dev.naijalabs.net]:
Press Enter Key to continue:
					Notice
------
Private-Key and Public-Certificate-Request files created.
Your files are:
* req: /etc/openvpn/easy-rsa/pki/reqs/openvpn.dev.naijalabs.net.req
* key: /etc/openvpn/easy-rsa/pki/private/openvpn.dev.naijalabs.net.key
Generate Diffie-Hellman Parameters |
These parameters help in securing the key exchange process:
./easyrsa gen-dh
					...omitted for brevity...
...............................................................................
...............................................................................
.......................................
++*++*++*++*++*++*++*++*++*++*++*++*++*++*++*++*++*++*++*++*++*++*++*++*++*++*+
+*++*++*++*++*++*++*++*++*++*++*++*++*++*++*++*++*++*++*++*++*++*++*++*++*++*++
*++*++*++*++*++*++*++*++*++*++*++*
DH parameters appear to be ok.

Notice
------

DH parameters of size 2048 created at:
* /etc/openvpn/easy-rsa/pki/dh.pem
Now, create a certificate for the server:
./easyrsa sign-req server openvpn.dev.naijalabs.net
Type the word ‘yes’ and press the Enter key to continue:
					...omitted for brevity...
Request subject, to be signed as a server certificate
for '825' days:

subject=
    commonName                = openvpn.dev.naijalabs.net

Type the word 'yes' to continue, or any other input to abort.
  Confirm request details: yes
Enter your Passphrase (from earlier section) and hit Enter to continue:
					Using configuration from /etc/openvpn/easy-rsa/pki/openssl-easyrsa.cnf
Enter pass phrase for /etc/openvpn/easy-rsa/pki/private/ca.key:
Your server certificate will be generated under /etc/openvpn/easy-rsa/pki/issued/:
					Check that the request matches the signature
Signature ok
The Subject's Distinguished Name is as follows
commonName            :ASN.1 12:'openvpn.dev.naijalabs.net'
Certificate is to be certified until May 22 00:10:35 2027 GMT (825 days)

Write out database with 1 new entries
Database updated

Notice
------
Certificate created at:
* /etc/openvpn/easy-rsa/pki/issued/openvpn.dev.naijalabs.net.crt
Generate HMAC Key for TLS Authentication |
Create an OpenVPN static key. This adds an extra layer of security for SSL/TLS:
openvpn --genkey --tls-auth /etc/openvpn/easy-rsa/pki/ta.key > /etc/openvpn/easy-rsa/pki/ta.key
The contents of the ta.key file should look similar to:
					#
# 2048 bit OpenVPN static key
#
-----BEGIN OpenVPN Static key V1-----
7ba45428c7b2706b87da10b676faf5a5
9abbf13dc01165a669b3106ee8dccfde
934869dad4960d39c564692526622c75
8c522731445b35f2846ab2c080a899ef
af010f744f225a8b60696718c7ecc822
0c89f4869dad4960d39c5646e440aa6c
14869dad4960d39c56468b836cb575fc
0ccc125fdd96327f80808850b45f4ce9
d099ffde6f2664d74f19d97d6d23ee16
d57e0bccbd706fbb3d6fc6449cd4ece8
694b64869dad4960d39c5646e5fa66bf
79d273e2efbcdb7bdada53489c2036a2
77cb5c2a7f2372119c60be582d146ca0
71e1f3e24e14a1e46abf502fdc279a7a
91339e11173628691d08780ccbf62931
9692028cdcfd9abf810ea9fa7265b747
-----END OpenVPN Static key V1-----
Generate Client Certificates |
For each client, you need to generate a client certificate and key.
./easyrsa gen-req vpnuser01 nopass
					...omitted for brevity...
..+............+.+......+++++++++++++++++++++++++++++++++++++++++++++++++++++++++++++++++
-----
You are about to be asked to enter information that will be incorporated
into your certificate request.
What you are about to enter is what is called a Distinguished Name or a DN.
There are quite a few fields but you can leave some blank
For some fields there will be a default value,
If you enter '.', the field will be left blank.
-----
Common Name (eg: your user, host, or server name) [vpnuser01]:
Press the Enter Key to accept default name [ vpnuser01 ] and proceed:
					Notice
------
Private-Key and Public-Certificate-Request files created.
Your files are:
* req: /etc/openvpn/easy-rsa/pki/reqs/vpnuser01.req
* key: /etc/openvpn/easy-rsa/pki/private/vpnuser01.key
Sign the certificate request to generate a client certificate:
./easyrsa sign-req client vpnuser01
Again, type the word ‘yes‘ and hit enter. Then, enter the CA passphrase to continue:
					Write out database with 1 new entries
Database updated

Notice
------
Certificate created at:
* /etc/openvpn/easy-rsa/pki/issued/vpnuser01.crt
OpenVPN Server Configuration |
Copy the sample server configuration file.
sudo cp /usr/share/doc/openvpn/examples/sample-config-files/server.conf /etc/openvpn/server.conf
Edit the configuration file to customize it for your environment:
sudo vim /etc/openvpn/server.conf
Enable IPv6 Ports |
Under the proto udp line, enter a directive to enable IPv6 ports:
					# TCP or UDP server?
;proto tcp
proto udp
proto udp6
Add Certificate and Key file locations |
Comment out the certificate and key lines and add the actual path to your certificate and key files:
					#ca ca.crt
#cert server.crt
#key server.key  # This file should be kept secret

ca /etc/openvpn/easy-rsa/pki/ca.crt
cert /etc/openvpn/easy-rsa/pki/issued/openvpn.dev.naijalabs.net.crt
key /etc/openvpn/easy-rsa/pki/private/openvpn.dev.naijalabs.net.key
Modify Diffie-Hellman |
Also, modify the Diffie-Hellman line:
					# Diffie hellman parameters.
# Generate your own with:
#   openssl dhparam -out dh2048.pem 2048
#dh dh2048.pem
dh /etc/openvpn/easy-rsa/pki/dh.pem
Add IPv6 Addressing |
Add the server-ipv6 directive for IPv6 addressing:
					# Configure server mode and supply a VPN subnet
# for OpenVPN to draw client addresses from.
# The server will take 10.8.0.1 for itself,
# the rest will be made available to clients.
# Each client will be able to reach the server
# on 10.8.0.1. Comment this line out if you are
# ethernet bridging. See the man page for more info.
server 10.8.0.0 255.255.255.0
server-ipv6 2001:db8:0:123::/64
Find the redirect-gateway line and uncomment it (remove the semi-colon):
					 If enabled, this directive will configure
# all clients to redirect their default
# network gateway through the VPN, causing
# all IP traffic such as web browsing and
# and DNS lookups to go through the VPN
# (The OpenVPN server machine may need to NAT
# or bridge the TUN/TAP interface to the internet
# in order for this to work properly).
#;push "redirect-gateway def1 bypass-dhcp"
push "redirect-gateway def1 bypass-dhcp"
Include another push directive to add OpenVPN as the gateway for VPN clients:
					#;push "redirect-gateway def1 bypass-dhcp"
push "redirect-gateway def1 bypass-dhcp"
push "route-ipv6 2000::/3"
Configure OpenVPN for DNS |
If you prefer your clients to use OpenVPN as their DNS server, make the following additional changes:
					# The addresses below refer to the public
# DNS servers provided by opendns.com.
#;push "dhcp-option DNS 208.67.222.222"
#;push "dhcp-option DNS 208.67.220.220"

push "dhcp-option DNS 8.8.8.8"
push "dhcp-option DNS 1.1.1.1"
Uncomment this line to allow VPN clients to communicate with one another:
					# To force clients to only see the server, you
# will also need to appropriately firewall the
# server's TUN/TAP interface.
#;client-to-client
client-to-client
Modify OpenVPN static key |
Specify the actual path to the OpenVPN static key:
					# The second parameter should be '0'
# on the server and '1' on the clients.
#;tls-auth ta.key 0 # This file is secret
tls-auth /etc/openvpn/easy-rsa/pki/ta.key 0
Finally, save and quit the file.
Start and enable OpenVPN server |
Start and enable the OpenVPN server with the following command:
sudo systemctl enable --now openvpn@server
Verify it’s running:
sudo systemctl status openvpn@server
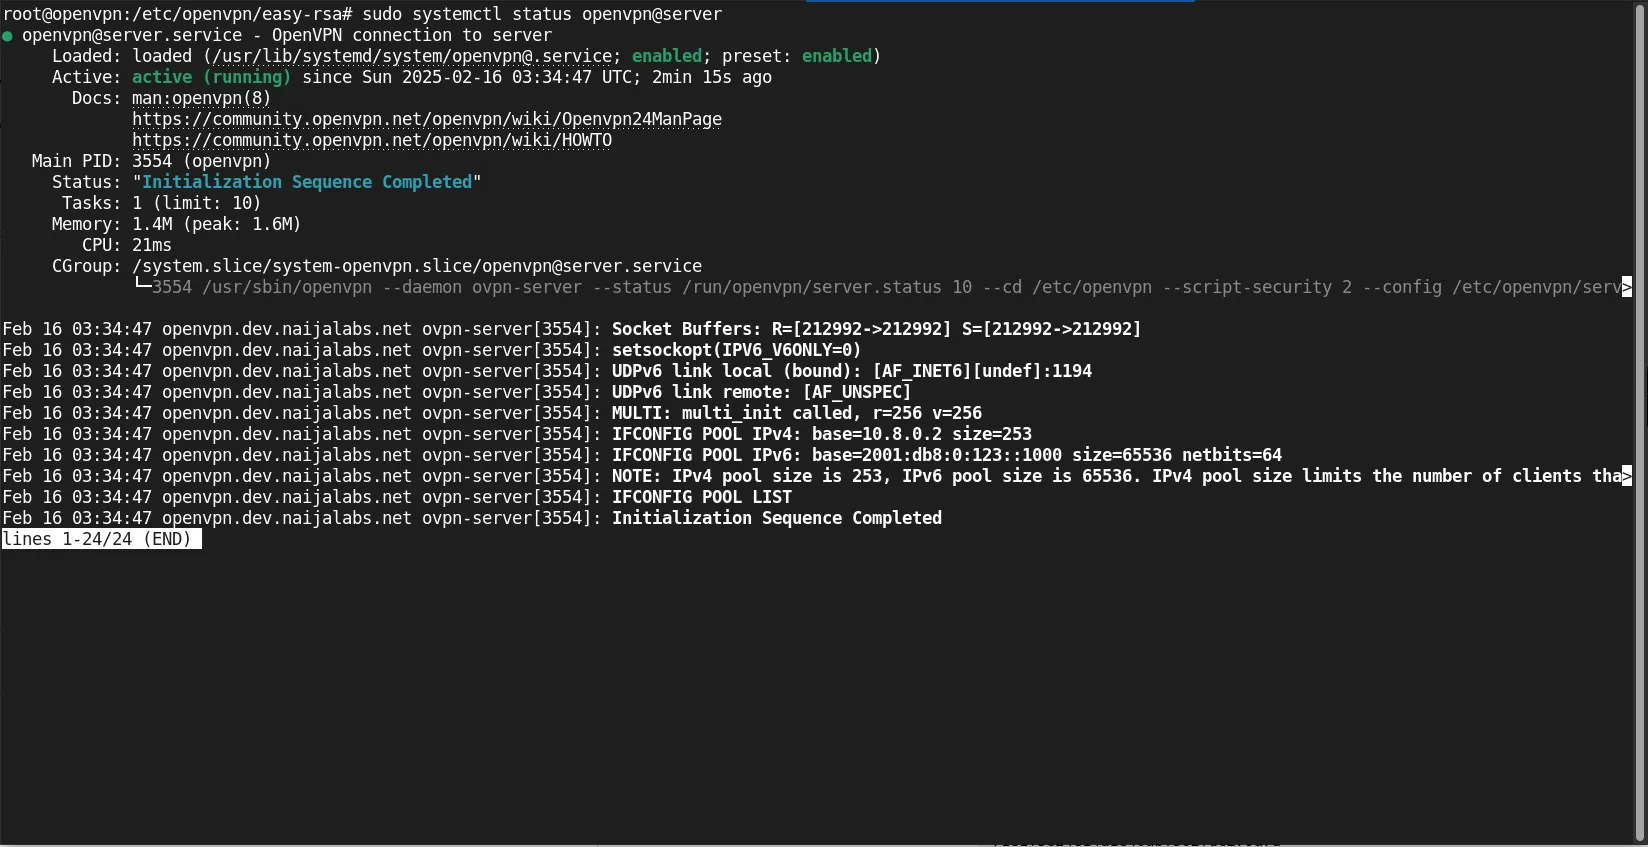
Photo by admingeek from Infotechys
Configure IP Forwarding |
To allow your VPN server to forward traffic from the client to the internet, you need to enable IP forwarding. Modify the sysctl configuration file:
echo "net.ipv4.ip_forward = 1" | sudo tee /etc/sysctl.d/60-custom.conf
net.ipv4.ip_forward = 1
Enable the BBR Algorithm |
Execute the following two commands to enable the TCP BBR algorithm:
echo "net.core.default_qdisc=fq" | sudo tee -a /etc/sysctl.d/60-custom.conf
net.core.default_qdisk=fq
echo "net.ipv4.tcp_congestion_control=bbr" | sudo tee -a /etc/sysctl.d/60-custom.conf
net.ipv4.tcp_congestion_control=bbr
Run this command to apply all the changes:
sudo sysctl -p /etc/sysctl.d/60-custom.conf
					net.ipv4.ip_forward = 1
net.core.default_qdisc = fq
net.ipv4.tcp_congestion_control = bbr
Configure IP Masquerading |
Configure IP masquerading in the firewall (enable the firewall if it’s not enabled):
sudo ufw allow 22/tcp && sudo ufw enable
					Rules updated
Rules updated (v6)
Command may disrupt existing ssh connections. Proceed with operation (y|n)? y
Firewall is active and enabled on system startup
Find your server’s main network interface name (eth0 in our case, yours may be different):
ip addr
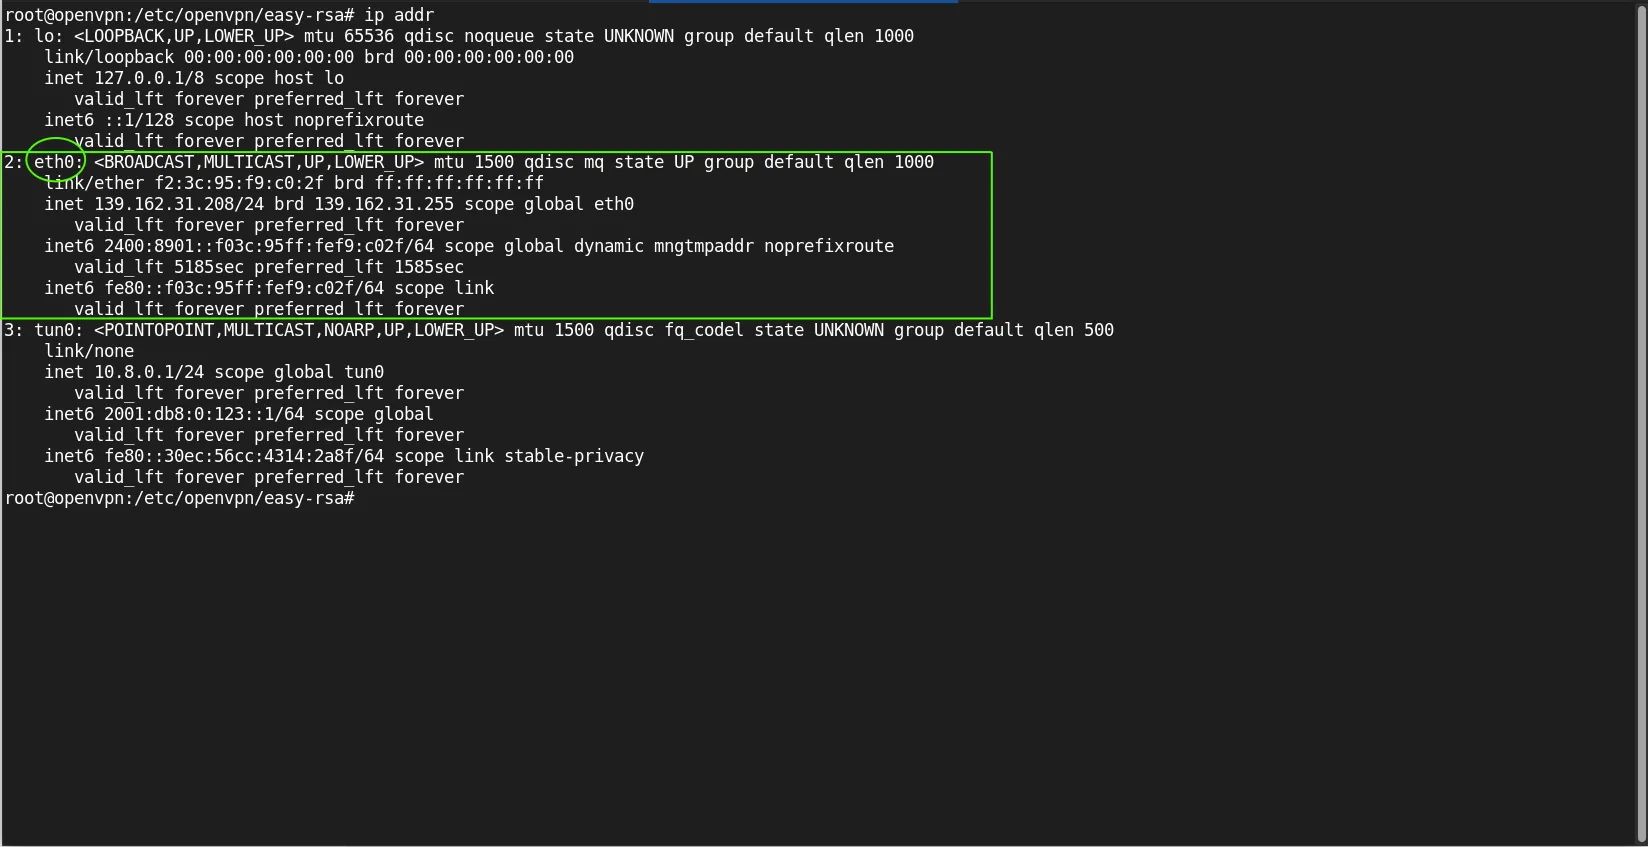
Photo by admingeek from Infotechys
To allow IP forwarding to work properly, we’ll need to add rules to the /etc/ufw/before.rules file:
sudo vim /etc/ufw/before.rules
Using your preferred text editor, append the following right above the COMMIT line:
					# allow forwarding for trusted network
-A ufw-before-forward -s 10.8.0.0/24 -j ACCEPT
-A ufw-before-forward -d 10.8.0.0/24 -j ACCEPT
Add the following to the end of the file (or after the COMMIT line) to establish IP masquerading (Replace eth0 with your actual network interface name. Then, save and quit the file):
					# NAT table rules
*nat
:POSTROUTING ACCEPT [0:0]
-A POSTROUTING -s 10.8.0.0/24 -o eth0 -j MASQUERADE

# don't delete the 'COMMIT' line or these rules won't be processed
COMMIT
Ensure IP masquerading is turned on:
sudo ufw enable && sudo iptables -t nat -L POSTROUTING
Your output should look similar to:
					Chain POSTROUTING (policy ACCEPT)
target     prot opt source               destination
MASQUERADE  all  --  10.8.0.0/24          anywhere
MASQUERADE  all  --  10.8.0.0/24          anywhere
MASQUERADE  all  --  10.8.0.0/24          anywhere
MASQUERADE  all  --  10.8.0.0/24          anywhere
Allow OpenVPN port |
Open TCP and UDP for port 1194:
sudo ufw allow 1194/tcp && sudo ufw allow 1194/udp
					Rule added
Rule added (v6)
Rule added
Rule added (v6)
Double-check ufw status:
sudo ufw status
					Status: active

To                         Action      From
--                         ------      ----
22/tcp                     ALLOW       Anywhere
1194/tcp                   ALLOW       Anywhere
1194/udp                   ALLOW       Anywhere
22/tcp (v6)                ALLOW       Anywhere (v6)
1194/tcp (v6)              ALLOW       Anywhere (v6)
1194/udp (v6)              ALLOW       Anywhere (v6)
Congratulations! The OpenVPN server-side configuration is now complete. The next section will cover the client-side setup.
For this demonstration, we’ll be using a CentOS 9 workstation as our client server:
Configure OpenVPN Client |
OpenVPN is available in the EPEL repository. If it’s not already installed on your machine, you can install it by running the following commands:
sudo dnf install epel-release -y && sudo dnf install openvpn -y
Copy the necessary files |
First, become the root user on your client machine. Then, navigate to the /etc/openvpn/client directory with the following command:
sudo -i
cd /etc/openvpn/client
Next, copy the following files from the OpenVPN server over to your client machine (replace IP address with your own):
scp root@139.162.31.208:/etc/openvpn/easy-rsa/pki/ca.crt .
scp root@139.162.31.208:/etc/openvpn/easy-rsa/pki/issued/vpnuser01.crt .
scp root@139.162.31.208:/etc/openvpn/easy-rsa/pki/private/vpnuser01.key .
scp root@139.162.31.208:/etc/openvpn/easy-rsa/pki/ta.key .
Modify OpenVPN Client Configuration file |
Save the existing client.conf file to a backup and open a new client.conf file:
sudo mv client.conf client.conf.orig && sudo vim client.conf
Add the following content:
					##############################################
# Sample client-side OpenVPN 2.6 config file #
# for connecting to multi-client server.     #
#                                            #
# This configuration can be used by multiple #
# clients, however each client should have   #
# its own cert and key files.                #
#                                            #
# On Windows, you might want to rename this  #
# file so it has a .ovpn extension           #
##############################################

# Specify that we are a client and that we
# will be pulling certain config file directives
# from the server.
client

# Use the same setting as you are using on
# the server.
# On most systems, the VPN will not function
# unless you partially or fully disable
# the firewall for the TUN/TAP interface.
;dev tap
dev tun

# Windows needs the TAP-Win32 adapter name
# from the Network Connections panel
# if you have more than one.  On XP SP2,
# you may need to disable the firewall
# for the TAP adapter.
;dev-node MyTap

# Are we connecting to a TCP or
# UDP server?  Use the same setting as
# on the server.
;proto tcp
proto udp

# The hostname/IP and port of the server.
# You can have multiple remote entries
# to load balance between the servers.
remote my-server-1 1194
;remote my-server-2 1194

# Choose a random host from the remote
# list for load-balancing.  Otherwise
# try hosts in the order specified.
;remote-random

# Keep trying indefinitely to resolve the
# host name of the OpenVPN server.  Very useful
# on machines which are not permanently connected
# to the internet such as laptops.
resolv-retry infinite

# Most clients don't need to bind to
# a specific local port number.
nobind

# Downgrade privileges after initialization (non-Windows only)
;user openvpn
;group openvpn

# Try to preserve some state across restarts.
persist-key
persist-tun

# If you are connecting through an
# HTTP proxy to reach the actual OpenVPN
# server, put the proxy server/IP and
# port number here.  See the man page
# if your proxy server requires
# authentication.
;http-proxy-retry # retry on connection failures
;http-proxy [proxy server] [proxy port #]

# Wireless networks often produce a lot
# of duplicate packets.  Set this flag
# to silence duplicate packet warnings.
;mute-replay-warnings

# SSL/TLS parms.
# See the server config file for more
# description.  It's best to use
# a separate .crt/.key file pair
# for each client.  A single ca
# file can be used for all clients.
ca ca.crt
cert client.crt
key client.key

# Verify server certificate by checking that the
# certificate has the correct key usage set.
# This is an important precaution to protect against
# a potential attack discussed here:
#  http://openvpn.net/howto.html#mitm
#
# To use this feature, you will need to generate
# your server certificates with the keyUsage set to
#   digitalSignature, keyEncipherment
# and the extendedKeyUsage to
#   serverAuth
# EasyRSA can do this for you.
remote-cert-tls server

# Allow to connect to really old OpenVPN versions
# without AEAD support (OpenVPN 2.3.x or older)
# This adds AES-256-CBC as fallback cipher and
# keeps the modern ciphers as well.
;data-ciphers AES-256-GCM:AES-128-GCM:?CHACHA20-POLY1305:AES-256-CBC

# If a tls-auth key is used on the server
# then every client must also have the key.
;tls-auth ta.key 1

# Set log file verbosity.
verb 3

# Silence repeating messages
;mute 20
Replace the remote my-server 1 line with the IP address of your OpenVPN server (change port to 1194 if necessary):
remote 139.162.31.208 1194
Change certificate and key directives to match the actual paths to the certificate and key files on your client machine:
					# SSL/TLS parms.
# See the server config file for more
# description.  It's best to use
# a separate .crt/.key file pair
# for each client.  A single ca
# file can be used for all clients.
ca /etc/openvpn/client/ca.crt
cert /etc/openvpn/client/vpnuser01.crt
key /etc/openvpn/client/vpnuser01.key
Make the same edit for the static key (then, save and exit the file).
					# If a tls-auth key is used on the server
# then every client must also have the key.
tls-auth /etc/openvpn/client/ta.key 1
Start OpenVPN client |
We are now ready to start the OpenVPN client but first, we must generate a systemd service file:
sudo vim /etc/systemd/system/openvpn-client@vpnuser01.service
Add the following content into the file:
					[Unit]
Description=OpenVPN Client for %i
After=network-online.target
Wants=network-online.target

[Service]
ExecStart=/usr/sbin/openvpn --config /etc/openvpn/client/client.conf
Restart=on-failure
RestartSec=5s

[Install]
WantedBy=multi-user.target
Start the client service:
systemctl start openvpn-client@vpnuser01.service
Verify the service is running:
systemctl status openvpn-client@vpnuser01.service
					● openvpn-client@vpnuser01.service - OpenVPN Client for vpnuser01
     Loaded: loaded (/etc/systemd/system/openvpn-client@vpnuser01.service; disabled; preset: disabled)
     Active: active (running) since Sun 2025-02-16 03:56:39 EST; 5min ago
   Main PID: 133994 (openvpn)
      Tasks: 1 (limit: 74875)
     Memory: 1.4M
        CPU: 772ms
     CGroup: /system.slice/system-openvpn\x2dclient.slice/openvpn-client@vpnuser01.service
             └─133994 /usr/sbin/openvpn --config /etc/openvpn/client/client.conf

Feb 16 03:56:40 client01.dev.naijalabs.net openvpn[133994]: 2025-02-16 03:56:40 net_addr_v4_add: 10.8.0.2/24 dev tun0
Feb 16 03:56:40 client01.dev.naijalabs.net openvpn[133994]: 2025-02-16 03:56:40 net_iface_mtu_set: mtu 1500 for tun0
Feb 16 03:56:40 client01.dev.naijalabs.net openvpn[133994]: 2025-02-16 03:56:40 net_iface_up: set tun0 up
...omitted for brevity...
Congratulations! You’ve completed the OpenVPN client setup. Now, you can proceed with testing your connection in the next section.
Test the VPN Connection |
Test your VPN connection by checking your IP address:
curl ifconfig.me
It should show the IP address of the OpenVPN server, confirming that the VPN is working properly.
139.162.31.208
Here are some common issues you may encounter and how to fix them:
| Issue | Description | Command/Action |
|---|---|---|
| Firewall Issues | If you can’t connect, check the firewall settings on both the server and client-side. | Verify firewall rules and open required ports. |
| Logs | Check OpenVPN logs for any errors to diagnose issues. | Run sudo journalctl -u openvpn@server to view logs. |
| Network Routing | Ensure that your server’s IP forwarding and NAT settings are properly configured. | Verify IP forwarding and NAT configuration. |
Setting up an OpenVPN server on Ubuntu 24.04 is a powerful way to secure your remote access needs. By following this guide, you’ve not only established an encrypted communication tunnel but also taken steps to ensure that your data remains private and protected.
OpenVPN’s flexibility and security features make it an excellent choice for both businesses and individuals who need secure remote access. With this configuration, you can safely connect multiple devices to your network without worrying about unauthorized access.
Did you find this article useful? Your feedback is invaluable to us! Please feel free to share this post!!
In this comprehensive guide, we’ll walk you through the process of installing Dogtag CA on CentOS 9, ensuring your system is equipped with the necessary

In this guide, we’ll delve into how to generate Letsencrypt wildcard certificates using Certbot, ensuring secure connections for your main domain and all its subdomains.

Learn how to install OpenVPN on Ubuntu 24.04 with this step-by-step guide. Secure your network with a robust VPN setup, including certificate management, firewall rules,