
Commands
In this article, we will review how to install VMware Workstation Player on a RHEL7 or CentOS7 Linux machine, guiding you through the installation process

Unlock the power of relational databases and streamline your data management processes by discovering how to easily install MySQL on CentOS – a must-know skill for any aspiring data professional!
MySQL was developed by Swedish company MySQL AB (“AB is a Swedish term which means corporation or limited company“) in 1994. In 2008, US Company Sun Microsystems took over and purchased the open-source database startup for $1 billion dollars in January of 2008.
Two years later (2010), US tech giant Oracle, acquired Sun Microsystems, which was publicly traded on the NASDAQ exchange (Ticker symbol: JAVA) at the time, for $9.50 a share. This amounted to a roughly $7.4 billion dollar purchase and Oracle still owns MySQL as of this publication.
MySQL is an open source relational database management system (RDBMS) with a client-server model. RDBMS is a software or service used to create and manage databases based on a relational model.
CentOS7 defaults to mariaDB version 5.5 when a sudo yum install mysql is executed. MariaDB was developed by the original developers of MySQL to serve as replacement. It was born out of concerns earlier on in development–that MySQL might lose its “open-source” status upon acquisition from a major tech company.
					$ sudo yum install mysql
[sudo] password for admin:
Loaded plugins: fastestmirror
Loading mirror speeds from cached hostfile
* base: mirror.centos.iad1.serverforge.org
* extras: mirror.umd.edu
* updates: nc-centos-mirror.iwebfusion.net
Resolving Dependencies
--> Running transaction check
---> Package mariadb.x86_64 1:5.5.68-1.el7 will be installed
--> Finished Dependency Resolution
Dependencies Resolved
=====================================================================================================
Package Arch Version Repository Size
=====================================================================================================
Installing:
mariadb x86_64 1:5.5.68-1.el7 base 8.8 M
Transaction Summary
=====================================================================================================
Install 1 Package
Total download size: 8.8 M
Installed size: 49 M
Is this ok [y/d/N]: y
Therefore, to install MySQL we need to download it’s repository. Using the wget command, we can pull down the latest MySQL5.7 release (as of this publication).
$ wget https://dev.mysql.com/get/mysql57-community-release-el7-9.noarch.rpm
Next, using yum we can install the mysql57-community-release-el7.9.noarch.rpm.
					$ sudo yum install mysql57-community-release-el7-9.noarch.rpm
[sudo] password for admin:
Loaded plugins: fastestmirror
Examining mysql57-community-release-el7-9.noarch.rpm: mysql57-community-release-el7-9.noarch
Marking mysql57-community-release-el7-9.noarch.rpm to be installed
Resolving Dependencies
--> Running transaction check
---> Package mysql57-community-release.noarch 0:el7-9 will be installed
--> Finished Dependency Resolution
Dependencies Resolved
============================================================================================================================
Package Arch Version Repository Size
============================================================================================================================
Installing:
mysql57-community-release noarch el7-9 /mysql57-community-release-el7-9.noarch 8.6 k
Transaction Summary
============================================================================================================================
Install 1 Package
Total size: 8.6 k
Installed size: 8.6 k
Is this ok [y/d/N]: y
Using the yum install method, we can avoid using wget altogether by executing the command against the URL of the MySQL Repository. This will download the mysql57-community-release repo and install it at once.
$ sudo yum -y install https://dev.mysql.com/get/mysql57-community-release-el7-9.noarch.rpm
Now that the MySQL repository is installed, we can proceed with yum using the -y flag to get ahead with the mysql-server install along with its GPG keys.
					$ sudo yum -y install mysql-server
...output omitted...
===============================================================================================================================
Package Arch Version Repository Size
===============================================================================================================================
Installing:
mysql-community-libs x86_64 5.7.37-1.el7 mysql57-community 2.4 M
replacing mariadb-libs.x86_64 1:5.5.68-1.el7
mysql-community-libs-compat x86_64 5.7.37-1.el7 mysql57-community 1.2 M
replacing mariadb-libs.x86_64 1:5.5.68-1.el7
mysql-community-server x86_64 5.7.37-1.el7 mysql57-community 174 M
Installing for dependencies:
mysql-community-client x86_64 5.7.37-1.el7 mysql57-community 25 M
mysql-community-common x86_64 5.7.37-1.el7 mysql57-community 311 k
Transaction Summary
===============================================================================================================================
Install 3 Packages (+2 Dependent packages)
Total download size: 203 M
Downloading packages:
warning: /var/cache/yum/x86_64/7/mysql57-community/packages/mysql-community-common-5.7.37-1.el7.x86_64.rpm: Header V4 RSA/SHA256 Signature, key ID 3a79bd29: NOKEY
Public key for mysql-community-common-5.7.37-1.el7.x86_64.rpm is not installed
(1/5): mysql-community-common-5.7.37-1.el7.x86_64.rpm | 311 kB 00:00:00
(2/5): mysql-community-libs-5.7.37-1.el7.x86_64.rpm | 2.4 MB 00:00:00
(3/5): mysql-community-libs-compat-5.7.37-1.el7.x86_64.rpm | 1.2 MB 00:00:00
(4/5): mysql-community-client-5.7.37-1.el7.x86_64.rpm | 25 MB 00:00:01
(5/5): mysql-community-server-5.7.37-1.el7.x86_64.rpm | 174 MB 00:00:02
------------------------------------------------------------------------------------------------------------------------------------------------------------------------------------------------
Total 63 MB/s | 203 MB 00:00:03
Retrieving key from file:///etc/pki/rpm-gpg/RPM-GPG-KEY-mysql
Importing GPG key 0x5072E1F5:
Userid : "MySQL Release Engineering <mysql-build@oss.oracle.com>"
Fingerprint: a4a9 4068 76fc bd3c 4567 70c8 8c71 8d3b 5072 e1f5
Package : mysql57-community-release-el7-9.noarch (@/mysql57-community-release-el7-9.noarch)
From : /etc/pki/rpm-gpg/RPM-GPG-KEY-mysql
***NOTE: If you are receiving a GPG error (circled below), that means the keys have expired.***
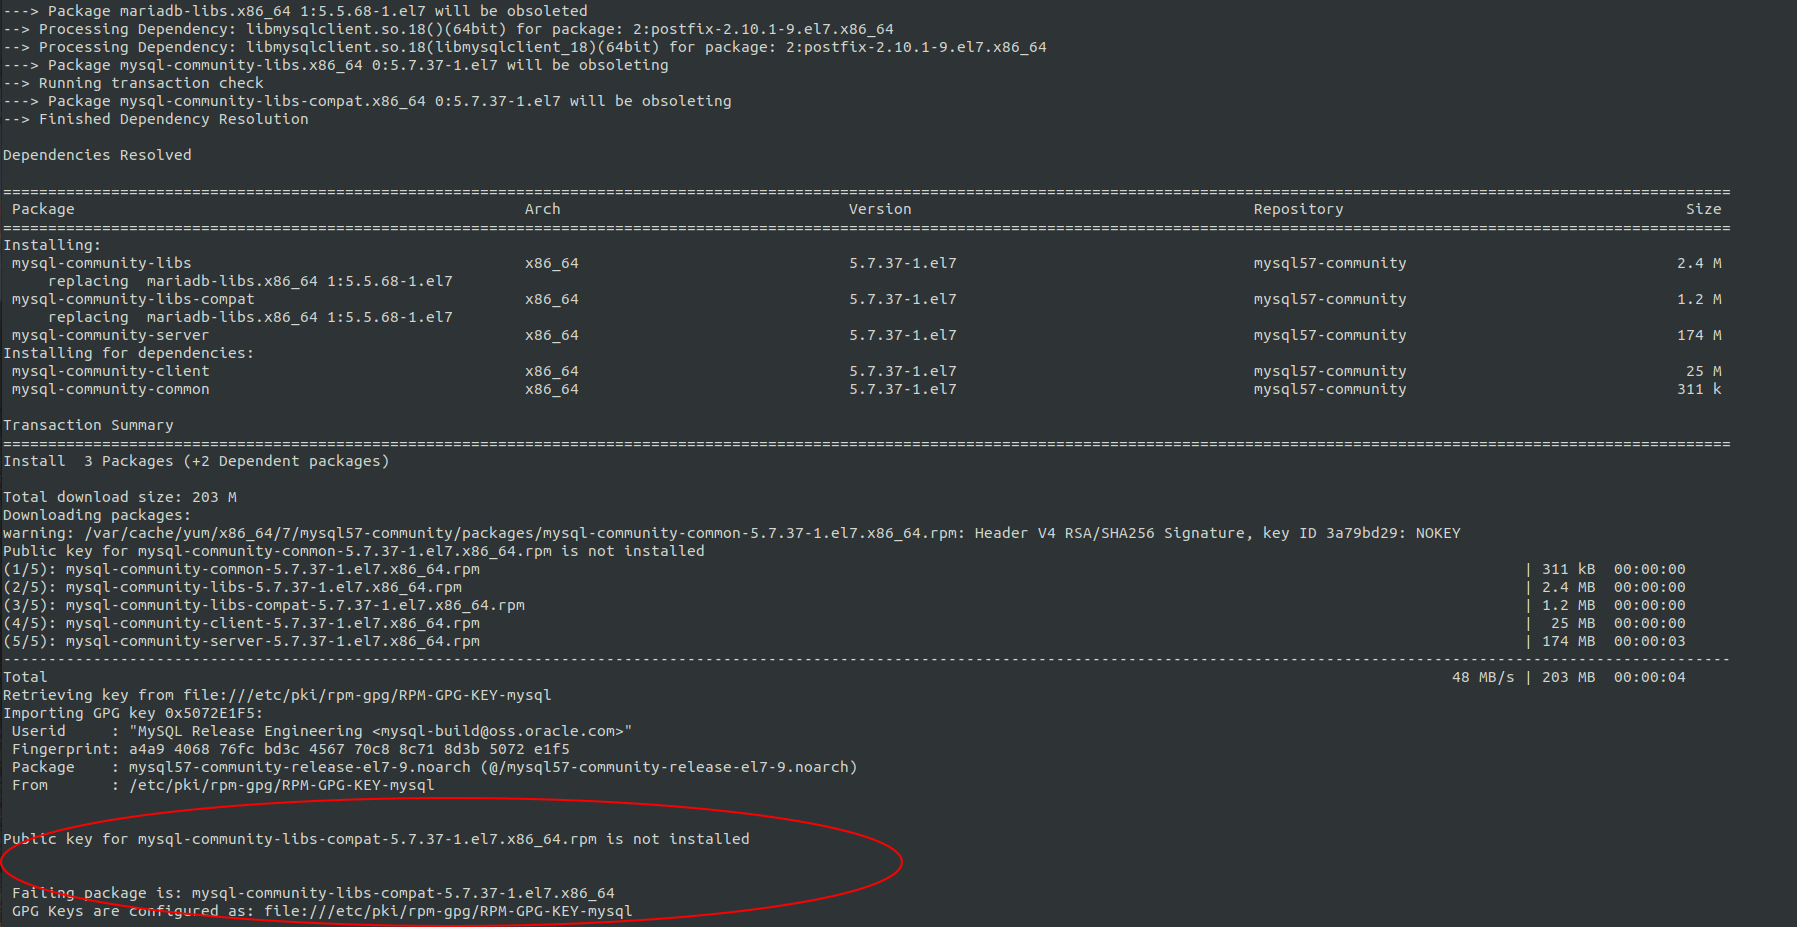
Photo by admingeek from Infotechys
Import the new GPG key and repeat the mysql-server install.
$ sudo rpm --import https://repo.mysql.com/RPM-GPG-KEY-mysql-2022
Then reinstall the mysql-server package.
$ sudo yum -y install mysql-server
To start the mysqld service, run the following command:
$ sudo systemctl start mysqld
To enable the mysqld service so that it automatically starts upon reboot, run the following:
$ sudo systemctl enable mysqld
During the initial startup of the mysqld.service, a temporary password is generated for the mysql root user and we can find it in the /var/log/mysqld.log.
					$ sudo systemctl start mysqld; sudo systemctl status mysqld
● mysqld.service - MySQL Server
Loaded: loaded (/usr/lib/systemd/system/mysqld.service; enabled; vendor preset: disabled)
Active: active (running) since Sun 2022-01-23 21:18:00 EST; 3s ago
Docs: man:mysqld(8)
http://dev.mysql.com/doc/refman/en/using-systemd.html
Process: 29168 ExecStart=/usr/sbin/mysqld --daemonize --pid-file=/var/run/mysqld/mysqld.pid $MYSQLD_OPTS (code=exited, status=0/SUCCESS)
Process: 29118 ExecStartPre=/usr/bin/mysqld_pre_systemd (code=exited, status=0/SUCCESS)
Main PID: 29171 (mysqld)
CGroup: /system.slice/mysqld.service
└─29171 /usr/sbin/mysqld --daemonize --pid-file=/var/run/mysqld/mysqld.pid

Jan 23 21:17:41 vm1.dev.infotechys.com systemd[1]: Starting MySQL Server...
Jan 23 21:18:00 vm1.dev.infotechys.com systemd[1]: Started MySQL Server.
Run the following grep command to display the temporary password. Your temporary password will be different from the one displayed (below). So make a note of it as you will need it for the next step.
					$ sudo grep password /var/log/mysqld.log
2022-01-24T02:17:46.056861Z 1 [Note] A temporary password is generated for root@localhost: L>S>h8BB.Agl
Run the following command to launch the MySQL server deployment security script:
$ sudo mysql_secure_installation
You will prompted to provide a password. Copy and paste your temporary password to continue and set a new password for the MySQL root user.
					Securing the MySQL server deployment.
Enter password for user root: L>S>h8BB.Agl
The existing password for the user account root has expired.
Please set a new password.
New password:
Re-enter new password:
The 'validate_password' plugin is installed on the server.
The subsequent steps will run with the existing configuration
of the plugin.
Using existing password for root.
For the section referring to password strength, you will be prompted to change your password again. This is the script’s way of making sure the password you set is strong enough (100). However, you’ve already set a new password so we will type No or any other key, and press ENTER to continue.
					Estimated strength of the password: 100
Change the password for root ? ((Press y|Y for Yes, any other key for No) : No
For the remaining prompts we will select Y and press ENTER to continue.
					Remove anonymous users? (Press y|Y for Yes, any other key for No) : Y
Success.
Disallow root login remotely.
					Normally, root should only be allowed to connect from
'localhost'. This ensures that someone cannot guess at
the root password from the network.
Disallow root login remotely? (Press y|Y for Yes, any other key for No) : Y
Success.
Remove the test database and all access to it.
					By default, MySQL comes with a database named 'test' that
anyone can access. This is also intended only for testing,
and should be removed before moving into a production
environment.
Remove test database and access to it? (Press y|Y for Yes, any other key for No) : Y
- Dropping test database...
Success.
- Removing privileges on test database...
Success.
Reload privileges tables to ensure all changes can take effect.
					Reloading the privilege tables will ensure that all changes
made so far will take effect immediately.
Reload privilege tables now? (Press y|Y for Yes, any other key for No) : Y
Success.
That’s it! You’ve successfully secured the MySQL server deployment.
Finally, run the following commands to test login with your new password and also verify the MySQL version installed.
					$ mysqladmin -u root -p version
Enter password:
mysqladmin Ver 8.42 Distrib 5.7.37, for Linux on x86_64
Copyright (c) 2000, 2022, Oracle and/or its affiliates.

Oracle is a registered trademark of Oracle Corporation and/or its
affiliates. Other names may be trademarks of their respective
owners.

Server version 5.7.37
Protocol version 10
Connection Localhost via UNIX socket
UNIX socket /var/lib/mysql/mysql.sock
Uptime: 1 hour 14 min 4 sec

Threads: 1 Questions: 11 Slow queries: 0 Opens: 113 Flush tables: 1 Open tables: 106 Queries per second avg: 0.002
Congrats!! You’ve successfully installed MySQL Server version 5.7 on your RHEL7 or CentOS7 machine. As part of this process, we resolved an issue with expired GPG keys. Was this article helpful to you? If so, let us know in the comments.
Related Posts
In this article, we will review how to install VMware Workstation Player on a RHEL7 or CentOS7 Linux machine, guiding you through the installation process

Installing RHEL7 or CentOS7 on a PC is fairly easy to do. In this tutorial, we will review the installation process step-by-step. Today’s focus will

In this article, we compare and contrast both container platforms and ultimately decide whether to docker or not to podman. Table of Contents Introduction When