Commands
In this tutorial, you will learn the process involved with building a docker registry. As part of this process, we will set up a web

If you’re a developer or IT professional looking to test and deploy Kubernetes applications, learn how to install Minikube on RHEL9 or CentOS9 with this step-by-step guide.
Minikube is an open-source tool that allows you to run Kubernetes clusters on your local machine. It is used for testing, development, and deployment of Kubernetes applications. Red Hat Enterprise Linux 9 (RHEL9) and CentOS 9 are the latest versions of the popular Linux distributions. In this article, we will guide you through the process of installing Minikube on RHEL9 or CentOS9. We will also cover the prerequisites and the installation steps in detail.
Minikube was created by Kubernetes community member Jonathan Johnson in 2016 at Google. Since then, it has become a popular tool for developers looking to develop and test Kubernetes applications locally. Minikube makes it easy to set up a local Kubernetes environment without the need for a full-scale cluster.
Before installing Minikube, there are a few prerequisites that need to be met. These include:
xorg-x11-xauth package is installed and X11 is forwarded on your machine.Follow these steps to install Minikube on RHEL9 or CentOS9:
First, let’s enable the docker repository:
$ sudo dnf config-manager --add-repo https://download.docker.com/linux/centos/docker-ce.repo
You can install Docker using the following command:
					$ sudo dnf install docker-ce --nobest -y
Docker CE Stable - x86_64                                                                                                      20 kB/s |  19 kB     00:00
Dependencies resolved.
==============================================================================================================================================================
 Package                                        Architecture                Version                               Repository                             Size
==============================================================================================================================================================
Installing:
 docker-ce                                      x86_64                      3:23.0.1-1.el9                        docker-ce-stable                       23 M
Installing dependencies:
 containerd.io                                  x86_64                      1.6.18-3.1.el9                        docker-ce-stable                       32 M
     replacing  runc.x86_64 4:1.1.4-1.el9_1
 docker-ce-cli                                  x86_64                      1:23.0.1-1.el9                        docker-ce-stable                      7.0 M
 docker-ce-rootless-extras                      x86_64                      23.0.1-1.el9                          docker-ce-stable                      3.8 M
Installing weak dependencies:
 docker-buildx-plugin                           x86_64                      0.10.2-1.el9                          docker-ce-stable                       12 M
 docker-compose-plugin                          x86_64                      2.16.0-1.el9                          docker-ce-stable                       11 M
 docker-scan-plugin                             x86_64                      0.23.0-3.el9                          docker-ce-stable                      3.8 M

Transaction Summary
==============================================================================================================================================================
Install  7 Packages

Total download size: 93 M
Downloading Packages:
(1/7): docker-buildx-plugin-0.10.2-1.el9.x86_64.rpm                                                                           5.0 MB/s |  12 MB     00:02
(2/7): docker-ce-23.0.1-1.el9.x86_64.rpm                                                                                      5.7 MB/s |  23 MB     00:04
(3/7): containerd.io-1.6.18-3.1.el9.x86_64.rpm                                                                                4.9 MB/s |  32 MB     00:06
(4/7): docker-ce-rootless-extras-23.0.1-1.el9.x86_64.rpm                                                                      1.2 MB/s | 3.8 MB     00:03
(5/7): docker-ce-cli-23.0.1-1.el9.x86_64.rpm                                                                                  1.9 MB/s | 7.0 MB     00:03
(6/7): docker-compose-plugin-2.16.0-1.el9.x86_64.rpm                                                                          4.8 MB/s |  11 MB     00:02
(7/7): docker-scan-plugin-0.23.0-3.el9.x86_64.rpm                                                                             1.8 MB/s | 3.8 MB     00:02
--------------------------------------------------------------------------------------------------------------------------------------------------------------
Total                                                                                                                          10 MB/s |  93 MB     00:09
Docker CE Stable - x86_64                                                                                                     9.2 kB/s | 1.6 kB     00:00
Importing GPG key 0x621E9F35:
 Userid     : "Docker Release (CE rpm) <docker@docker.com>"
 Fingerprint: 060A 61C5 1B55 8A7F 742B 77AA C52F EB6B 621E 9F35
 From       : https://download.docker.com/linux/centos/gpg
Key imported successfully
Running transaction check
Transaction check succeeded.
Running transaction test
Transaction test succeeded.
Running transaction
  Preparing        :                                                                                                                                      1/1
  Installing       : docker-scan-plugin-0.23.0-3.el9.x86_64                                                                                               1/8
  Running scriptlet: docker-scan-plugin-0.23.0-3.el9.x86_64                                                                                               1/8
  Installing       : docker-compose-plugin-2.16.0-1.el9.x86_64
...output omitted...
Start and enable the Docker service:
					$ sudo systemctl start docker

$ sudo systemctl enable docker
Created symlink /etc/systemd/system/multi-user.target.wants/docker.service → /usr/lib/systemd/system/docker.service.
Run a quick status check to verify docker is running:
					$ sudo systemctl status docker
● docker.service - Docker Application Container Engine
     Loaded: loaded (/usr/lib/systemd/system/docker.service; enabled; vendor preset: disabled)
     Active: active (running) since Mon 2023-03-13 22:21:13 EDT; 42s ago
TriggeredBy: ● docker.socket
       Docs: https://docs.docker.com
   Main PID: 28820 (dockerd)
      Tasks: 8
     Memory: 28.4M
        CPU: 622ms
     CGroup: /system.slice/docker.service
             └─28820 /usr/bin/dockerd -H fd:// --containerd=/run/containerd/containerd.sock
Next, ensure kubectl is installed. There are two ways we can achieve this:
To enable the Kubernetes repository, open a file called kubernetes.repo under /etc/yum.repos.d/ directory using vim or you’re favorite text editor.
$ sudo vim /etc/yum.repos.d/kubernetes.repo
Copy and paste the following into the file:
					[kubernetes]
name=Kubernetes
baseurl=https://packages.cloud.google.com/yum/repos/kubernetes-el7-x86_64
enabled=1
gpgcheck=1
repo_gpgcheck=1
gpgkey=https://packages.cloud.google.com/yum/doc/yum-key.gpg https://packages.cloud.google.com/yum/doc/rpm-package-key.gpg
exclude=kubelet kubeadm kubectl
Save and quit the file, then install the kubectl package.
$ sudo dnf install -y kubectl --nobest
The --nobest option tells dnf not to automatically select the “best” package to install based on dependencies, but instead install the specific version that matches the package name.
First, download the kubectl binary using curl:
$ sudo curl -LO "https://dl.k8s.io/release/$(curl -L -s https://dl.k8s.io/release/stable.txt)/bin/linux/amd64/kubectl"
Then, install it with the following command:
$ sudo install -o root -g root -m 0755 kubectl /usr/local/bin/kubectl
Verify the kubectl package is installed and operational by running the following command:
					$ kubectl version --output=yaml
clientVersion:
  buildDate: "2023-02-22T13:39:03Z"
  compiler: gc
  gitCommit: fc04e732bb3e7198d2fa44efa5457c7c6f8c0f5b
  gitTreeState: clean
  gitVersion: v1.26.2
  goVersion: go1.19.6
  major: "1"
  minor: "26"
  platform: linux/amd64
kustomizeVersion: v4.5.7
This should display the version of kubectl that you just installed. Now that you have installed kubectl, you can use it to interact with your Kubernetes cluster.
Now that we have ensured that Docker and Kubectl is installed on our machine, we can proceed with the minikube install:
You can download the latest version of Minikube using the following command:
$ curl -LO https://storage.googleapis.com/minikube/releases/latest/minikube-linux-amd64
Then, you need to make the binary executable using the following command:
$ sudo chmod +x minikube-linux-amd64
Finally, move the binary to the /usr/local/bin directory using the following command:
$ sudo mv minikube-linux-amd64 /usr/local/bin/minikube
Start Minikube using the following command:
					$ minikube start

😄  minikube v1.29.0 on Redhat 9.1 (kvm/amd64)
✨  Automatically selected the podman driver. Other choices: none, ssh
📌  Using Podman driver with root privileges
👍  Starting control plane node minikube in cluster minikube
🚜  Pulling base image ...
💾  Downloading Kubernetes v1.26.1 preload ...
    > preloaded-images-k8s-v18-v1...:  397.05 MiB / 397.05 MiB  100.00% 28.68 M
    > gcr.io/k8s-minikube/kicbase...:  407.19 MiB / 407.19 MiB  100.00% 15.40 M
🔥  Creating podman container (CPUs=2, Memory=2200MB) ...
🐳  Preparing Kubernetes v1.26.1 on Docker 20.10.23 ...
    ▪ Generating certificates and keys ...
    ▪ Booting up control plane ...
    ▪ Configuring RBAC rules ...
🔗  Configuring bridge CNI (Container Networking Interface) ...
    ▪ Using image gcr.io/k8s-minikube/storage-provisioner:v5
🔎  Verifying Kubernetes components...
🌟  Enabled addons: default-storageclass, storage-provisioner
🏄  Done! kubectl is now configured to use "minikube" cluster and "default" namespace by default
The installation can take several minutes to complete depending on your machine.
Finally, use kubectl to verify minikube is installed and running properly:
					$ kubectl cluster-info
Kubernetes control plane is running at https://192.168.49.2:8443
CoreDNS is running at https://192.168.49.2:8443/api/v1/namespaces/kube-system/services/kube-dns:dns/proxy

To further debug and diagnose cluster problems, use 'kubectl cluster-info dump
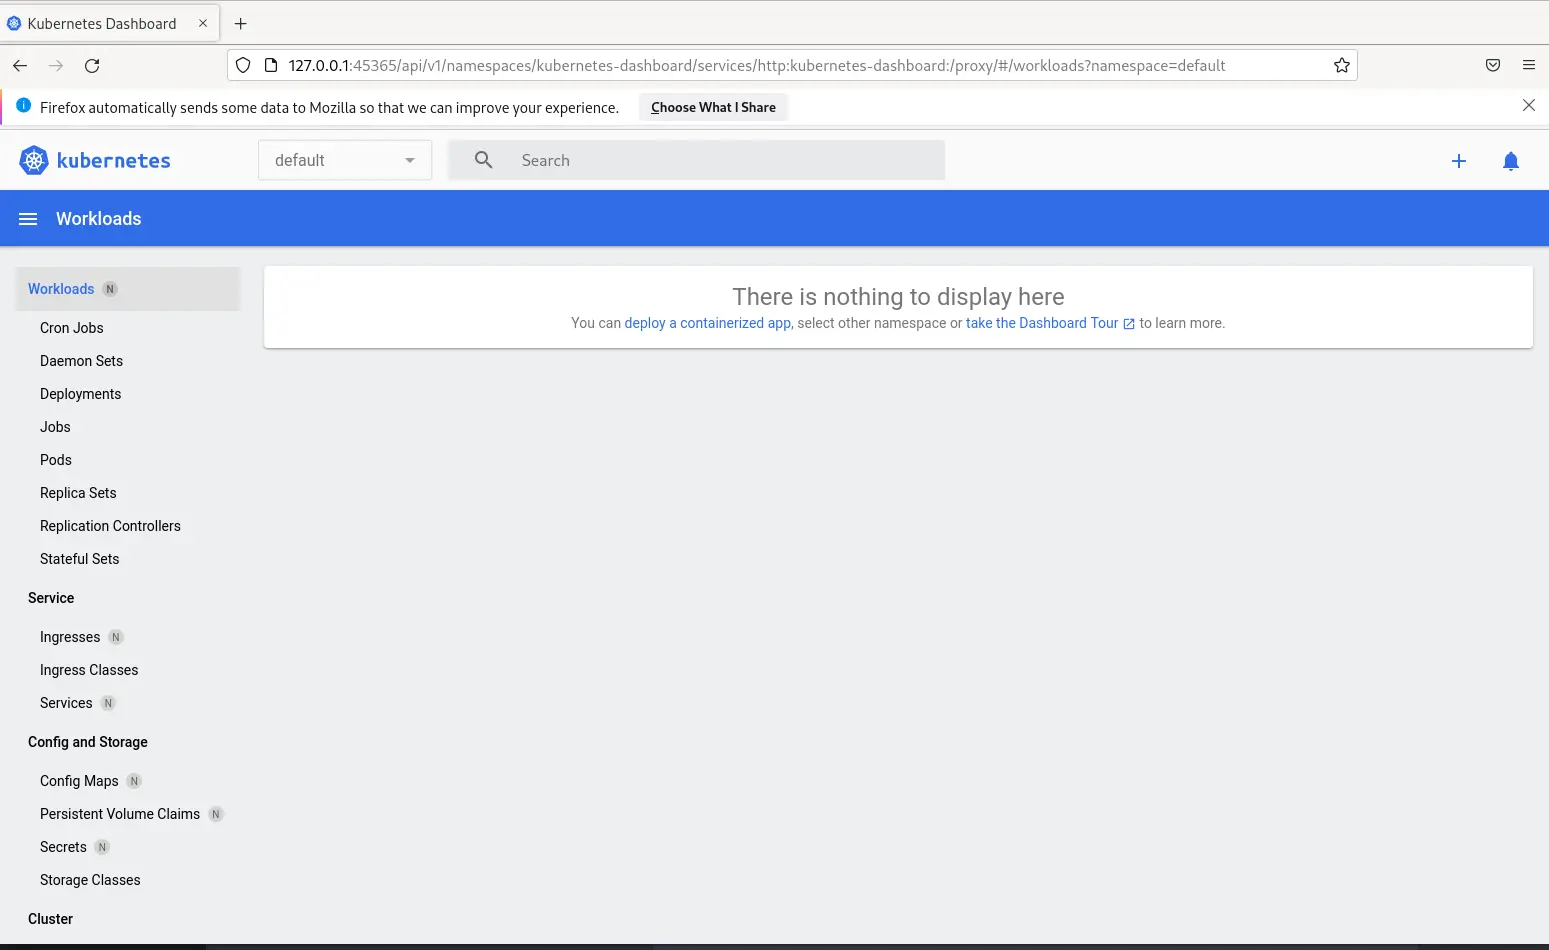
Minikube also provides a web-based dashboard that you can use to manage your Kubernetes cluster. To access the dashboard, run the following command:
					$ minikube dashboard
🔌  Enabling dashboard ...
    ▪ Using image docker.io/kubernetesui/dashboard:v2.7.0
    ▪ Using image docker.io/kubernetesui/metrics-scraper:v1.0.8
  Verifying dashboard health ...
🚀  Launching proxy ...
🤔  Verifying proxy health ...
...output omitted...
This command will open a web browser and launch the Kubernetes dashboard. You can use the dashboard to manage your resources.
Here are some best practices to keep in mind when working with Minikube:
Minikube is a powerful tool for testing and developing Kubernetes applications on your local machine. In this article, we have provided a step-by-step guide for installing Minikube on RHEL9 or CentOS9, including prerequisites such as Docker and kubectl.
Minikube allows you to develop and test your Kubernetes applications locally before deploying them to a production environment. It’s important to keep in mind that Minikube is not designed for use in production environments, so it’s important to use it only for testing and development purposes.
By following the best practices outlined in this article, you can ensure that your Minikube environment is stable, secure, and reliable. Was this guide helpful in getting you started with Minikube on RHEL9 or CentOS9? If so, leave us a comment below and share this page!
Related Posts
In this tutorial, you will learn the process involved with building a docker registry. As part of this process, we will set up a web
Discover how Linux in Cloud Computing and DevOps is revolutionizing the way businesses manage their IT infrastructure, offering unparalleled scalability, customization, and security. Table of
In this tutorial, we will review the Kubernetes cluster install on CentOS8. This procedure will mirror our previous article about this subject. Install a Kubernetes