
HOWTO
In this article, we will examine installing and using Gitlab on Ubuntu server version 20.04. Gitlab community edition or Gitlab CE can be installed by


Learn how to install GitLab CE on RHEL 9 or CentOS 9 using Ansible roles. This comprehensive guide covers prerequisites, creating Ansible roles, executing playbooks, and setting up SSL for a secure GitLab instance. Streamline your DevOps workflow with automation and maintainability!
GitLab Community Edition (CE) is a powerful web-based DevOps tool that provides Git repository management, CI/CD features, issue tracking, and more. In this blog post, we’ll guide you through installing GitLab CE on RHEL 9 or CentOS 9 using Ansible roles, ensuring a smooth and automated setup. This approach not only simplifies the installation process but also maintains consistency across environments, making it perfect for DevOps practices.
Using Ansible for installing GitLab CE offers several benefits:
Prerequisites |
Before you start, make sure you have:
sudo privileges./etc/hosts file:
					# Gitlab
192.168.1.21 	ansible.dev.naijalabs.net    # Replace with your actual hostname and IP address
192.168.1.7 	gitlab.dev.naijalabs.net     # Replace with your actual hostname and IP address
For demonstration purposes, we’ve configured our Linux nodes as follows:
| Hostname | RAM | Cores | OS |
| ansible.dev.naijalabs.net (control) | 4 | 2 | Red Hat Enterprise Linux release 9.4 (Plow) |
| gitlab.dev.naijalabs.net (target) | 4 | 2 | Red Hat Enterprise Linux release 9.4 (Plow) |
To install Ansible (on your control node), use the following command:
$ sudo dnf install ansible -y
Ansible roles allow you to organize your playbooks and tasks effectively. A role can include tasks, handlers, variables, files, templates, and more. For this installation, we will create a role specifically for GitLab.
Setting Up Your Ansible Environment |
$ mkdir -p ~/ansible-gitlab && cd ~/ansible-gitlab
$ ansible-galaxy init gitlab
This command will create a directory structure like this:
					gitlab/
├── README.md
├── tasks
│   └── main.yml
├── handlers
│   └── main.yml
├── vars
│   └── main.yml
├── defaults
│   └── main.yml
└── templates
Creating Ansible Roles |
Edit the tasks/main.yml File:
Here’s how you can configure the tasks for installing GitLab CE.
					---
# tasks file for GitLab
- name: Install necessary packages
  dnf:
    name:
      - curl
      - policycoreutils
      - openssh-server
      - perl
      - python3-cryptography
      - postfix
    state: present

- name: Enable and start SSH service
  systemd:
    name: sshd
    state: started
    enabled: true

# Configure GitLab Repository
- name: Configure GitLab Repository
  ansible.builtin.shell: |
    curl -sS https://packages.gitlab.com/install/repositories/gitlab/gitlab-ce/script.rpm.sh | sudo bash
  changed_when: false

- name: Create SSL directory
  file:
    path: /etc/gitlab/ssl
    state: directory
    mode: '0755'

- name: Generate private key
  community.crypto.openssl_privatekey:
    path: "/etc/gitlab/ssl/{{ fqdn }}.key"
    type: RSA
    size: 2048
    state: present

- name: Generate self-signed certificate and private key
  shell: |
    openssl req -x509 -nodes -days 365 \
      -newkey rsa:2048 \
      -keyout /etc/gitlab/ssl/{{ fqdn }}.key \
      -out /etc/gitlab/ssl/{{ fqdn }}.crt \
      -subj "/CN={{ fqdn }}"

  args:
    creates: "/etc/gitlab/ssl/{{ fqdn }}.crt"

# Install GitLab CE
- name: Install GitLab CE
  dnf:
    name: gitlab-ce
    state: latest

- name: Reconfigure GitLab
  command: gitlab-ctl reconfigure
  async: 10
  poll: 0

- name: Open firewall ports 80 and 443
  firewalld:
    port: "{{ item }}"
    permanent: yes
    state: enabled
  with_items:
    - "80/tcp"     # HTTP port
    - "443/tcp"    # HTTPS/SSL port for Apache
  notify:
    - Reload firewalld

- name: Set SELinux boolean for httpd_can_network_connect
  command: sudo setsebool -P httpd_can_network_connect 1

- name: Set SELinux boolean for nis_enabled
  command: sudo setsebool -P nis_enabled 1
In the handlers/main.yml, add the following to manage GitLab services:
					---
# handlers file for gitlab
- name: restart gitlab
  systemd:
    name: gitlab-runsvdir
    state: restarted

- name: Reload firewalld
  service:
    name: firewalld
    state: reloaded
If you want to customize your GitLab installation, set up variables in the vars/main.yml file.
					---
# vars file for gitlab
gitlab_external_url: 'https://gitlab.dev.naijalabs.net'
fqdn: 'gitlab.dev.naijalabs.net'
Now that we have our role ready, we can create a playbook to run the GitLab installation.
Create a Playbook File |
Create a file named gitlab_install.yml:
					---
- hosts: all
  become: yes
  roles:
    - gitlab
Run the Playbook |
Execute the playbook with the following command:
$ ansible-playbook -i hosts gitlab_install.yml -K
Here, hosts is your inventory file where you specify the IP addresses or hostnames of your target servers.
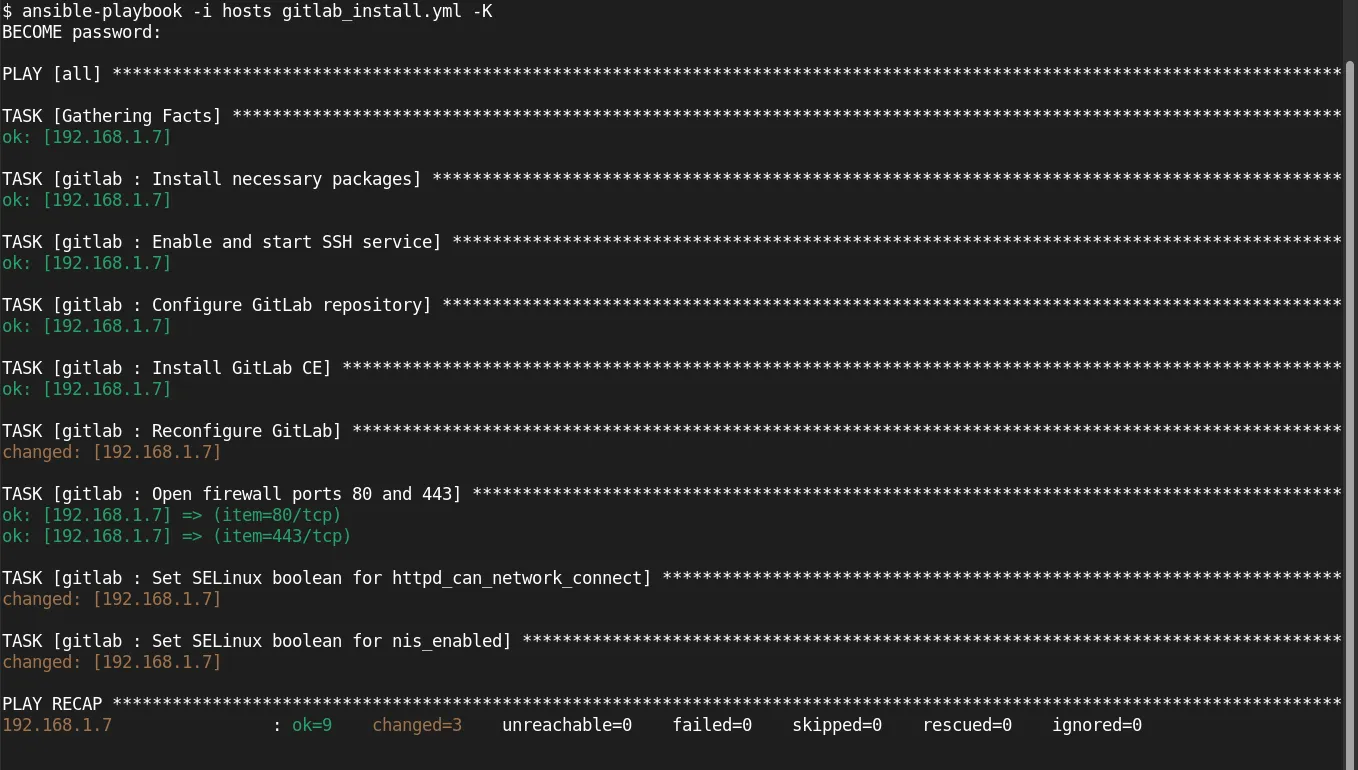
Photo by admingeek from Infotechys
hosts):
					[gitlab]
your_server_ip ansible_ssh_user=your_user
Our setup looks like this (below):
					[gitlab]
192.168.1.7 ansible_ssh_user=admin
Access GitLab |
Open your web browser and navigate to http://gitlab.dev.naijalabs.net or <server-ip-address>. You should see the GitLab welcome page.
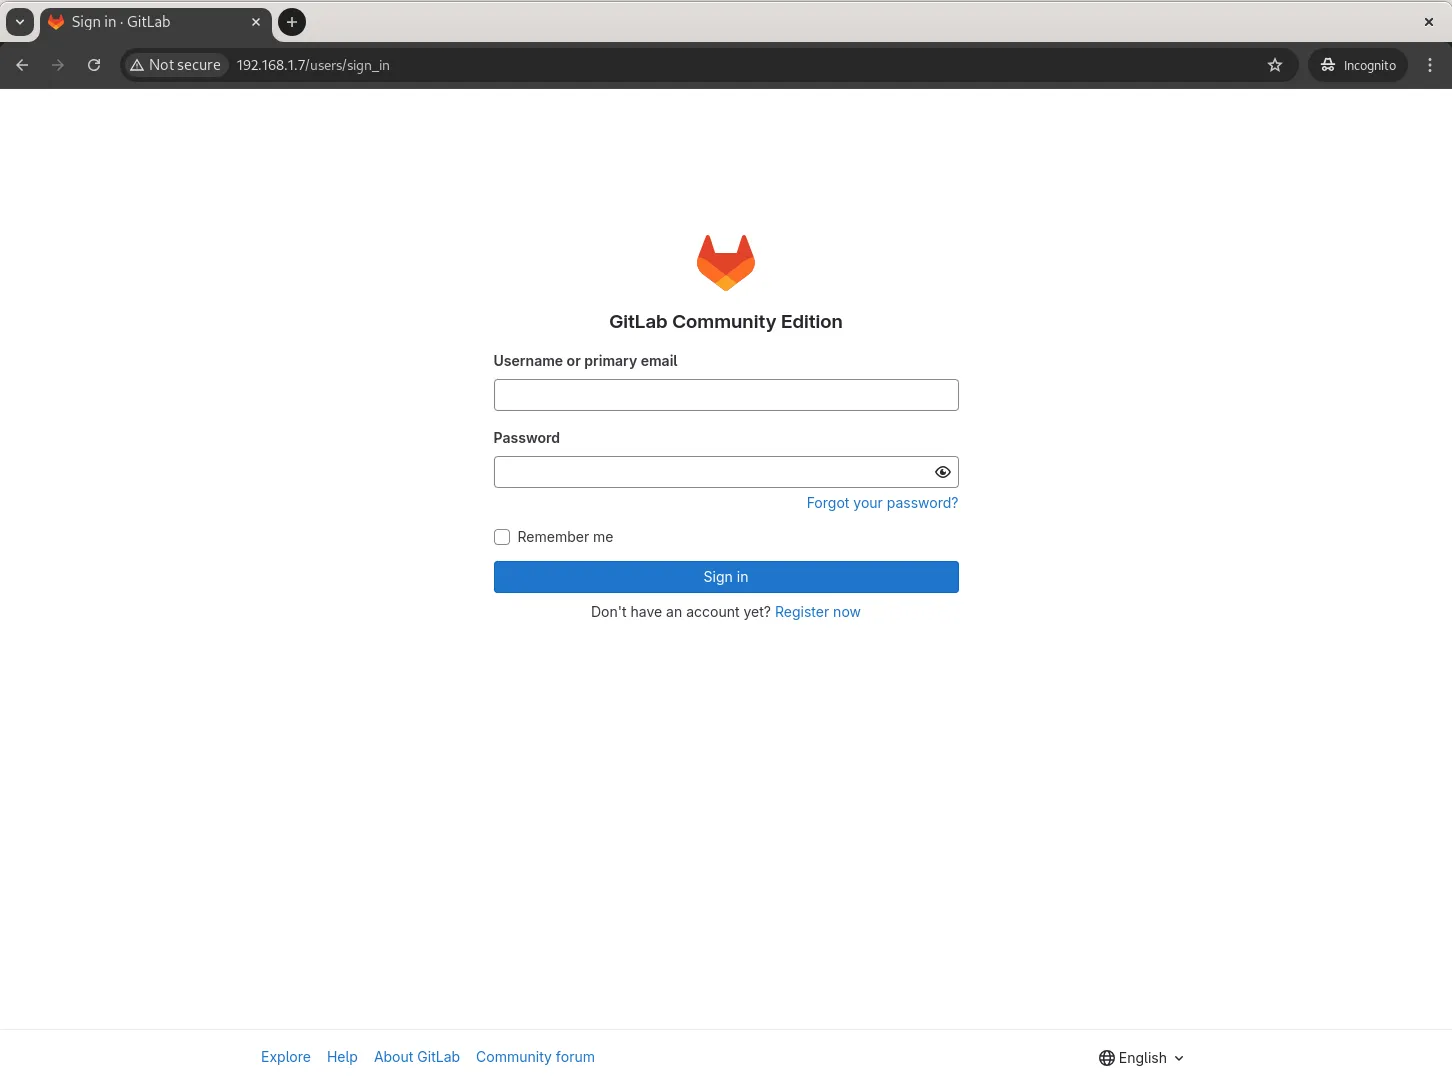
Photo by admingeek from Infotechys
Set Up GitLab Admin Account |
During the first login, you will be prompted to set up an admin password. Make sure to keep it secure. Your initial login credentials are located in the /etc/gitlab/initial_root_password file for the root user. You can also reset the root password with the following command:
$ sudo gitlab-rake "gitlab:password:reset[root]"
Configure Email Notifications (Optional) |
Modify the configuration in /etc/gitlab/gitlab.rb to set up email notifications. After making changes, run gitlab-ctl reconfigure to apply them.
SSL Configuration (Optional) |
For production environments, it’s advisable to use HTTPS. You can configure Let’s Encrypt or your own SSL certificates in the gitlab.rb file.
					external_url 'https://gitlab.dev.naijalabs.net'
letsencrypt['enable'] = true
In the bonus section below, we outline the steps for configuring SSL on your GitLab instance.
Setting up SSL for your GitLab installation is essential for protecting your data and enhancing security. You can use Let’s Encrypt for free SSL certificates or use your own certificates. Below, we’ll cover both methods.
Option 1: Using Let’s Encrypt |
Using your preferred text editor, open the GitLab configuration file:
$ sudo vim /etc/gitlab/gitlab.rb
Locate the external_url line and change it to use HTTPS:
external_url 'https://gitlab.dev.naijalabs.net'
Enable Let’s Encrypt by adding the following lines:
					letsencrypt['enable'] = true
letsencrypt['contact_emails'] = ['your_email@example.com']  # Change this to your email
After updating the configuration, run the following command to apply the changes:
$ sudo gitlab-ctl reconfigure
Open your web browser and navigate to https://gitlab.dev.naijalabs.net. You should see the GitLab login page with a secure connection indicator.
Option 2: Using Custom SSL Certificates |
If you prefer to use your own SSL certificates, follow these steps:
If you don’t already have SSL certificates, you can generate them or purchase them from a certificate authority (CA). Make sure you have the following files:
your_domain.crt: Your SSL certificate.your_domain.key: Your private key.ca_bundle.crt: Intermediate certificate if required by your CA.Copy your SSL certificate files to the GitLab configuration directory:
					$ sudo cp your_domain.crt /etc/gitlab/ssl/
$ sudo cp your_domain.key /etc/gitlab/ssl/
If using an intermediate certificate, also copy it:
$ sudo cp ca_bundle.crt /etc/gitlab/ssl/
Open the GitLab configuration file:
$ sudo vi /etc/gitlab/gitlab.rb
Set the external_url to use HTTPS:
external_url 'https://gitlab.dev.naijalabs.net'
Configure the paths to your SSL certificate and key:
					nginx['ssl_certificate'] = "/etc/gitlab/ssl/your_domain.crt"
nginx['ssl_certificate_key'] = "/etc/gitlab/ssl/your_domain.key"
(Include ca_bundle.crt if required.)
Run the following command to apply your SSL configuration:
$ sudo gitlab-ctl reconfigure
Open your web browser and navigate to https://gitlab.dev.naijalabs.net to ensure that SSL is working correctly.
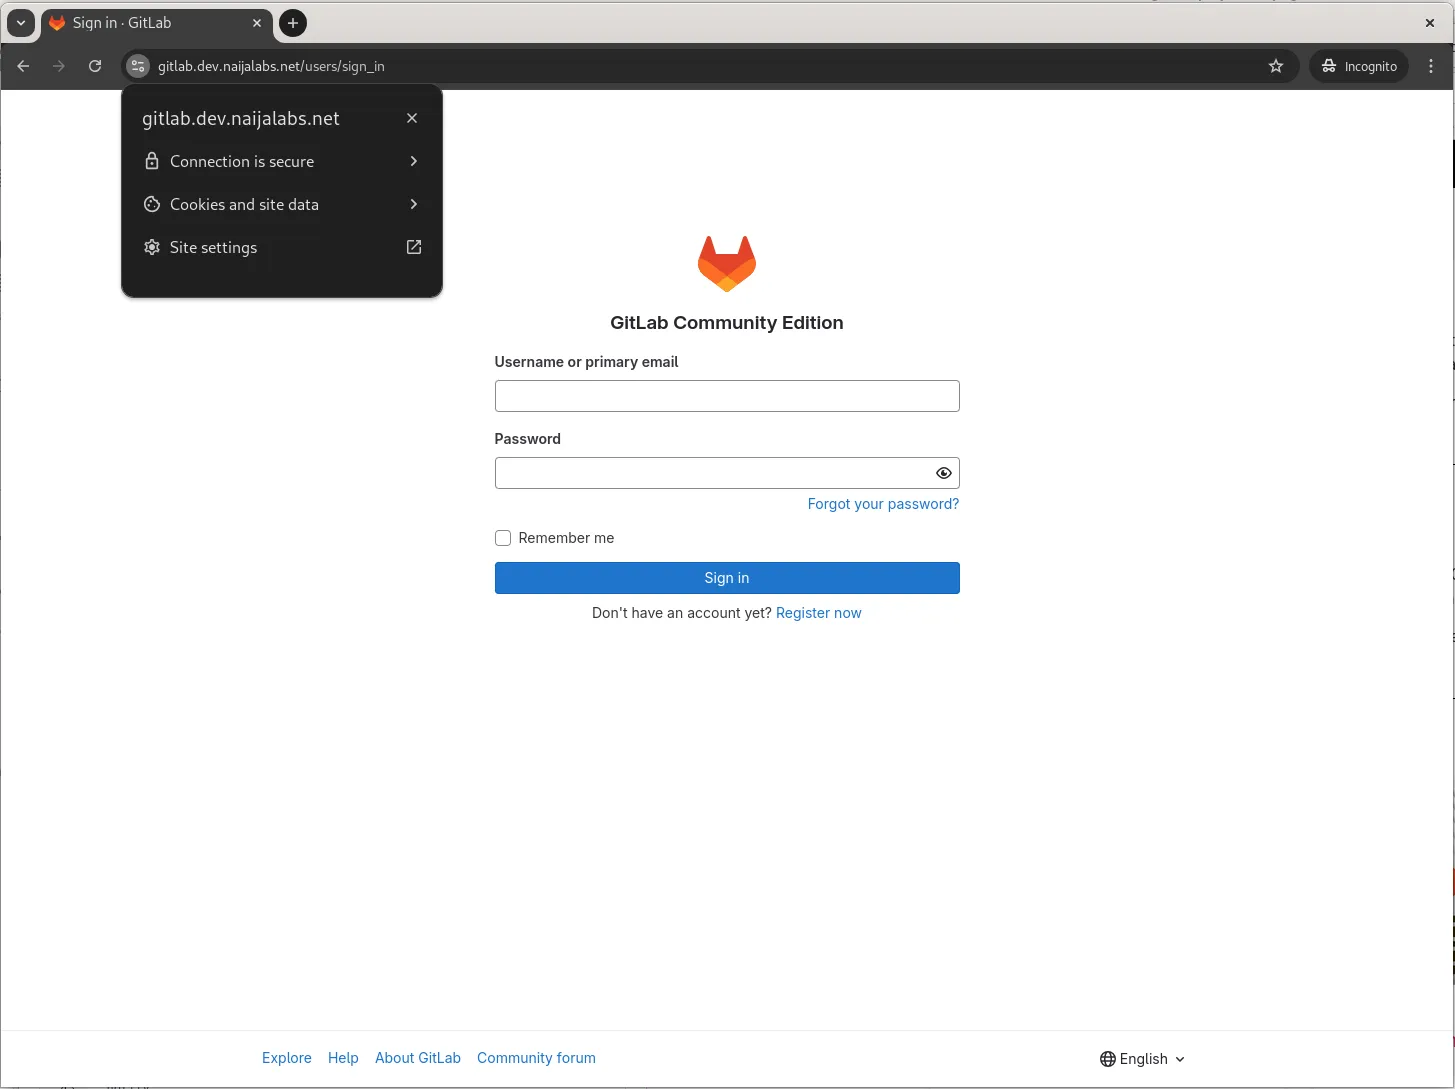
Photo by admingeek from Infotechys
If you want to enhance security further, you can customize NGINX settings in the GitLab configuration file by adding:
					nginx['ssl_protocols'] = "TLSv1.2 TLSv1.3"
nginx['ssl_ciphers'] = "HIGH:!aNULL:!MD5"
These settings ensure that only strong encryption protocols are used.
Setting up SSL for your GitLab CE installation is crucial for maintaining data security and integrity. Whether you choose Let’s Encrypt for a hassle-free, automatic solution or use your own certificates, securing your GitLab instance helps safeguard sensitive information.
Make sure to test your SSL setup after configuration and monitor it regularly to ensure continued security.
By following the steps outlined in this guide, you’ve successfully installed GitLab CE on RHEL 9 or CentOS 9 using Ansible roles. This method not only simplifies the installation process but also aligns with modern DevOps practices, ensuring a consistent and scalable deployment.
Did you find this article useful? Your feedback is invaluable to us! Please feel free to share your thoughts in the comments section below.
In this article, we will examine installing and using Gitlab on Ubuntu server version 20.04. Gitlab community edition or Gitlab CE can be installed by

In this article, we will review the top 10 most commonly used Git commands. You can’t call yourself a competent DevOps Engineer or IT professional

Learn how to effortlessly install GitLab CE on your RHEL 9 or CentOS 9 system with our comprehensive guide. Follow our step-by-step instructions for a