Commands
In today’s article, we will review the step-by-step process involved with a Kubernetes cluster install on Ubuntu server version 20.04. However, this procedure will work

In this guide, we’ll walk you through the process of deploying WordPress on Kubernetes, leveraging its benefits to ensure your website runs smoothly and efficiently.
In the fast-paced realm of website management, the quest for a scalable, reliable, and efficient platform is never-ending. Enter Kubernetes – the revolutionary container orchestration tool that has transformed the way we deploy, manage, and scale applications in modern IT environments.
Kubernetes, often abbreviated as K8s, is an open-source container orchestration platform originally developed by Google and now maintained by the Cloud Native Computing Foundation (CNCF). At its core, Kubernetes automates the deployment, scaling, and management of containerized applications, providing a unified platform for orchestrating workloads across a cluster of machines.
We configured our kubernetes cluster with the following settings:
| master node | master.localdomain |
| No. of worker nodes | 3 (wk1.localdomain, wk2.localdomain, wk3.localdomain) |
| RAM | 4 GB |
| Cores | 2 |
| Docker Version | Docker version 25.0.1, build 29cf629 |
| Kubectl Version | { “clientVersion”: { “major”: “1”, “minor”: “29”, “gitVersion”: “v1.29.1”, “gitCommit”: “bc401b91f2782410b3fb3f9acf43a995c4de90d2”, “gitTreeState”: “clean”, “buildDate”: “2024-01-17T15:51:03Z”, “goVersion”: “go1.21.6”, “compiler”: “gc”, “platform”: “linux/amd64” }, “kustomizeVersion”: “v5.0.4-0.20230601165947-6ce0bf390ce3” } |
| Kubernetes Version | v1.28.3 |
| Operating System (OS) Images | Debian GNU/Linux 11 (bullseye) |
Imagine Kubernetes as the conductor of a symphony orchestra, meticulously coordinating each instrument to create a harmonious melody. Similarly, Kubernetes orchestrates the various components of your WordPress application – from the web server to the database – ensuring they work in concert to deliver a seamless user experience.
At its essence, Kubernetes abstracts away the complexities of infrastructure management, allowing you to focus on what truly matters – building and maintaining your WordPress website. Whether you’re a seasoned developer or a novice user, Kubernetes offers a level playing field for deploying WordPress applications, democratizing access to enterprise-grade infrastructure capabilities.
Now, let’s delve into the nitty-gritty of deploying WordPress on Kubernetes and unleash the power of cloud-native hosting for your website.
Before deploying WordPress, you need to have a Kubernetes cluster up and running. You can choose from various Kubernetes distributions like Minikube for local development or managed services like Google Kubernetes Engine (GKE), Amazon Elastic Kubernetes Service (EKS), or Azure Kubernetes Service (AKS) for production environments.
					[admin@master wordpress-deployment]$ cat <<EOF >./kustomization.yaml
secretGenerator:
- name: mysql-pass
  literals:
  - password=YOUR_PASSWORD
EOF
WordPress relies on a database to store its content and configuration. We’ll start by deploying a MySQL database on Kubernetes. Below is an example YAML manifest for deploying MySQL:
					apiVersion: v1
kind: Service
metadata:
  name: wordpress-mysql
  labels:
    app: wordpress
spec:
  ports:
    - port: 3306
  selector:
    app: wordpress
    tier: mysql
  clusterIP: None
---
apiVersion: v1
kind: PersistentVolumeClaim
metadata:
  name: mysql-pv-claim
  labels:
    app: wordpress
spec:
  accessModes:
    - ReadWriteOnce
  resources:
    requests:
      storage: 5Gi
---
apiVersion: apps/v1
kind: Deployment
metadata:
  name: wordpress-mysql
  labels:
    app: wordpress
spec:
  selector:
    matchLabels:
      app: wordpress
      tier: mysql
  strategy:
    type: Recreate
  template:
    metadata:
      labels:
        app: wordpress
        tier: mysql
    spec:
      containers:
      - image: mysql:8.0
        name: mysql
        env:
        - name: MYSQL_ROOT_PASSWORD
          valueFrom:
            secretKeyRef:
              name: mysql-pass
              key: password
        - name: MYSQL_DATABASE
          value: wordpress
        - name: MYSQL_USER
          value: wordpress
        - name: MYSQL_PASSWORD
          valueFrom:
            secretKeyRef:
              name: mysql-pass
              key: password
        ports:
        - containerPort: 3306
          name: mysql
        volumeMounts:
        - name: mysql-persistent-storage
          mountPath: /var/lib/mysql
      volumes:
      - name: mysql-persistent-storage
        persistentVolumeClaim:
          claimName: mysql-pv-claim
This deployment is setting up a MySQL database for a WordPress application in a Kubernetes cluster. It consists of three main components: a Service, a PersistentVolumeClaim, and a Deployment.
The Service wordpress-mysql exposes port 3306 for MySQL communication and selects pods with the labels app: wordpress and tier: mysql. The PersistentVolumeClaim mysql-pv-claim requests 5Gi of storage with ReadWriteOnce access mode to store MySQL data persistently.
The Deployment wordpress-mysql ensures the desired state of the MySQL pods, pulling the mysql:8.0 image, setting environment variables for database configuration, and mounting persistent storage for data storage at /var/lib/mysql.
Copy and paste the contents above to a file called mysql.yaml (or your preferred name).
With the MySQL database running, we can now deploy WordPress. Below is an example YAML manifest for deploying WordPress with NGINX Ingress:
					apiVersion: v1
kind: Service
metadata:
  name: wordpress
  labels:
    app: wordpress
spec:
  ports:
    - port: 80
  selector:
    app: wordpress
    tier: frontend
  type: LoadBalancer
---
apiVersion: v1
kind: PersistentVolumeClaim
metadata:
  name: wp-pv-claim
  labels:
    app: wordpress
spec:
  accessModes:
    - ReadWriteOnce
  resources:
    requests:
      storage: 5Gi
---
apiVersion: apps/v1
kind: Deployment
metadata:
  name: wordpress
  labels:
    app: wordpress
spec:
  selector:
    matchLabels:
      app: wordpress
      tier: frontend
  strategy:
    type: Recreate
  template:
    metadata:
      labels:
        app: wordpress
        tier: frontend
    spec:
      containers:
      - image: wordpress:6.2.1-apache
        name: wordpress
        env:
        - name: WORDPRESS_DB_HOST
          value: wordpress-mysql
        - name: WORDPRESS_DB_PASSWORD
          valueFrom:
            secretKeyRef:
              name: mysql-pass
              key: password
        - name: WORDPRESS_DB_USER
          value: wordpress
        ports:
        - containerPort: 80
          name: wordpress
        volumeMounts:
        - name: wordpress-persistent-storage
          mountPath: /var/www/html
      volumes:
      - name: wordpress-persistent-storage
        persistentVolumeClaim:
          claimName: wp-pv-claim
This deployment is setting up a WordPress application in a Kubernetes cluster. It consists of three main components: a Service, a PersistentVolumeClaim (PVC), and a Deployment.
The Service named “wordpress” exposes port 80 for external access and selects pods with the labels app: wordpress and tier: frontend. The PVC named “wp-pv-claim” requests 5Gi of storage with ReadWriteOnce access mode to persistently store WordPress data.
The Deployment named “wordpress” ensures the desired state of the WordPress pods, pulling the wordpress:6.2.1-apache image, setting environment variables for database configuration, and mounting persistent storage for data storage at /var/www/html.
Copy and paste the contents above to a file called wordpress.yaml (or your preferred name).
Once you’ve created the MySQL and WordPress YAML files, along with the kustomization file, your working directory should resemble the following (below):
					[admin@master wordpress-deployment]$ ls -lh
total 12K
-rw-r--r--. 1 admin admin   74 Feb  3 17:40 kustomization.yaml
-rw-r--r--. 1 admin admin 1.5K Feb  3 17:43 mysql.yaml
-rw-r--r--. 1 admin admin 1.4K Feb  3 17:43 wordpress.yaml
Now copy and paste the following (below) to your command-line to add the resource entries to the kustomization file.
					[admin@master wordpress-deployment]$ cat <<EOF >>./kustomization.yaml
resources:
  - mysql.yaml
  - wordpress.yaml
EOF
The contents of the kustomization.yaml file should resemble what is displayed below:
					[admin@master wordpress-deployment]$ cat kustomization.yaml
secretGenerator:
- name: mysql-pass
  literals:
  - password=YOUR_PASSWORD
resources:
  - mysql.yaml
  - wordpress.yaml
Now let’s deploy the kustomization.yaml with the following command:
$ kubectl apply -k ./
					secret/mysql-pass-df44tkf8t9 created
service/wordpress created
service/wordpress-mysql created
persistentvolumeclaim/mysql-pv-claim created
persistentvolumeclaim/wp-pv-claim created
deployment.apps/wordpress created
deployment.apps/wordpress-mysql created
Check the running status of the pods with the following command:
$ kubectl get pods
					NAME                               READY   STATUS              RESTARTS   AGE
wordpress-cd74ffcf-2gz2v           0/1     ContainerCreating   0          2m25s
wordpress-mysql-86f59dbdd7-h6tmx   1/1     Running             0          2m25s
Check and verify the status of the PVCs using this command. As you can see (below), the persistent volumes are bound and dynamically provisioned.
$ kubectl get pvc
					NAME             STATUS   VOLUME                                     CAPACITY   ACCESS MODES   STORAGECLASS   AGE
mysql-pv-claim   Bound    pvc-06040cc7-20e9-49c6-8940-d7657fb303a7   5Gi        RWO            standard       3m50s
wp-pv-claim      Bound    pvc-6087efab-efab-492a-b46e-d9c6e249bf10   5Gi        RWO            standard       3m50s
In addition, check the status of the secret to ensure it was generated successfully (as shown below):
					$ kubectl get secret
NAME                    TYPE     DATA   AGE
mysql-pass-df44tkf8t9   Opaque   1      13m
Check the status of the wordpress service:
$ kubectl get services wordpress
					NAME        TYPE           CLUSTER-IP      EXTERNAL-IP       PORT(S)        AGE
wordpress   LoadBalancer   10.128.80.159   139.144.240.166   80:31552/TCP   5m13s
The wordpress service is running and provides information (EXTERNAL-IP address: 139.144.240.166) we will need to view our website. Simply enter the URL http://<your-external-IP> to launch the WordPress installation page.
Rest assured that if you encounter pending instances, there’s no cause for alarm. It’s normal for all components to take a few minutes to become operational. Feel free to take a break, enjoy a coffee, or grab a quick snack, and return shortly.
However, if your deployments remain pending for more than 15-20 minutes, it’s advisable to consider allocating additional system resources, such as RAM or cores, to your worker nodes. Alternatively, you can explore deploying WordPress on a Minikube cluster, which is better suited for running test deployments and may provide a smoother experience.
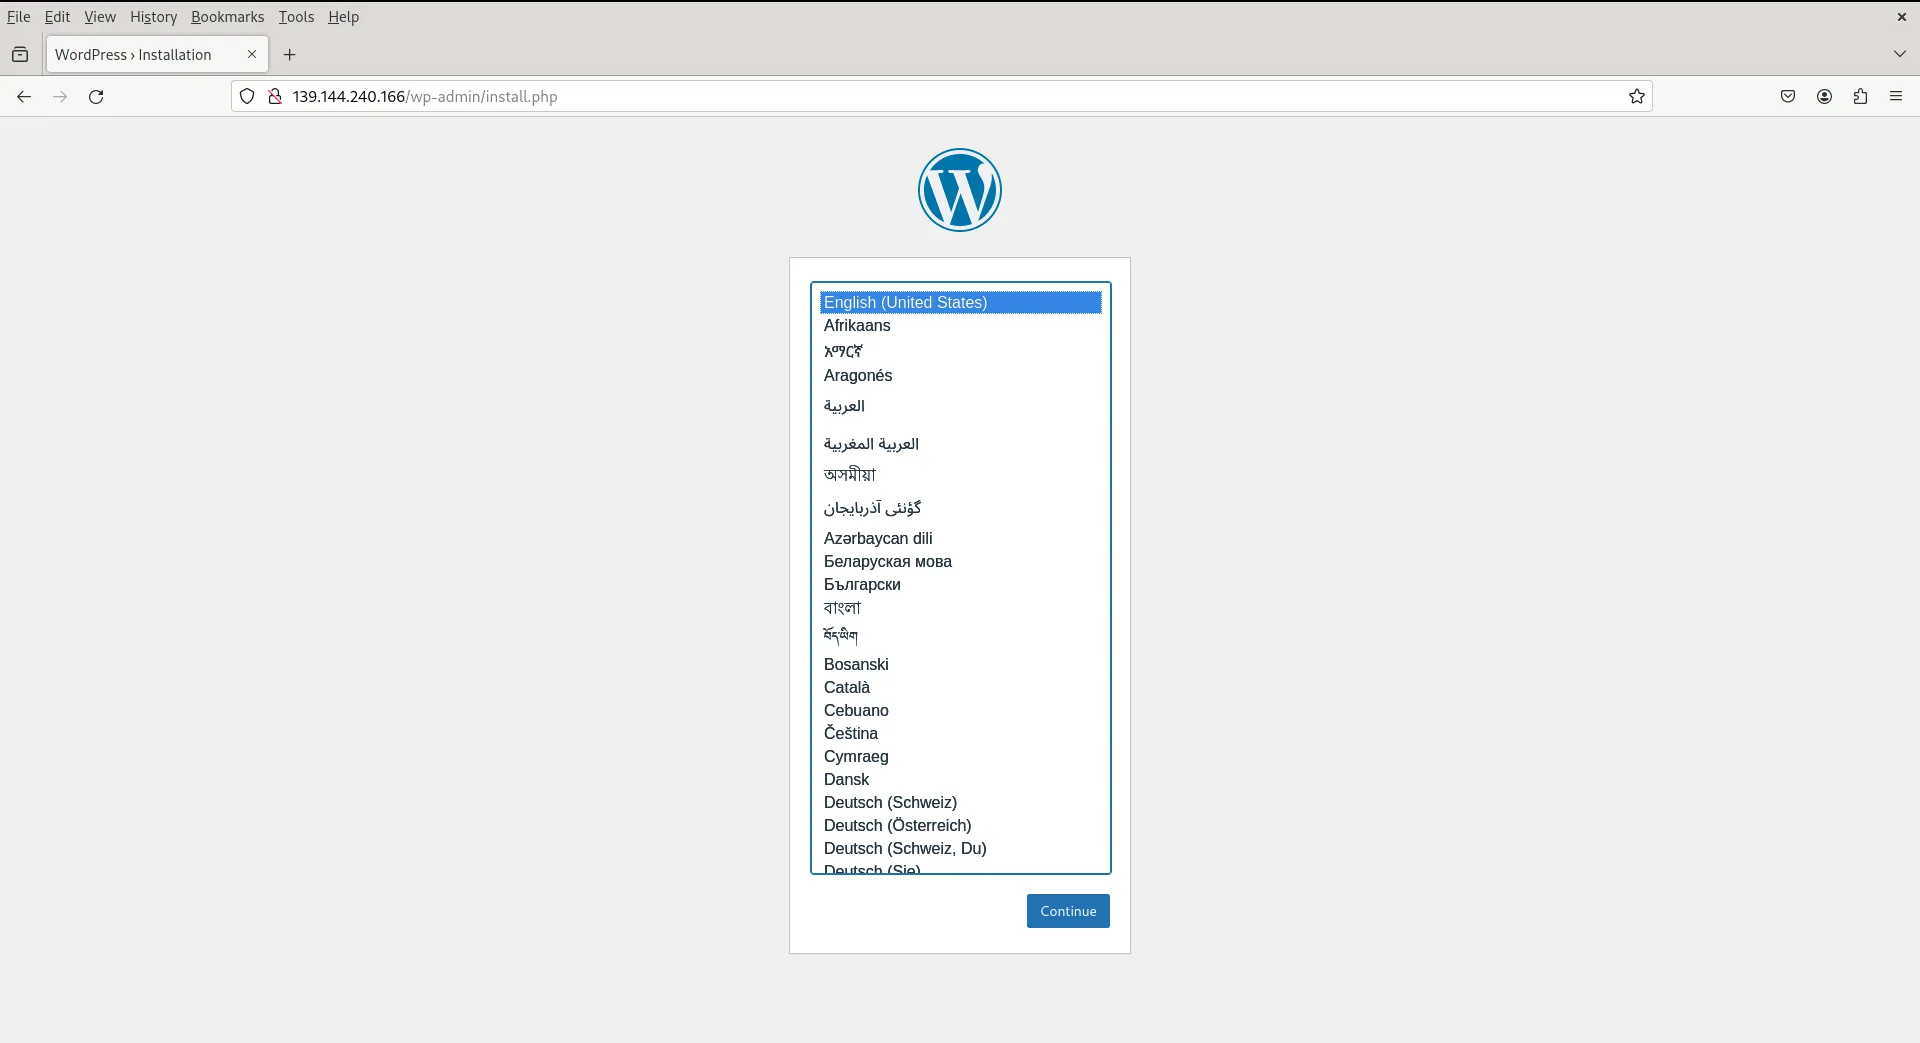
Photo by admingeek from Infotechys
Well done! Your WordPress site has been successfully deployed on Kubernetes. Now, you can move forward with configuring your WordPress site or execute the command below to remove your deployments and deploy something else!
$ kubectl delete -k ./
Deploying WordPress on Kubernetes offers numerous benefits, including scalability, resilience, and ease of management. By following the steps outlined in this guide, you can set up a robust WordPress environment that can handle the demands of your website while ensuring high availability and performance.
Did you find this article useful? Your feedback is invaluable to us! Please feel free to share your thoughts in the comments section below.
Related Posts
In today’s article, we will review the step-by-step process involved with a Kubernetes cluster install on Ubuntu server version 20.04. However, this procedure will work
Are you looking to set up a Kubernetes development environment with Vagrant quickly and efficiently? Look no further! In this guide, we’ll walk through how
In this tutorial, we will review the Kubernetes cluster install on CentOS8. This procedure will mirror our previous article about this subject. Install a Kubernetes