
HOWTO
Learn how to secure SSH with Ansible and protect your Linux systems from unauthorized access with this step-by-step guide. Table of Contents IntroductionAnsible is a


Learn how to automate server provisioning with Ansible. This comprehensive guide covers everything from installing Ansible to writing playbooks and best practices for automation.
In today’s fast-paced IT world, efficient and reliable server provisioning is essential. The days of manually configuring servers, setting up environments, and ensuring consistency are long gone. Enter Ansible, an open-source automation tool that simplifies IT infrastructure management. With Ansible, you can automate server provisioning, reducing errors, saving time, and boosting scalability.
In this post, we will dive deep into how to automate server provisioning using Ansible, providing practical examples, step-by-step instructions, and insights into best practices.
Ansible is an open-source automation tool used to automate configuration management, application deployment, and task execution across a variety of systems. What sets Ansible apart is its simplicity and ease of use. It doesn’t require an agent to be installed on the target servers, and it uses simple YAML files, known as playbooks, to define automation tasks.
Ansible operates on a client-server model where the control node (the machine running Ansible) communicates with the managed nodes (the servers to be provisioned).
Key Features of Ansible |
Automating server provisioning provides several benefits:
| Benefit | Description |
|---|---|
| Consistency | Ensures all your servers are set up exactly the same way, reducing configuration drift. |
| Speed | Deploy new servers or environments faster than with manual configurations. |
| Scalability | Easily scale your infrastructure up or down by provisioning or decommissioning servers with minimal effort. |
| Reliability | Automation minimizes human error and reduces the chances of misconfigurations. |
| Cost-Efficiency | Reduces the need for manual intervention, freeing up time for other tasks. |
By automating server provisioning with Ansible, you also pave the way for Continuous Integration and Continuous Deployment (CI/CD) pipelines, making it easier to manage environments in a repeatable and consistent manner.
The process of automating server provisioning with Ansible involves several key steps, including installing Ansible, creating playbooks, and running them against your infrastructure. Let’s break this down.
Step 1: Installing Ansible |
Ansible is available for multiple operating systems. Here’s how you can install it:
For Ubuntu/Debian-based systems:
sudo apt update -y && sudo apt install ansible -y
For CentOS systems:
sudo yum install epel-release -y && sudo yum install ansible -y
For CentOS 8+ systems:
For CentOS 8 or higher releases:
sudo dnf install epel-release -y && sudo dnf install ansible -y
For RHEL systems:
sudo yum install https://dl.fedoraproject.org/pub/epel/epel-release-latest-$(rpm -E %rhel).noarch.rpm -y && sudo yum install ansible -y
For RHEL 8+ systems:
For RHEL 8 or higher releases:
sudo dnf install https://dl.fedoraproject.org/pub/epel/epel-release-latest-$(rpm -E %rhel).noarch.rpm -y && sudo dnf install ansible -y
For macOS:
brew install ansible
Run the following command to verify the installation:
ansible --version
Step 2: Setting Up Your Inventory File |
In Ansible, the inventory file defines the list of servers (hosts) that will be managed. This can be a simple text file where each host is listed. You can define groups of servers, making it easier to apply:
Example Inventory File (hosts.ini): |
					[web_servers]
web-srv1.example.com
web-srv2.example.com
web-srv3.example.com

[db_servers]
db-srv1.example.com
db-srv2.example.com
db-srv3.example.com
Step 3: Writing an Ansible Playbook |
Ansible playbooks are written in YAML (Yet Another Markup Language), a human-readable format that specifies a a set of tasks to be executed. Playbooks contain plays, and each play targets a set of hosts and defines tasks to be executed.
Example Playbook (server_provisioning.yml): |
					---
- name: Provisioning Web Servers
  hosts: web_servers
  become: yes

  tasks:
    - name: Install Apache web server
      apt:
        name: apache2
        state: present

    - name: Start Apache service
      service:
        name: apache2
        state: started
        enabled: yes
This playbook will install Apache on all servers listed under the web_servers group and ensure the service is started and enabled at boot.
Step 4: Running the Playbook |
To run a playbook, you use the ansible-playbook command:
ansible-playbook -i hosts.ini server_provisioning.yml
If everything is set up correctly, Ansible will connect to the target servers and execute the tasks defined in the playbook.
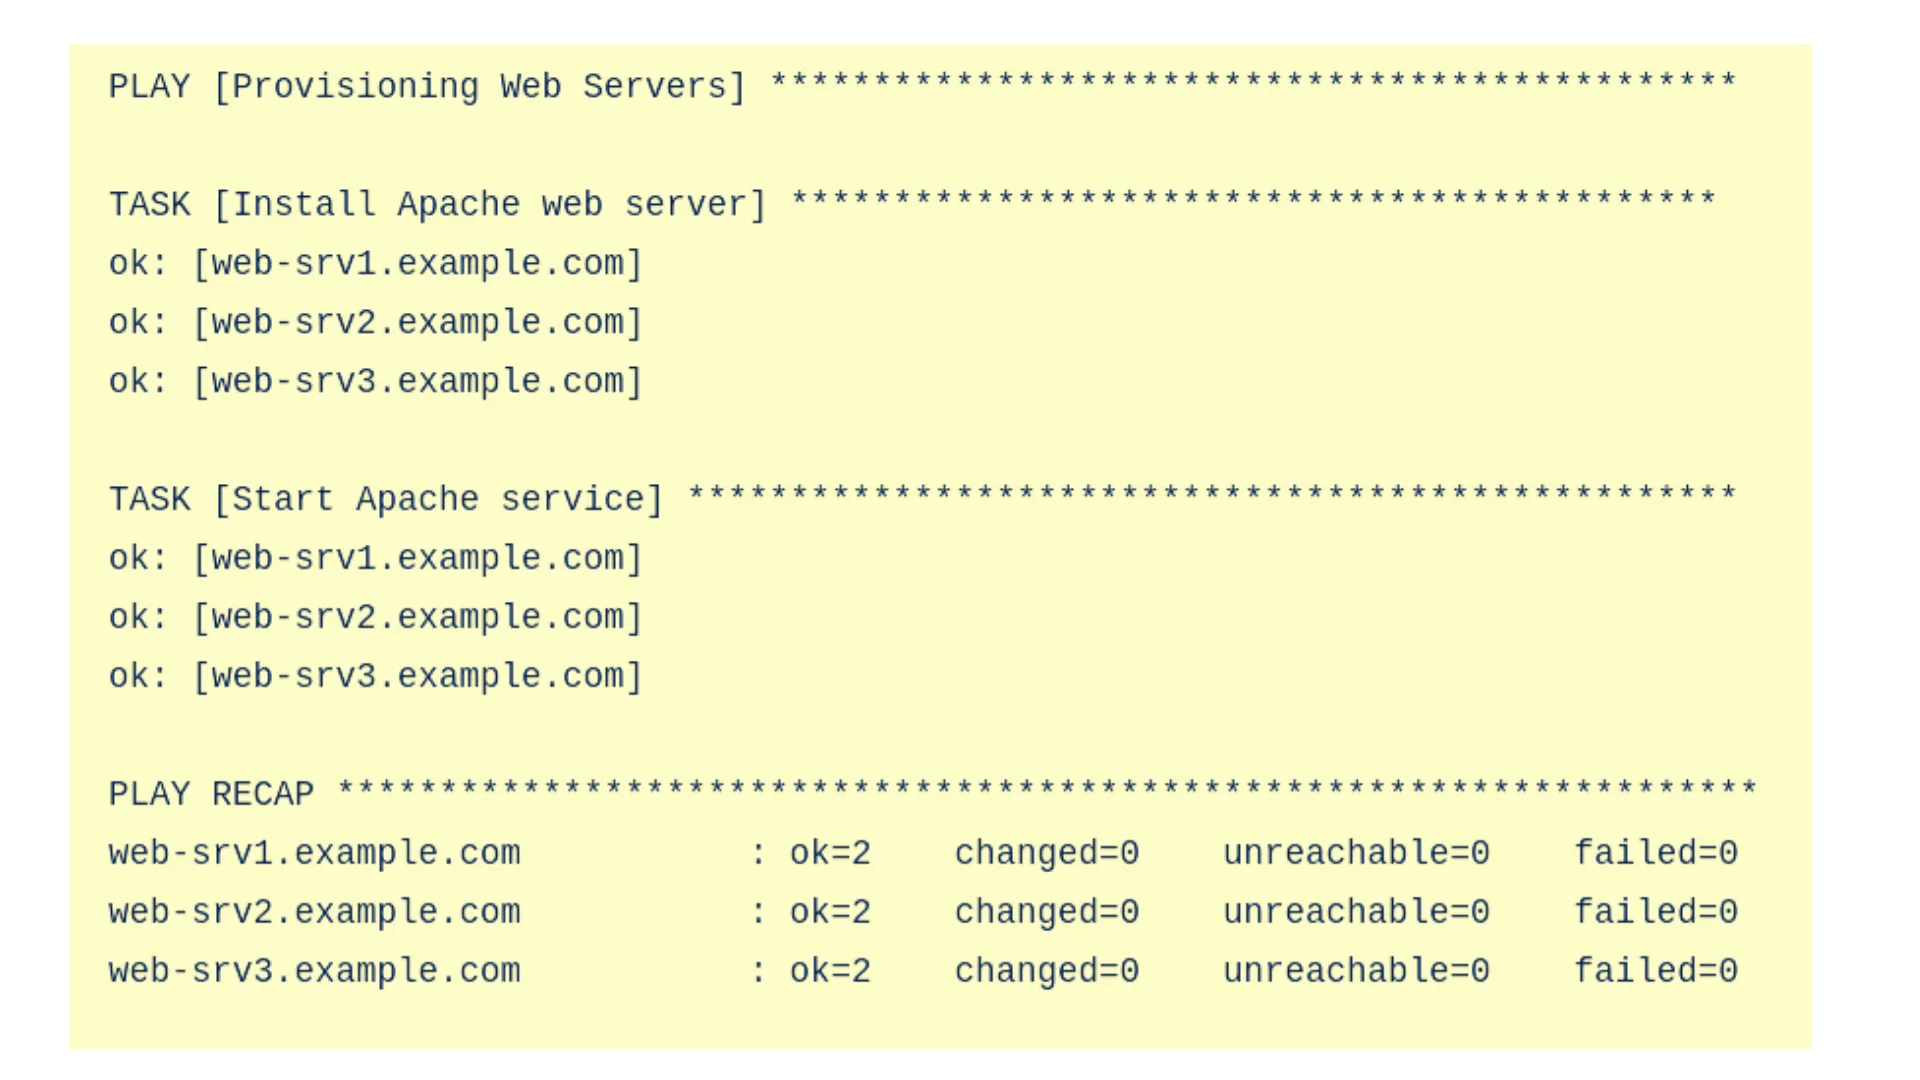
Photo by admingeek from Infotechys
Step 5: Using Variables for Dynamic Provisioning |
In real-world scenarios, you may want to make your playbooks more flexible. Ansible allows you to use variables to define dynamic values that can be reused across multiple tasks.
Example Playbook Using Variables: |
					---
- name: Provisioning Web Servers with Dynamic Variables
  hosts: web_servers
  become: yes
  vars:
    apache_package: apache2
    apache_service: apache2

  tasks:
    - name: Install Apache web server
      apt:
        name: "{{ apache_package }}"
        state: present

    - name: Start Apache service
      service:
        name: "{{ apache_service }}"
        state: started
        enabled: yes
Step 6: Advanced Server Provisioning: Configuring Databases |
Let’s take server provisioning a step further by configuring a database server. This is a more advanced example but gives a clear understanding of how Ansible can automate a variety of server configurations.
Example Playbook for Database Server Provisioning (db_provisioning.yml): |
					---
- name: Provision Database Servers
  hosts: db_servers
  become: yes
  vars:
    mysql_root_password: "your_root_password"  # Define your password variable here, or pass it at runtime.

  tasks:
    - name: Install MySQL Server
      apt:
        name: mysql-server
        state: present

    - name: Start MySQL service
      service:
        name: mysql
        state: started
        enabled: yes

    - name: Set up root password
      mysql_user:
        name: root
        password: "{{ mysql_root_password }}"
        host_all: yes
        state: present
In this example (above):
Step 7: Creating a Complete Server Provisioning Workflow |
To fully automate server provisioning, you’ll often need to combine multiple roles. Ansible uses roles to organize playbooks into reusable components. This way, you can split tasks into smaller units, improving modularity and reusability.
Example Project Directory Structure: |
					server_provisioning/
├── roles/
│   ├── apache/
│   │   ├── tasks/
│   │   │   └── main.yml
│   │   ├── handlers/
│   │   │   └── main.yml
│   │   └── vars/
│   │       └── main.yml
│   └── mysql/
│       ├── tasks/
│       │   └── main.yml
│       ├── handlers/
│       │   └── main.yml
│       └── vars/
│           └── main.yml
├── tasks/
│   └── main.yml
└── site.yml
Step 8: Best Practices for Server Provisioning with Ansible |
To ensure you’re getting the most out of Ansible, follow these best practices:
| Best Practice | Description |
|---|---|
| Use Version Control | Store your playbooks in a Git repository to track changes and roll back when necessary. |
| Test in Staging | Always test your playbooks in a staging environment before deploying to production. |
| Avoid Hardcoding | Use variables and templates to keep your playbooks flexible and maintainable. |
| Keep Playbooks Simple | Organize your playbooks logically and break them into smaller roles and tasks for easier management. |
| Use Ansible Vault | For sensitive information (like passwords), use Ansible Vault to encrypt variables and ensure security. |
Automating server provisioning with Ansible is an effective way to streamline infrastructure management and ensure consistency across environments. From setting up web servers to configuring databases. Ansible enables system administrators to automate repetitive tasks with ease, saving time and reducing errors. By following the steps outlined in this post, you can begin automating your server provisioning workflows, leading to a more efficient, scalable, and reliable IT infrastructure.
Did you find this article useful? Your feedback is invaluable to us! Please feel free to share this post and your thoughts in the comments section below.
Learn how to secure SSH with Ansible and protect your Linux systems from unauthorized access with this step-by-step guide. Table of Contents IntroductionAnsible is a

In this article, we will examine 10 ways to speed up your Ansible Playbooks, providing actionable strategies and examples to optimize performance and streamline automation

Learn how to install GitLab CE on RHEL 9 or CentOS 9 using Ansible roles. This comprehensive guide covers prerequisites, creating Ansible roles, executing playbooks, and