Commands
Learn how to implement SSL on FreeIPA servers to secure communication channels. This comprehensive guide covers obtaining, installing, and verifying SSL certificates, along with troubleshooting

Learn how to configure SSL for Splunk Enterprise on RHEL 9 or CentOS 9. This detailed guide covers certificate generation, secure web interface setup, and SSL forwarding configuration for maximum security.
Securing your Splunk Enterprise deployment is crucial, especially when dealing with sensitive data and enterprise-level monitoring. One of the most effective ways to do this is by enabling SSL (Secure Sockets Layer), ensuring encrypted communications between clients and servers.
In this guide, you’ll learn how to configure SSL for Splunk Enterprise on RHEL 9 and CentOS 9, step by step. We’ll walk through generating SSL certificates, configuring Splunk Web and Splunkd for HTTPS, and verifying the setup.
This guide assumes you have Splunk Enterprise already installed and running on RHEL 9 or CentOS 9.
Before configuring SSL on Splunk Enterprise, ensure you have the following:
|
|
|
|
|
For production, use a certificate from a trusted Certificate Authority (CA). For testing, you can create a self-signed certificate using OpenSSL.
🧪 Create Self-Signed Certificates |
					# Navigate to Splunk's SSL directory
cd /opt/splunk/etc/auth/

# Generate private key
openssl genrsa -out mySplunk.key 2048

# Generate CSR (Certificate Signing Request)
openssl req -new -key mySplunk.key -out mySplunk.csr \
  -subj "/C=US/ST=YourState/L=YourCity/O=YourOrg/OU=IT/CN=your.domain.com"

# Generate self-signed certificate
openssl x509 -req -days 365 -in mySplunk.csr -signkey mySplunk.key -out mySplunk.pem
|
|
Splunk Web runs on port 8000 by default. To enable SSL:
🧪 Edit |
sudo vim /opt/splunk/etc/system/local/web.conf
Add or update the following entries:
					[settings]
enableSplunkWebSSL = true
serverCert = /opt/splunk/etc/auth/mySplunk.pem
privKeyPath = /opt/splunk/etc/auth/mySplunk.key
💡Tip: Make sure file permissions are secure. Avoid |
To secure communication between indexers, search heads, and forwarders, enable SSL on port 9997 or a custom management port.
🧪 Edit |
sudo vim /opt/splunk/etc/system/local/inputs.conf
					[SSL]
serverCert = /opt/splunk/etc/auth/mySplunk.pem
sslPassword = yourStrongPassword
requireClientCert = false

[splunktcp-ssl:9997]
disabled = 0
🧪 Edit |
sudo vim /opt/splunkforwarder/etc/system/local/outputs.conf
					[tcpout]
defaultGroup = ssl-group

[tcpout:ssl-group]
server = your.indexer.domain.com:9997
sslCertPath = /opt/splunkforwarder/etc/auth/mySplunk.pem
sslRootCAPath = /opt/splunkforwarder/etc/auth/cacert.pem
sslPassword = yourStrongPassword
sslVerifyServerCert = false
💡Note: Replace paths and filenames as per your environment. Use full certificates signed by a CA in production. |
Once you’ve made the changes, restart Splunk services:
					# Restart Splunk Enterprise
sudo /opt/splunk/bin/splunk restart
					Stopping splunkd...
Shutting down.  Please wait, as this may take a few minutes.
...
Stopping splunk helpers...

Done.

Splunk> The Notorious B.I.G. D.A.T.A.

Checking prerequisites...
	Checking http port [8000]: open
	Checking mgmt port [8089]: open
	Checking appserver port [127.0.0.1:8065]: open
	Checking kvstore port [8191]: open
	Checking configuration... Done.
New certs have been generated in '/opt/splunk/etc/auth'.
	Checking critical directories...	Done
	Checking indexes...
		Validated: _audit _configtracker _dsappevent _dsclient _dsphonehome _internal _introspection _metrics _metrics_rollup _telemetry _thefishbucket history main summary
	Done
	Checking filesystem compatibility...  Done
	Checking conf files for problems...
	Done
	Checking default conf files for edits...
	Validating installed files against hashes from '/opt/splunk/splunk-10.0.0-e8eb0c4654f8-linux-amd64-manifest'
	All installed files intact.
	Done
All preliminary checks passed.

Starting splunk server daemon (splunkd)...
Done
🧪 Verify Web SSL |
Open your browser and navigate to (https://your-domain.com):
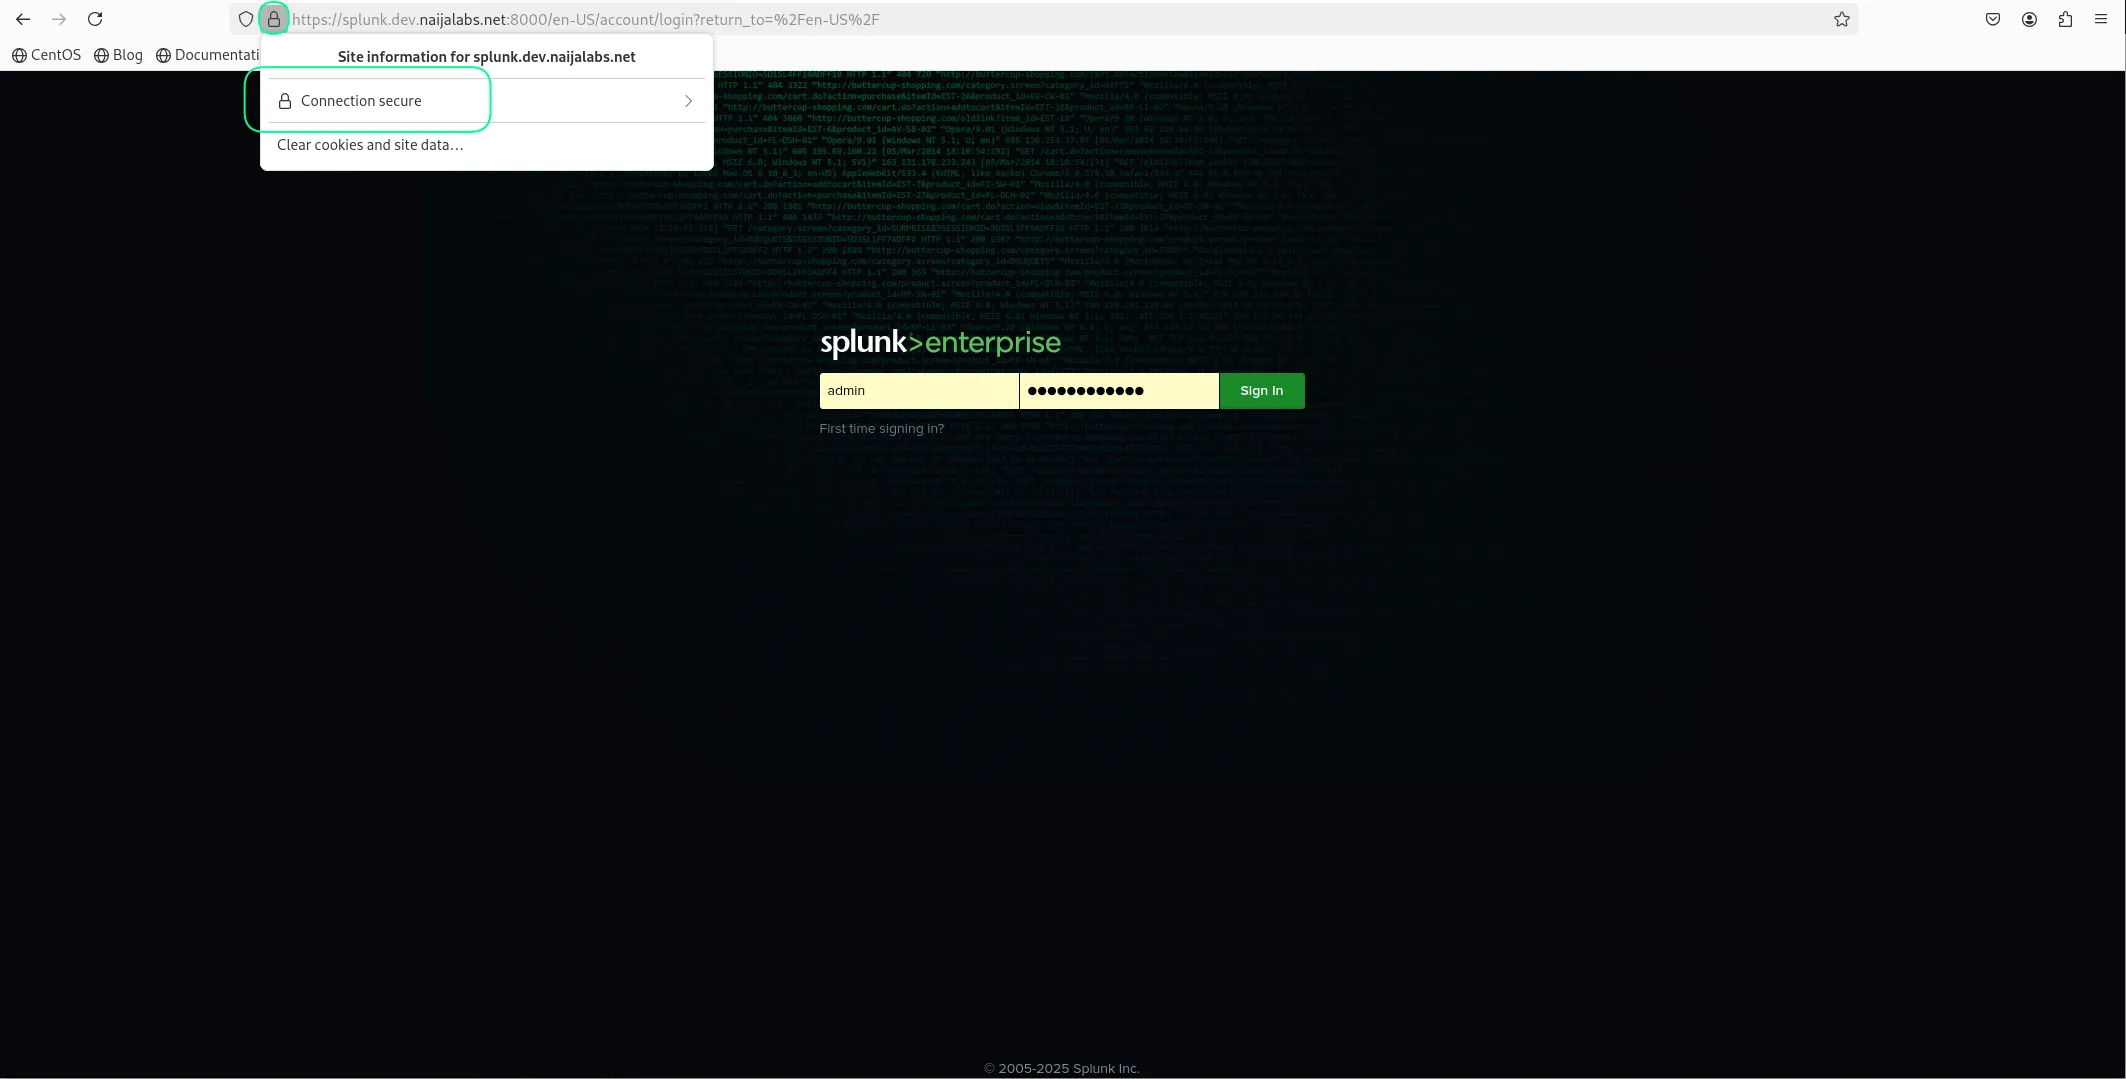
Photo by admingeek from Infotechys
If using self-signed certificates, your browser will warn you. You can proceed if you trust the source.
🧪 Verify Port 9997 (SSL) |
Use netstat or ss to check if Splunk is listening on SSL port:
sudo ss -tuln | grep 9997
Expected Output:
LISTEN 0 128 0.0.0.0:9997 0.0.0.0:*
🧪 Optional: Validate with BTool Again |
sudo /opt/splunk/bin/splunk btool web list --debug
					Checking: /opt/splunk/etc/users/admin/search/local/ui-tour.conf
Checking: /opt/splunk/etc/users/admin/user-prefs/local/user-prefs.conf
Checking: /opt/splunk/etc/apps/learned/local/props.conf
Checking: /opt/splunk/etc/apps/search/local/health.conf
Checking: /opt/splunk/etc/apps/search/local/inputs.conf
Checking: /opt/splunk/etc/apps/splunk_instrumentation/local/telemetry.conf
Checking: /opt/splunk/etc/apps/SplunkDeploymentServerConfig/default/app.conf
Checking: /opt/splunk/etc/apps/SplunkDeploymentServerConfig/default/indexes.conf
Checking: /opt/splunk/etc/apps/SplunkDeploymentServerConfig/default/inputs.conf
Checking: /opt/splunk/etc/apps/SplunkDeploymentServerConfig/default/macros.conf
Checking: /opt/splunk/etc/apps/SplunkDeploymentServerConfig/default/outputs.conf
Checking: /opt/splunk/etc/apps/SplunkDeploymentServerConfig/default/props.conf
Checking: /opt/splunk/etc/apps/SplunkDeploymentServerConfig/default/savedsearches.conf
Checking: /opt/splunk/etc/apps/SplunkForwarder/default/app.conf
Checking: /opt/splunk/etc/apps/SplunkForwarder/default/default-mode.conf
...omitted for brevity...
| Problem | Solution |
|---|---|
| Browser shows certificate error | Use a certificate from a trusted CA |
| Splunk won’t start | Check splunkd.log in /opt/splunk/var/log/splunk/ |
| SSL port not listening | Confirm inputs.conf and outputs.conf settings |
| Forwarder not connecting | Ensure firewalls allow port 9997 and verify SSL settings |
📝 Check Logs |
cat /opt/splunk/var/log/splunk/splunkd.log | grep -i ssl
| Component | File | Correct SSL Directives |
|---|---|---|
| Splunk Web | web.conf | enableSplunkWebSSL, serverCert, privKeyPath |
| Splunkd Listener | inputs.conf | serverCert, sslPassword, requireClientCert |
| Forwarder | outputs.conf | sslCertPath, sslRootCAPath, sslPassword, sslVerifyServerCert |
SSL is essential for securing data in transit in your Splunk environment. Whether you’re securing Splunk Web or internal communication between components, proper SSL configuration greatly enhances the security posture of your monitoring stack.
By following the steps above, you now have a secure Splunk setup running on RHEL 9 or CentOS 9, using SSL/TLS encryption.
Keep your certificates updated, monitor logs for SSL handshake issues, and periodically test your SSL endpoints for vulnerabilities.
Did you find this article helpful? Your feedback is invaluable to us! Feel free to share this post with those who may benefit, and let us know your thoughts in the comments section below.
Learn how to implement SSL on FreeIPA servers to secure communication channels. This comprehensive guide covers obtaining, installing, and verifying SSL certificates, along with troubleshooting
Learn how to monitor SSL certificate expiry using Zabbix with automated scripts and triggers. Avoid service disruptions by setting up alerts for expiring certificates. Table

Want to secure your Jenkins environment and protect sensitive data? Learn how to install SSL certificates on Jenkins and enhance the security of your continuous