
Commands
This blog post covers how to install and configure Zabbix version 7.0-2 on RHEL 9 in detail, including prerequisites, step-by-step instructions, and troubleshooting tips. Table


Learn how to deploy a highly available PostgreSQL database cluster using Pacemaker on RHEL 9 or CentOS 9. This comprehensive guide covers installation, configuration, and testing steps, ensuring robust data integrity and uptime. Perfect for IT professionals seeking reliable high-availability solutions.
Setting up a highly available PostgreSQL database cluster is essential for ensuring data integrity, uptime, and performance in production environments. Pacemaker, a powerful open-source cluster resource manager, works seamlessly with PostgreSQL to provide a robust high-availability solution. This guide will walk you through the steps to deploy a PostgreSQL database cluster using Pacemaker on RHEL 9 or CentOS 9.
Before we begin, ensure you have the following:
For demonstration purposes, we’ve configured our Linux nodes as follows (4 nodes, 1 master, 3 slaves or standbys):
| Hostnames | RAM (GB) | Cores | Operating System (OS) |
| mr-1.dev.naijalabs.net | 4 | 2 | Red Hat Enterprise Linux release 9.4 (Plow) |
| sl-1.dev.naijalabs.net | 4 | 2 | Red Hat Enterprise Linux release 9.4 (Plow) |
| sl-2.dev.naijalabs.net | 4 | 2 | Red Hat Enterprise Linux release 9.4 (Plow) |
| sl-3.dev.naijalabs.net | 4 | 2 | Red Hat Enterprise Linux release 9.4 (Plow) |
*** Take note of the additional entry in our /etc/hosts file which accounts for the IP address on the cluster network designated for the Virtual IP or vip.
Copy and paste the following entries in the /etc/hosts file on each node (replace IP addresses and hostnames with your actual settings):
					# PostgreSQL Database Cluster
192.168.1.12  pcs-vip.dev.naijlabs.net pcs-vip
192.168.1.250 mr-1.dev.naijalabs.net mr-1
192.168.1.252 sl-1.dev.naijalabs.net sl-1
192.168.1.253 sl-2.dev.naijalabs.net sl-2
192.168.1.254 sl-3.dev.naijalabs.net sl-3
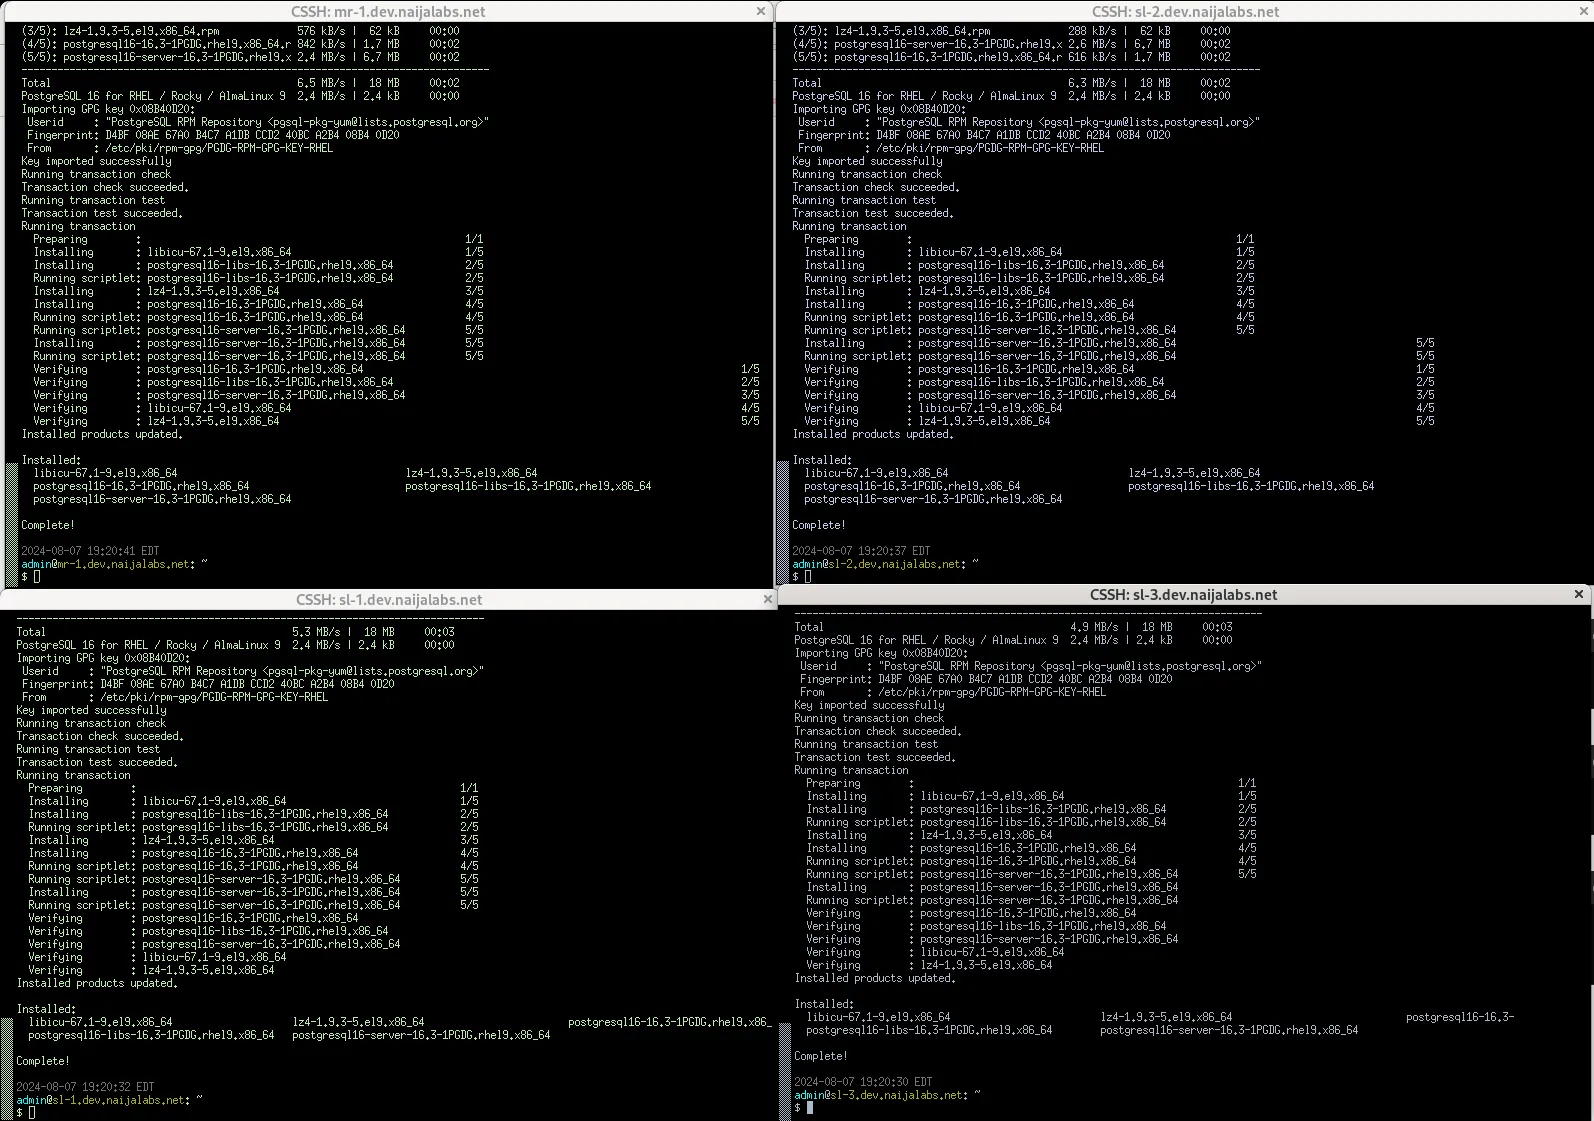
Photo by admingeek from Infotechys
First, ensure that all your nodes are updated to the latest versions of their system packages. After updating, reboot each node. If you have a tool like Cluster SSH installed, this process will be quicker. Now, let’s get started!
Step 1: Install Required Packages |
Install the postgresql package repository on all nodes with the following command(s):
sudo dnf install -y https://download.postgresql.org/pub/repos/yum/reporpms/EL-9-x86_64/pgdg-redhat-repo-latest.noarch.rpm
					... omitted for brevity ...
Installed products updated.

Installed:
  pgdg-redhat-repo-42.0-43PGDG.noarch

Complete!
sudo dnf -qy module disable postgresql
					...
Importing GPG key 0x08B40D20:
 Userid     : "PostgreSQL RPM Repository <pgsql-pkg-yum@lists.postgresql.org>"
 Fingerprint: D4BF 08AE 67A0 B4C7 A1DB CCD2 40BC A2B4 08B4 0D20
 From       : /etc/pki/rpm-gpg/PGDG-RPM-GPG-KEY-RHEL
sudo dnf install -y postgresql16-server postgresql16-contrib
If you prefer an earlier version of PostgreSQL, replace “16” with the desired version number (e.g., postgresql14-server or postgresql15-server).
sudo /usr/pgsql-16/bin/postgresql-16-setup initdb
Initializing database ... OK
sudo systemctl enable --now postgresql-16
Created symlink /etc/systemd/system/multi-user.target.wants/postgresql-16.service → /usr/lib/systemd/system/postgresql-16.service.
Let’s verify the postgresql install is operational and proceed to the next step.
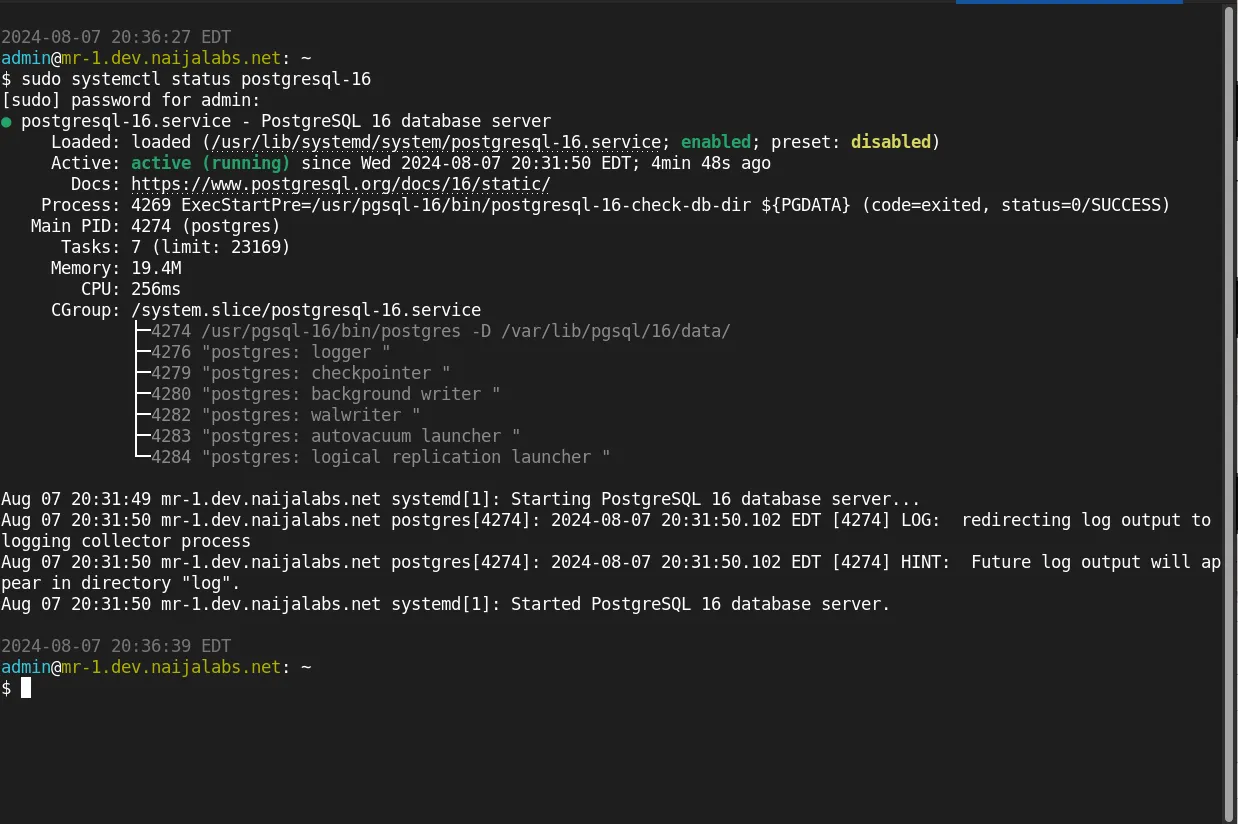
Photo by admingeek from Infotechys
Now that PostgreSQL is installed and running on all nodes, we’ll enable the high-availability package repository on each node. This repository provides the necessary packages to build the cluster.
sudo subscription-manager repos --enable rhel-9-for-x86_64-highavailability-rpms
sudo dnf config-manager --set-enabled highavailability
sudo dnf install -y pacemaker corosync pcs resource-agents fence-agents-all
To ensure that traffic for high availability services (such as Pacemaker and Corosync) and PostgreSQL is allowed, execute the following commands (on all nodes):
sudo firewall-cmd --permanent --add-service=high-availability
sudo firewall-cmd --permanent --add-service=postgresql
sudo firewall-cmd --reload
Verify your firewall settings with the following command:
sudo firewall-cmd --list-all | grep services
services: cockpit dhcpv6-client high-availability postgresql ssh
Step 2: Configure Corosync |
Corosync is responsible for cluster communication. Configure it on all nodes. Using your preferred text editor, open the Corosync configuration file /etc/corosync/corosync.conf on the master node:
sudo vim /etc/corosync/corosync.conf
Copy and paste the following entries (below) into the file:
					totem {
    version: 2
    secauth: off
    cluster_name: postgres
    transport: udpu
}

nodelist {
    node {
        ring0_addr: 192.168.1.250
        name: mr-1.dev.naijalabs.net
        nodeid: 1
    }
    node {
        ring0_addr: 192.168.1.252
        name: sl-1.dev.naijalabs.net
        nodeid: 2
    }
    node {
        ring0_addr: 192.168.1.253
        name: sl-2.dev.naijalabs.net
        nodeid: 3
    }
    node {
        ring0_addr: 192.168.1.254
        name: sl-3.dev.naijalabs.net
        nodeid: 4
    }

}

quorum {
    provider: corosync_votequorum
}

logging {
    to_syslog: yes
}
Replace the hostnames and IP addresses to suit your environment. Then, save and exit the file.
Here’s a detailed explanation of each configuration line:
| Configuration Section | Line | Explanation |
|---|---|---|
| totem | Defines the cluster communication protocol settings. | |
version: 2 | Specifies the version of the Totem protocol used for communication. | |
secauth: off | Disables secure authentication between cluster nodes (set to on for security). | |
cluster_name: postgres | Assigns a name to the cluster for identification purposes. | |
transport: udpu | Sets the transport method to UDP Unicast for node communication. | |
| nodelist | Defines the list of nodes participating in the cluster. | |
node { | Begins the configuration for an individual cluster node. | |
ring0_addr: 192.168.1.250 | Specifies the IP address of the first node for ring 0 communication. | |
nodeid: 1 | Assigns a unique identifier to the first node. | |
} | Ends the configuration block for the first node. | |
node { | Begins the configuration for the second node. | |
ring0_addr: 192.168.1.252 | Specifies the IP address of the second node for ring 0 communication. | |
nodeid: 2 | Assigns a unique identifier to the second node. | |
} | Ends the configuration block for the second node. | |
node { | Begins the configuration for the third node. | |
ring0_addr: 192.168.1.253 | Specifies the IP address of the third node for ring 0 communication. | |
nodeid: 3 | Assigns a unique identifier to the third node. | |
} | Ends the configuration block for the third node. | |
node { | Begins the configuration for the fourth node. | |
ring0_addr: 192.168.1.254 | Specifies the IP address of the fourth node for ring 0 communication. | |
nodeid: 4 | Assigns a unique identifier to the fourth node. | |
} | Ends the configuration block for the fourth node. | |
| quorum | Configures the quorum settings to ensure a majority decision in the cluster. | |
provider: corosync_votequorum | Specifies the quorum provider to use, in this case, Corosync’s built-in quorum. | |
| logging | Configures the logging options for Corosync. | |
to_syslog: yes | Enables logging to the system log. |
Copy the corosync.conf file to the other nodes in the cluster:
scp /etc/corosync/corosync.conf root@sl-1.dev.naijalabs.net:/etc/corosync/
scp /etc/corosync/corosync.conf root@sl-2.dev.naijalabs.net:/etc/corosync/
scp /etc/corosync/corosync.conf root@sl-3.dev.naijalabs.net:/etc/corosync/
Step 3: Start and Enable Cluster Services |
Enable and start Corosync and Pacemaker on all nodes:
sudo systemctl enable --now pacemaker
sudo systemctl enable --now corosync
sudo systemctl enable --now pcsd
Step 4: Authenticate and Form the Cluster |
To set a password for the user hacluster on each node in the cluster and authenticate the user on the node from which you will run the pcs commands, follow these steps:
sudo passwd hacluster
For this demonstration, we will use the simple password ‘hacluster’ for the user. While this is not recommended for production environments, it is acceptable for our purposes here 🙂 Use PCS to authenticate the nodes and form the cluster (on the master node):
					sudo pcs host auth mr-1.dev.naijalabs.net -u hacluster -p hacluster
sudo pcs host auth sl-1.dev.naijalabs.net -u hacluster -p hacluster
sudo pcs host auth sl-2.dev.naijalabs.net -u hacluster -p hacluster
sudo pcs host auth sl-3.dev.naijalabs.net -u hacluster -p hacluster
					mr-1.dev.naijalabs.net: Authorized
sl-1.dev.naijalabs.net: Authorized
sl-2.dev.naijalabs.net: Authorized
sl-3.dev.naijalabs.net: Authorized
The output should confirm in the terminal that each node has been authorized. Next, proceed to disable STONITH (on each node). Although it is generally not recommended to disable STONITH in production environments unless you have a valid reason, we will do so here solely for demonstration purposes.
sudo pcs property set stonith-enabled=false
Next, let’s verify the status of our cluster by executing the following command:
sudo pcs status
					Cluster name: postgres
Cluster Summary:
  * Stack: corosync (Pacemaker is running)
  * Current DC: mr-1.dev.naijalabs.net (version 2.1.7-5.el9_4-0f7f88312) - partition with quorum
  * Last updated: Sat Aug 10 14:53:54 2024 on mr-1.dev.naijalabs.net
  * Last change:  Sat Aug 10 14:47:12 2024 by root via root on mr-1.dev.naijalabs.net
  * 4 nodes configured
  * 0 resource instances configured

Node List:
  * Online: [ mr-1.dev.naijalabs.net sl-1.dev.naijalabs.net sl-2.dev.naijalabs.net sl-3.dev.naijalabs.net ]

Full List of Resources:
  * No resources

Daemon Status:
  corosync: active/enabled
  pacemaker: active/enabled
  pcsd: active/enabled
Your output should resemble the example shown above. Note that our cluster currently has no resources, which we will address in the next section.
Step 5: Configure the Cluster Resources |
Create the necessary resources for PostgreSQL, including the floating IP (also known as virtual IP or vip), the PostgreSQL service, and monitoring configurations.
Configure PostgreSQL for Replication |
First, ensure that PostgreSQL is set up for replication between the master and standby nodes. This includes setting up the postgresql.conf and pg_hba.conf files appropriately on all nodes.
On the master node, modify the postgresql.conf file to enable replication. Add the following settings to the file, preferably just before the “FILE LOCATIONS” section:
					#------------------------------------------------------------------------------
# DATABASE CLUSTER REPLICATION SETTINGS (MASTER)
#------------------------------------------------------------------------------
listen_addresses = '*'
wal_level = replica
archive_mode = on
archive_command = 'cp %p /var/lib/pgsql/archive/%f'
max_wal_senders = 4
max_replication_slots = 4
| Setting | Description |
|---|---|
listen_addresses = '*' | Allows the server to listen on all available IP addresses. |
wal_level = replica | Sets the Write-Ahead Logging (WAL) level to enable replication. |
archive_mode = on | Enables archiving of WAL files. |
archive_command = 'cp %p /var/lib/pgsql/archive/%f' | Specifies the command to archive WAL files. |
max_wal_senders = 3 | Sets the maximum number of WAL sender processes, which are responsible for sending WAL data to standby nodes. |
max_replication_slots = 3 | Sets the maximum number of replication slots, ensuring that WAL files are retained until they have been replicated. |
On each standby (slave) node, modify the postgresql.conf file to enable replication from the master. For each standby node, the configuration must reflect the specific node’s replication slot name. Add the following settings:
					#------------------------------------------------------------------------------
# DATABASE CLUSTER REPLICATION SETTINGS (STANDBY)
#------------------------------------------------------------------------------
listen_addresses = '*'
primary_conninfo = 'host=192.168.1.250 port=5432 user=replicator password=replicator'
primary_slot_name = 'sl_1'
hot_standby = on
					#------------------------------------------------------------------------------
# DATABASE CLUSTER REPLICATION SETTINGS (STANDBY)
#------------------------------------------------------------------------------
listen_addresses = '*'
primary_conninfo = 'host=192.168.1.250 port=5432 user=replicator password=replicator'
primary_slot_name = 'sl_2'
hot_standby = on
					#------------------------------------------------------------------------------
# DATABASE CLUSTER REPLICATION SETTINGS (STANDBY)
#------------------------------------------------------------------------------
listen_addresses = '*'
primary_conninfo = 'host=192.168.1.250 port=5432 user=replicator password=replicator'
primary_slot_name = 'sl_3'
hot_standby = on
| Setting | Description |
|---|---|
listen_addresses = '*' | Allows the server to listen on all available IP addresses. |
primary_conninfo = 'host=192.168.1.12 port=5432 user=replicator password=replicator' | Specifies the connection information for the standby node to connect to the master node. |
primary_slot_name | Assigns a unique replication slot name for each standby node (sl_1, sl_2, sl_3). |
hot_standby = on | Enables the standby server to accept read-only queries while it is in recovery mode. |
Ensure that the primary_slot_name on each standby node corresponds to the correct slot configured on the master node. This setup ensures that each standby node maintains its connection to the master node using its designated replication slot.
pg_hba.conf FileThe pg_hba.conf file controls client authentication, and it must be configured to allow replication connections between the master and standby nodes.
On the master node, add the following entries to the pg_hba.conf file:
					# TYPE  DATABASE        USER            ADDRESS                 METHOD
host    replication     replicator      192.168.1.0/24          md5
On each standby node, add the following entries to the pg_hba.conf file:
					# TYPE  DATABASE        USER            ADDRESS                 METHOD
host    all             all             192.168.1.0/24          md5
| Entry | Description |
|---|---|
host replication replicator 192.168.1.0/24 md5 | Allows the user replicator to connect from any IP address in the 192.168.1.0/24 subnet for replication purposes. |
host all all 192.168.1.0/24 md5 | Allows all users to connect to all databases from any IP address in the 192.168.1.0/24 subnet. |
These configurations ensure that the replicator user can establish connections necessary for replication and that all nodes within the specified subnet can communicate with each other.
Now that we’ve completed our configurations, we can proceed with creating the replication slots on the primary (master) node. Ensure the postgresql-16.service is running and execute the following psql commands:
sudo systemctl is-active postgresql-16.service
active
sudo -u postgres psql -c "SELECT pg_create_physical_replication_slot('sl_1');"
					 pg_create_physical_replication_slot
-------------------------------------
 (sl_1,)
(1 row)
sudo -u postgres psql -c "SELECT pg_create_physical_replication_slot('sl_2');"
					 pg_create_physical_replication_slot
-------------------------------------
 (sl_2,)
(1 row)
sudo -u postgres psql -c "SELECT pg_create_physical_replication_slot('sl_3');"
					 pg_create_physical_replication_slot
-------------------------------------
 (sl_3,)
(1 row)
Run the following command to verify:
sudo -u postgres psql -c "SELECT * FROM pg_replication_slots;"
					 slot_name | plugin | slot_type | datoid | database | temporary | active | active_pid | xmin | catalog_xmin | restart_lsn | confirmed_flush_lsn | wal_status | safe_wal_size | two_phase | conflicting
-----------+--------+-----------+--------+----------+-----------+--------+------------+------+--------------+-------------+---------------------+------------+---------------+-----------+-------------
 sl_1      |        | physical  |        |          | f         | f      |            |      |              |             |                     |            |               | f         |
 sl_2      |        | physical  |        |          | f         | f      |            |      |              |             |                     |            |               | f         |
 sl_3      |        | physical  |        |          | f         | f      |            |      |              |             |                     |            |               | f         |
(3 rows)
Please note that the active status for each standby slot is currently set to false. We’ll cover how to activate replication in the upcoming sections.
Create the PostgreSQL Systemd Resource |
Create the PostgreSQL resource managed by systemctl:
					sudo pcs resource create postgres-master systemd:postgresql-16 \
    op start interval=0 timeout=60s \
    op stop interval=0 timeout=60s \
    op monitor interval=10s timeout=30s \
    meta target-role=Started
Create the Virtual IP Resource |
Now that replication is set up for postgreSQL, we will proceed on the master, to create a resource for the Virtual IP address (We’ve set our virtual IP to an available IP on our cluster’s network e.g. 192.168.1.12):
					sudo pcs resource create virtual_ip ocf:heartbeat:IPaddr2 \
    ip=192.168.1.12 \
    cidr_netmask=24 \
    op start interval=0 timeout=30s \
    op stop interval=0 timeout=30s \
    op monitor interval=10s timeout=20s
Set Resource Constraints |
Ensure the Virtual IP and PostgreSQL resources are colocated and ordered correctly:
sudo pcs constraint colocation add virtual_ip with postgres-master INFINITY
sudo pcs constraint order start postgres-master then start virtual_ip
Adding postgres-master virtual_ip (kind: Mandatory) (Options: first-action=start then-action=start)
Step 6: Test Failover and Replication |
Now that we’ve completed our resource and replication setups, it’s time to test and see how the cluster behaves:
First, let’s run the pcs status and check the current state of our cluster:
sudo pcs status
					Cluster name: postgres
Cluster Summary:
  * Stack: corosync (Pacemaker is running)
  * Current DC: sl-2.dev.naijalabs.net (version 2.1.7-5.el9_4-0f7f88312) - partition with quorum
  * Last updated: Mon Aug 12 18:40:16 2024 on mr-1.dev.naijalabs.net
  * Last change:  Mon Aug 12 17:00:36 2024 by root via root on mr-1.dev.naijalabs.net
  * 4 nodes configured
  * 2 resource instances configured

Node List:
  * Online: [ mr-1.dev.naijalabs.net sl-1.dev.naijalabs.net sl-2.dev.naijalabs.net sl-3.dev.naijalabs.net ]

Full List of Resources:
  * postgres-master	(systemd:postgresql-16):	 Started mr-1.dev.naijalabs.net
  * virtual_ip	(ocf:heartbeat:IPaddr2):	 Started mr-1.dev.naijalabs.net

Daemon Status:
  corosync: active/enabled
  pacemaker: active/enabled
  pcsd: active/enabled
With our cluster now configured with PostgreSQL and a virtual IP address as resources, you can proceed to test failover by rebooting the master node.
sudo systemctl reboot
Next, execute the same (pcs status) command on one of the standby instances to verify if it has been promoted to the master role.
sudo pcs status
					Cluster name: postgres
Cluster Summary:
  * Stack: corosync (Pacemaker is running)
  * Current DC: sl-2.dev.naijalabs.net (version 2.1.7-5.el9_4-0f7f88312) - partition with quorum
  * Last updated: Mon Aug 12 18:48:20 2024 on sl-1.dev.naijalabs.net
  * Last change:  Mon Aug 12 17:00:36 2024 by root via root on mr-1.dev.naijalabs.net
  * 4 nodes configured
  * 2 resource instances configured

Node List:
  * Online: [ sl-1.dev.naijalabs.net sl-2.dev.naijalabs.net sl-3.dev.naijalabs.net ]
  * OFFLINE: [ mr-1.dev.naijalabs.net ]

Full List of Resources:
  * postgres-master	(systemd:postgresql-16):	 Started sl-1.dev.naijalabs.net
  * virtual_ip	(ocf:heartbeat:IPaddr2):	 Started sl-1.dev.naijalabs.net

Daemon Status:
  corosync: active/enabled
  pacemaker: active/enabled
  pcsd: active/enabled
Observe that the virtual IP and PostgreSQL master have successfully migrated to one of the standby instances. To fail back to the original master, simply reboot the standby instance.
To test replication on our cluster, we first need to prepare the PostgreSQL and replication users on the master node. Log into psql and run the following commands:
sudo -u postgres psql
					psql (16.4)
Type "help" for help.

postgres=#
Set a strong password for the postgres user.
ALTER USER postgres PASSWORD 'your_postgres_password';
Create the replication user and set a password for it with the following command in psql:
CREATE USER replicator REPLICATION LOGIN PASSWORD 'your_replicator_password';
Replace 'replicator' and 'your_password' with your desired username and password.
Then, using your preferred text editor, create a location to store your PostgreSQL credentials:
sudo -i -u postgres vim .pgpass
Copy and paste the following entries into the file. Then, save and exit the file:
					localhost:5432:*:postgres:your_postgres_password
localhost:5432:*:replicator:your_replicator_password
Change the permission settings on the .pgpass file:
chmod 600 .pgpass
Ensure that the pg_hba.conf file is properly configured to allow local connections. This file is usually located in the PostgreSQL data directory (e.g., /var/lib/pgsql/data/pg_hba.conf or /var/lib/pgsql/<version_number>/data/pg_hba.conf).
sudo vim /var/lib/pgsql/16/data/pg_hba.conf
Ensure it contains a line similar to:
local all postgres md5
Save and exit the file. Then, restart the postgresql service.
sudo systemctl restart postgresql-16
With the replication and PostgreSQL users set up, we can now proceed to test the replication (starting with the master node). We will begin by creating a database table named replication_test with the following columns: id, test_data, and created_at.
					sudo -u postgres psql -c "CREATE TABLE replication_test (
    id SERIAL PRIMARY KEY,
    test_data TEXT,
    created_at TIMESTAMP DEFAULT CURRENT_TIMESTAMP
);"
CREATE TABLE
Additionally, we need to ensure that the replication user has the necessary permissions.
sudo -u postgres psql -c "GRANT SELECT, INSERT, UPDATE, DELETE ON TABLE replication_test TO replicator;"
GRANT
To insert test data into the replication_test table from the command line, use the following command:
sudo -u postgres psql -c "INSERT INTO replication_test (test_data) VALUES ('Test data');"
INSERT 0 1
Run the command as many times as needed to generate rows of data. For this demonstration, we executed the command twice to insert two records into the table. Verify the data with the following command:
sudo -u postgres psql -c "SELECT * FROM replication_test;"
					 id | test_data |        created_at
----+-----------+---------------------------
  1 | Test data | 2024-08-12 23:04:02.51905
  2 | Test data | 2024-08-12 23:07:17.43283
(2 rows)
On each standby instance, follow these steps to ensure it is connecting to the master and replicating properly. First things first, stop the postgresql-16.service if it is running:
sudo systemctl stop postgresql
Next, become the postgres user and create a backups directory.
sudo su - postgres
mkdir -p backups
Then, navigate to that directory and copy a backup of the configuration files:
cd backups && cp /var/lib/pgsql/16/data/postgresql.conf . ; cp /var/lib/pgsql/16/data/pg_hba.conf .
Delete all contents under /var/lib/pgsql/l6/data/. We are going to restore it later using the master instance:
rm -rvf /var/lib/pgsql/16/data/*
Restore the database on the standby instance using the pg_basebackup command to copy the data from the master instance. Provide the replicator user password:
pg_basebackup -h 192.168.1.12 -D /var/lib/pgsql/16/data/ -U replicator -P --wal-method=stream -Fp -Xs -R -v
Password:
					pg_basebackup: initiating base backup, waiting for checkpoint to complete
pg_basebackup: checkpoint completed
pg_basebackup: write-ahead log start point: 0/2A000028 on timeline 1
pg_basebackup: starting background WAL receiver
pg_basebackup: created temporary replication slot "pg_basebackup_94285"
23451/23451 kB (100%), 1/1 tablespace
pg_basebackup: write-ahead log end point: 0/2A000100
pg_basebackup: waiting for background process to finish streaming ...
pg_basebackup: syncing data to disk ...
pg_basebackup: renaming backup_manifest.tmp to backup_manifest
pg_basebackup: base backup completed
💡Remember, we’ve essentially cloned the master instance. Therefore, you will need to restore the configuration files (pg_hba.conf and postgresql.conf) for the standby node using the backups we established earlier.
As the postgres user, run the following commands:
cp backups/pg_hba.conf /var/lib/pgsql/16/data/
cp backups/postgresql.conf /var/lib/pgsql/16/data/
After restoring the configuration files, restart PostgreSQL on the standby instance:
sudo systemctl restart postgresql-16.service
On the master instance, follow these steps to ensure the standby (slave) instances are connecting and replicating properly. First things first, start the postgresql-16.service if it is not already running:
sudo systemctl start postgresql-16.service
Run the following command to check the replication slots (we ran this command earlier before setting up the replication function):
sudo -u postgres psql -c "SELECT * FROM pg_replication_slots;"
Observe the image below: The output of the pg_replication_slots query now indicates that the sl_1 standby node is active and successfully replicating. Additionally, the pg_stat_replication command provides real-time monitoring information about the status of replication between the primary (master) and its standby (slave) nodes. It displays critical details such as the process ID, the current state of replication, the write-ahead log (WAL) locations, and the delay between the primary and standby nodes.
This view is essential for administrators to ensure replication is functioning correctly and to diagnose any potential issues with data synchronization.
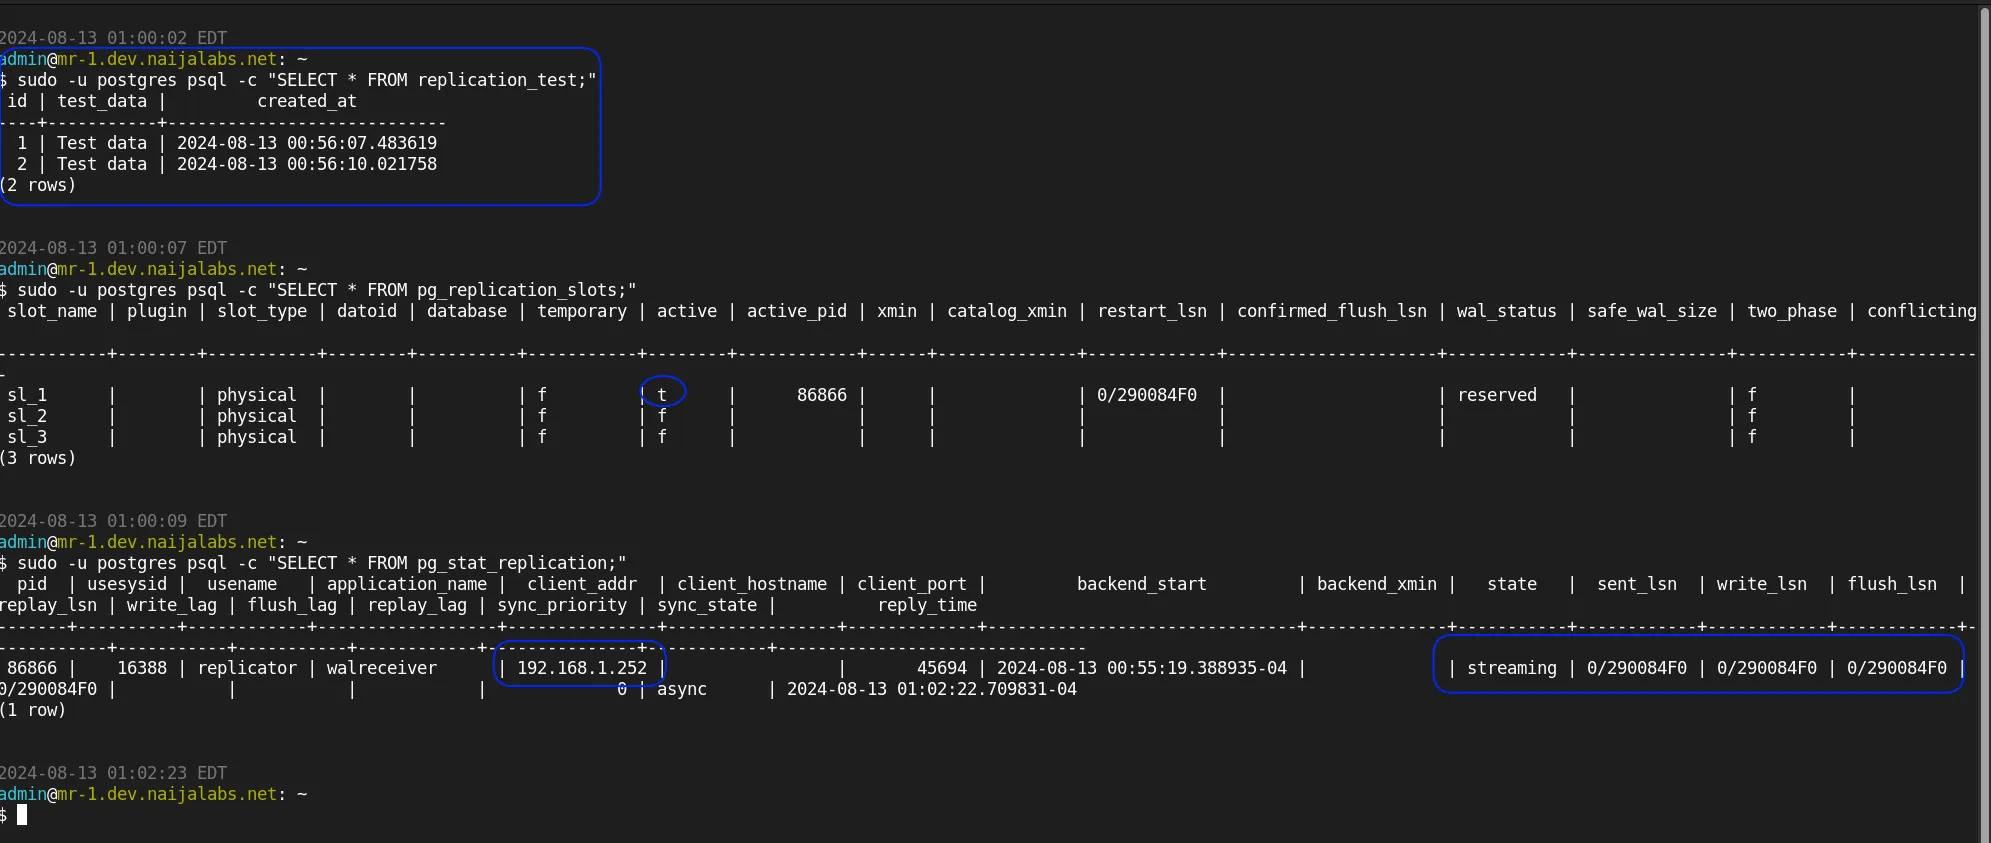
Photo by admingeek from Infotechys
Repeat the steps outlined in this section for the remaining standby nodes in your database cluster.
Step 7: Create a Promotion Service |
With our resource and replication setups complete and their functionality successfully tested, we can now move on to a critical feature of the database cluster setup: promotion. Promotion is the process that enables another node to assume the responsibilities of the master node if it goes down. When executed correctly, this process is seamless, ensuring that frontend applications communicating with the database cluster remain unaffected. By default, the PCS resource prefers using pgsql over systemd because the promote option is a function of the pg_ctl command. However, it’s possible to leverage the promotion function by converting it into a systemd service and then adding it as a resource to the cluster. This section will outline the steps involved in this process.
On each node, switch to the postgres user and create a hidden directory named .promote:
sudo su - postgres
mkdir -p .promote
pgsql_promote.sh scriptNavigate to that directory and create a file named pgsql_promote.sh:
cd .promote && vim pgsql_promote.sh
Copy and paste the following (below) into that file:
					#!/bin/bash

PGDATA="/var/lib/pgsql/16/data"
PGHBA="${PGDATA}/pg_hba.conf"
NODE_IP="192.168.1.250"
VIRTUAL_IP="192.168.1.12"
REQUIRED_ENTRIES=(
    "host    all             postgres        192.168.1.0/24          trust"
    "host    all             all             192.168.1.247/32        trust"
)

# Get the IP addresses assigned to the current node
CURRENT_IPS=$(hostname -I)

# Check if both the node IP and virtual IP are present on the same node
if echo "${CURRENT_IPS}" | grep -q "${NODE_IP}" && echo "${CURRENT_IPS}" | grep -q "${VIRTUAL_IP}"; then
    echo "Both the node IP (${NODE_IP}) and virtual IP (${VIRTUAL_IP}) are present on this node. Primary is in control. No action required."
    exit 0
fi

# Ensure the required entries are present in pg_hba.conf
for ENTRY in "${REQUIRED_ENTRIES[@]}"; do
    if ! grep -qF "$ENTRY" "${PGHBA}"; then
        echo "$ENTRY" >> "${PGHBA}"
        echo "Added entry to pg_hba.conf: $ENTRY"
    else
	    echo "Entries already updated for PostgreSQL and Zabbix (in pg_hba.conf): [OK]"
    fi
done

# Proceed with promotion if the node is in standby mode
if [ -f "${PGDATA}/standby.signal" ]; then
    pg_ctl -D "${PGDATA}" promote
    if [ $? -eq 0 ]; then
        echo "Promotion successful."
        exit 0
    else
        echo "Promotion failed."
        exit 1
    fi
else
    echo "Standby Node Has Control: [OK]"
    exit 1
fi
Save and exit the file. Then, make it an executable:
chmod 755 pgsql_promote.sh
Here’s a breakdown of the bash script:
| Section | Description |
|---|---|
#!/bin/bash | Shebang to indicate that the script should be executed using the Bash shell. |
PGDATA="/var/lib/pgsql/16/data" | Defines the path to the PostgreSQL data directory. |
PGHBA="${PGDATA}/pg_hba.conf" | Sets the path to the pg_hba.conf file, which is used for client authentication. |
NODE_IP="192.168.1.250" | Specifies the IP address of the current node. |
VIRTUAL_IP="192.168.1.12" | Specifies the virtual IP address that should be assigned to the master node. |
REQUIRED_ENTRIES=() | Array containing the required entries that must be present in the pg_hba.conf file. |
CURRENT_IPS=$(hostname -I) | Retrieves all IP addresses assigned to the current node. |
if echo "${CURRENT_IPS}" ... fi | Checks if both the node IP and virtual IP are assigned to the same node. If they are, it assumes the primary node is in control and no further action is required. |
for ENTRY in "${REQUIRED_ENTRIES[@]}" | Iterates through each entry in the REQUIRED_ENTRIES array and checks if it exists in the pg_hba.conf file. If an entry is missing, it is appended to the file. Otherwise, it confirms that the entries are already present. |
if [ -f "${PGDATA}/standby.signal" ]; then | Checks if the node is in standby mode by verifying the presence of the standby.signal file. |
pg_ctl -D "${PGDATA}" promote | Promotes the standby node to a primary node using the pg_ctl promote command if the node is in standby mode. |
if [ $? -eq 0 ]; then ... fi | Checks if the promotion command was successful. If successful, it outputs a confirmation message and exits with a status of 0. If it fails, it outputs an error message and exits with a status of 1. |
else ... exit 1 | If the standby.signal file is not present, the script assumes that the node is already the primary or another condition has prevented promotion, and it exits with a status of 1. |
Modify the unit file as necessary to match your specific environment (e.g., adjusting IP addresses, file paths, or PostgreSQL versions).
To convert the promotion function into a systemd service, you’ll need to create a systemd unit file on all nodes in your cluster.
sudo vim /etc/systemd/system/promote.service
Insert the following content into the file:
					[Unit]
Description=PostgreSQL Promotion Script
After=network.target

[Service]
Type=oneshot
User=postgres

# Check if IP conditions are met; if yes, exit with success
ExecStartPre=/bin/bash -c 'if ip a | grep -q "192.168.1.250" && ip a | grep -q "192.168.1.12"; then exit 0; fi'

# Execute the promotion script only if IP conditions are not met
ExecStart=/bin/bash -c 'if [ -f /var/lib/pgsql/16/data/postmaster.pid ]; then /var/lib/pgsql/.promote/pgsql_promote.sh; exit 0; else exit 1; fi'

Restart=on-failure
RemainAfterExit=yes

[Install]
WantedBy=multi-user.target
Modify as needed to suit your environment. Save and exit the file.
Here’s a breakdown of the systemd unit file:
| Section | Directive | Description |
|---|---|---|
| [Unit] | Describes the unit and its behavior in relation to other system services. | |
Description=PostgreSQL Promotion Script | Provides a brief description of the service. In this case, it describes the PostgreSQL promotion script. | |
After=network.target | Specifies that the service should start only after the network has been initialized. Ensures that network dependencies are up before attempting to run the script. | |
| [Service] | Contains details about how the service is executed. | |
Type=oneshot | This service type is for one-off tasks that do not remain running. Once the script finishes, the service will complete. | |
User=postgres | Specifies that the service will run as the postgres user, which is necessary for executing PostgreSQL-related commands. | |
ExecStartPre | A command that runs before the main service. It checks if both the node IP (192.168.1.250) and virtual IP (192.168.1.12) are present. If they are, it exits with success (exit 0), indicating that promotion is not necessary. | |
ExecStart | Runs the promotion script only if the PostgreSQL process is active (checked by the presence of postmaster.pid). If the file exists, it runs the promotion script (pgsql_promote.sh). If the promotion is not needed or the service fails, it exits. | |
Restart=on-failure | Configures the service to restart if it fails. This ensures that the script will retry if an error occurs during execution. | |
RemainAfterExit=yes | Ensures that systemd considers the service to be active even after the ExecStart command has completed, as the operation is one-time but critical for cluster health. | |
| [Install] | Describes how the service should be integrated into the system. | |
WantedBy=multi-user.target | Specifies that the service should be started in multi-user mode, which is the standard operating mode of the system after boot. |
This unit file ensures that the promotion script is only executed when necessary, based on the IP conditions, and allows systemd to handle restarts in the event of failure.
Once saved, reload the systemd daemon:
sudo systemctl daemon-reload
promote.service statusYour newly created promote.service should look similar to the following output when you check its status on the standby node:
sudo systemctl status promote.service
					○ promote.service - PostgreSQL Promotion Script
     Loaded: loaded (/etc/systemd/system/promote.service; disabled; preset: disabled)
     Active: inactive (dead)
On the master node, you should see output similar to the following when checking the status of the promote.service:
					● promote.service - PostgreSQL Promotion Script
   Loaded: loaded (/etc/systemd/system/promote.service; disabled; preset: disabled)
   Active: active (exited) since Wed 2024-08-14 22:25:40 EDT; 15s ago
   Process: 7158 ExecStartPre=/bin/bash -c 'if ip a | grep -q "192.168.1.250" && ip a | grep -q "192.168.1.12"; then exit 0; fi' (code=exited, status=0/SUCCESS)
   Process: 7163 ExecStart=/bin/bash -c 'if [ -f /var/lib/pgsql/16/data/postmaster.pid ]; then /var/lib/pgsql/.promote/pgsql_promote.sh; exit 0; else exit 1; fi' (code=exited, status=0/SUCCESS)
   Main PID: 7163 (code=exited, status=0/SUCCESS)
        CPU: 26ms

Aug 14 22:25:40 mr-1.dev.naijalabs.net systemd[1]: Starting PostgreSQL Promotion Script...
Aug 14 22:25:40 mr-1.dev.naijalabs.net bash[7164]: Both the node IP (192.168.1.250) and virtual IP (192.168.1.12) are present on this node. Primary is in control. No action required.
Aug 14 22:25:40 mr-1.dev.naijalabs.net systemd[1]: Finished PostgreSQL Promotion Script.
This output confirms that the promotion script ran as expected and exited successfully, with the service status reflecting that no further action was required.
⚠️ NOTE: Since the promote.service is only needed under specific conditions, you should ensure it is not enabled to start automatically. Instead, it’s function should be controlled by the cluster as a pcs resource.
sudo systemctl disable promote.service
Step 8: Adding the Promote Service as a Resource in the Cluster |
With our resource and replication setups complete and their functionality successfully tested and promote service running as expected, we can now proceed to add it as resource on our cluster. Here’s how:
Use pcs to create a new resource for the promote service. This command sets up the promote service as a managed resource within the cluster:
					sudo pcs resource create promoted systemd:promote.service \
    op monitor interval=30s timeout=60s \
    op start timeout=60s \
    op stop timeout=60s \
    meta target-role=Started
Postgres-master: Order Constraint: This command ensures that the promote service starts only after the postgres-master resource has started. It defines the order in which the resources should be started.
sudo pcs constraint order start postgres-master then promote
Virtual IP: Order Constraint: This command ensures that the promote service starts only after the virtual_ip resource has started. This ensures that the virtual IP is in place before attempting promotion.
sudo pcs constraint order start virtual_ip then promoted
Colocation Constraint: This command ensures that the promote service is always colocated with the virtual_ip resource. This means the promote service will run on the same node as the virtual_ip.
sudo pcs constraint colocation add promoted with virtual_ip INFINITY
Check the status of the newly added resource to ensure it’s properly integrated into the cluster:
sudo pcs status resources
					  * postgres-master	(systemd:postgresql-16):	 Started mr-1.dev.naijalabs.net
  * virtual_ip	(ocf:heartbeat:IPaddr2):	 Started mr-1.dev.naijalabs.net
  * promoted	(systemd:promote.service):	 Started mr-1.dev.naijalabs.net
This command will display the current state of all resources, including the newly added "promoted" pcs resource.
Simulate a failover or other scenarios to ensure that the promote service behaves as expected within the cluster environment.
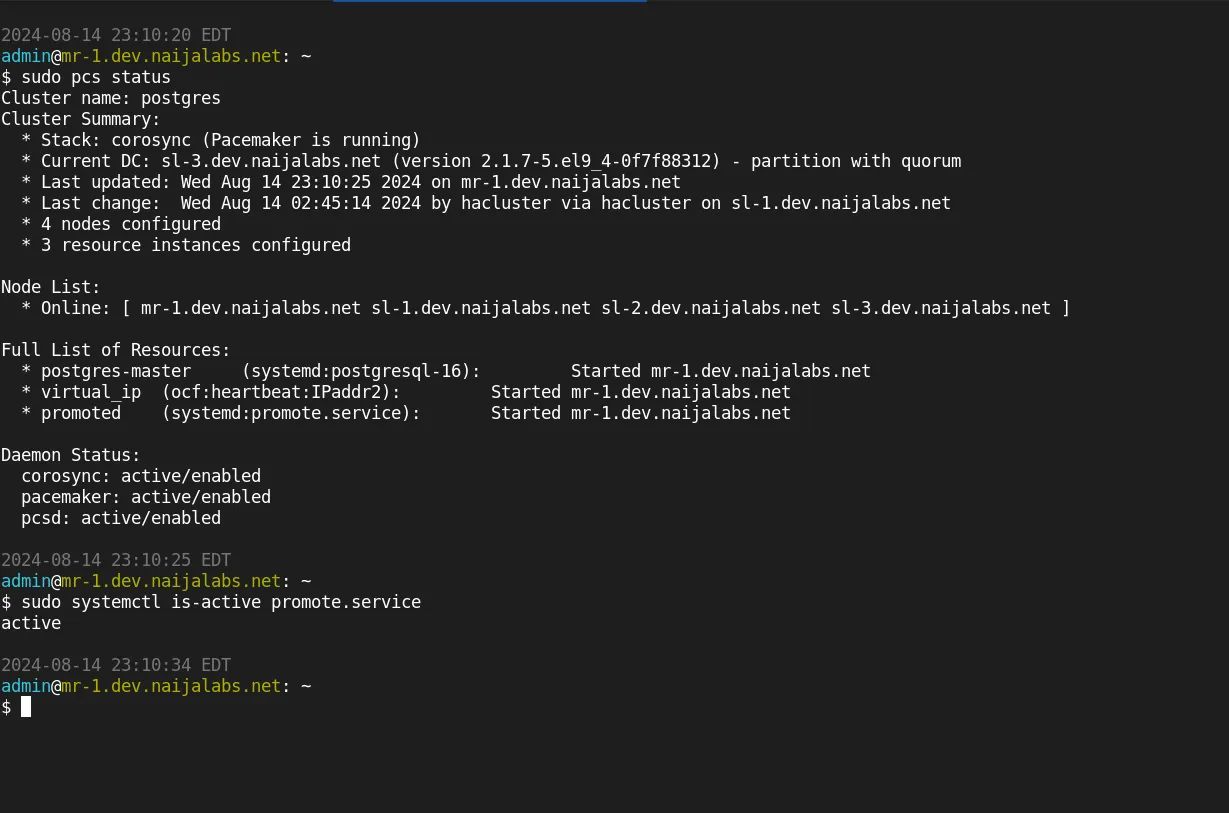
Photo by admingeek from Infotechys
Verify that the service correctly promotes the standby node when required. One way to trigger a failover is by rebooting the master node:
sudo systemctl reboot
Next, run sudo pcs status on a standby node to verify that the failover was successful.
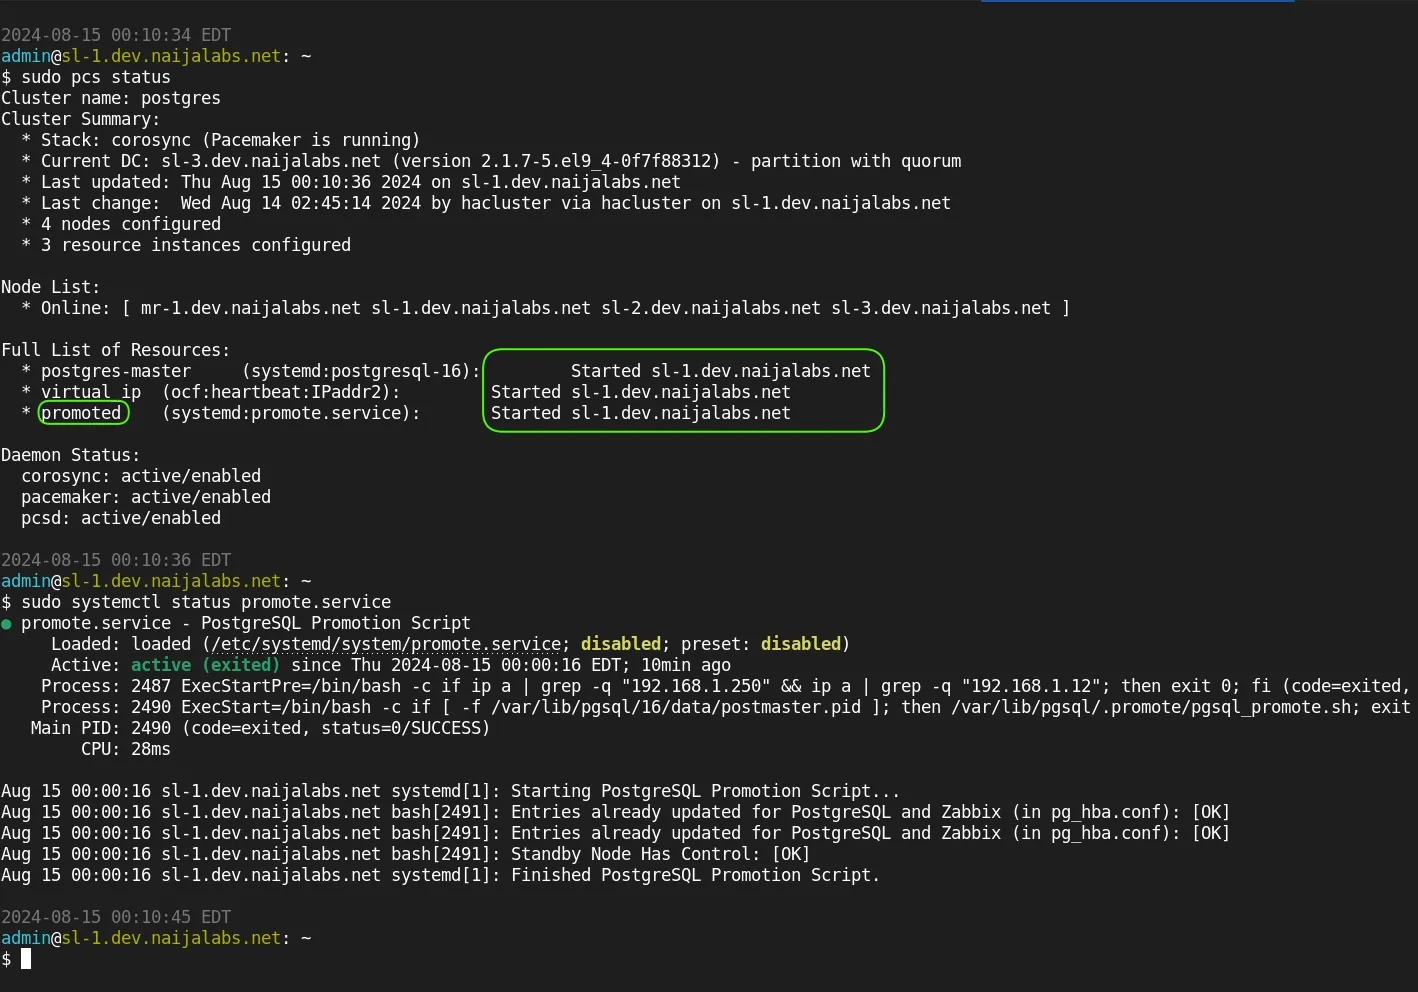
Photo by admingeek from Infotechys
Congratulations!! 😊You’ve successfully completed the database cluster setup using Pacemaker and Corosync on RHEL 9 | CentOS 9. As shown in the image above, the standby node (sl-1.dev.naijalabs.net) has now assumed the role of the primary (master). A status check on the promote service confirms that the promotion was successful, and the necessary entries in the PostgreSQL configuration file (pg_hba.conf) have been updated to allow communication with monitoring applications such as Zabbix (in this example).
⚠️ NOTE: This tutorial serves as a starting reference and is not designed for production environments. It is intended for use in a testbed or controlled setting where you can implement and test necessary security measures before deploying to a production environment.
Deploying a PostgreSQL database cluster using Pacemaker and Corosync on RHEL 9 or CentOS 9 provides a robust solution for high availability and automatic failover in mission-critical environments. Throughout this guide, we have successfully set up replication between nodes, configured the necessary resources, and implemented the promote service to ensure seamless failover from the master to the standby node when needed.
The configuration of the cluster allows for intelligent resource management, ensuring that frontend applications remain unaware of any failovers, as the cluster seamlessly promotes standby nodes to the primary role. The addition of custom scripts and constraints further enhances the flexibility and control over the failover process, enabling precise management of PostgreSQL resources.
Did you find this article useful? Your feedback is invaluable to us! Please feel free to share your thoughts in the comments section below.
For further reading and to deepen your understanding of PostgreSQL clustering and high availability with Pacemaker and Corosync, here are some valuable resources:
| Resource Title | Description | Link |
|---|---|---|
| PostgreSQL Documentation | Official documentation covering everything from basic setup to advanced configurations for PostgreSQL. | PostgreSQL Documentation |
| Red Hat Enterprise Linux 9 Pacemaker Documentation | Comprehensive guide on configuring and managing clusters using Pacemaker, including best practices. | Red Hat Enterprise Linux 9 Pacemaker Documentation |
| Corosync Documentation | In-depth documentation on Corosync, including its architecture, configuration, and troubleshooting. | Corosync Documentation |
| High Availability with PostgreSQL | A detailed guide on setting up high availability PostgreSQL clusters, covering various tools and techniques. | High Availability with PostgreSQL |
| Red Hat Enterprise Linux 9 High Availability Add-On | Official Red Hat documentation on the high availability add-on for RHEL 9, which includes instructions for setting up clusters. | RHEL 9 High Availability Add-On |
These resources will provide you with further insights and technical details to enhance your PostgreSQL clustering setup and management skills.
Related Posts
This blog post covers how to install and configure Zabbix version 7.0-2 on RHEL 9 in detail, including prerequisites, step-by-step instructions, and troubleshooting tips. Table

Learn how to install Zabbix with PostgreSQL on RHEL 9 | CentOS 9 with our comprehensive step-by-step guide. Follow clear instructions with CLI examples and

Learn about installing and using PostgreSQL on CentOS 8 with this step-by-step guide and take your data management to the next level! Table of Contents