
Commands
In this guide, we’ll walk you through the process of setting up a Caddy server using Podman, empowering you to host your websites with confidence.

In this comprehensive guide, we’ll explore how to master virtual hosting management using Podman and HAProxy, enabling you to streamline your web infrastructure, achieve optimal performance, and secure your websites with HTTPS.
In today’s digital world, handling many websites efficiently isn’t just about making things easier; it’s super important for both businesses and regular folks like us. Whether you’re a pro coder managing lots of different projects, someone starting their own online businesses, or a small business owner wanting to grow online, knowing how to handle and host lots of websites is a big deal. So, let’s take a look at how we can do this with Podman and HAProxy!
Before diving into virtual hosting management, ensure you have the following prerequisites in place:
Linux Server: You’ll need access to a Linux server where you can install and configure Podman and HAProxy. This guide assumes basic familiarity with Linux command-line operations.
Podman Installation: Install Podman on your server by following the official installation instructions for your Linux distribution. Podman provides a lightweight, daemonless container management solution, making it perfect for our use case.
HAProxy Installation: Install HAProxy on your server using your distribution’s package manager or by compiling it from source. HAProxy is a high-performance load balancer and proxy server that will help us efficiently route traffic to our website containers.
Registered Domain Names: Make sure you have registered domain names for each website you intend to host. These domain names will be used to access your websites once they’re deployed.
SSL Certificates: Obtain SSL certificates for each of your domain names to enable HTTPS support. You can obtain SSL certificates from a trusted Certificate Authority (CA) or use Let’s Encrypt for free certificates.
We’ve configured our Linux server with the following settings:
| Domain names | websrv1.naijalabs.net, websrv2.naijalabs.net, websrv3.naijalabs.net |
| Public IP address | 23.92.19.127 |
| RAM | 4 |
| Cores | 2 |
| Operating System | CentOS Stream release 9 |
Virtual hosting, also known as name-based hosting, allows you to host multiple websites on a single server by associating each website with its own domain name (e.g., example.com, example2.com). This enables you to efficiently utilize server resources while providing a seamless experience for visitors to your sites.
Podman: Podman is a container management tool that provides a lightweight and secure environment for running applications in containers. Unlike traditional container engines, Podman does not require a central daemon, making it a perfect fit for environments where security and resource efficiency are top priorities.
HAProxy: HAProxy is a high-performance TCP/HTTP load balancer and proxy server known for its reliability and advanced features. It allows you to distribute incoming traffic across multiple backend servers based on various criteria, including hostname, making it ideal for virtual hosting scenarios.
Now that you have all the prerequisites in place, let’s proceed with setting up your environment for website deployment using Podman and HAProxy. Additionally, we will pull all our images from Docker Hub so modify the following entry in the /etc/containers/registries.conf file.
					# unqualified-search-registries = ["registry.access.redhat.com", "registry.redhat.io", "docker.io"]
unqualified-search-registries = ["docker.io"]
Comment out the existing entry and change it to search only the docker.io registry.
Using Podman, you can create separate containers for each website, ensuring isolation and flexibility. Here’s an example of how to create containers for two websites:
$ podman pull nginx
First, pull down an nginx image from Docker Hub.
					✔ docker.io/library/nginx:latest
Trying to pull docker.io/library/nginx:latest...
Getting image source signatures
Copying blob c7f80e9cdab2 done   |
Copying blob 88f6f236f401 done   |
Copying blob e1caac4eb9d2 done   |
Copying blob cc1bb4345a3a done   |
Copying blob c3ea3344e711 done   |
Copying blob da8fa4352481 done   |
Copying blob 18a869624cb6 done   |
Copying config e4720093a3 done   |
Writing manifest to image destination
e4720093a3c1381245b53a5a51b417963b3c4472d3f47fc301930a4f3b17666a
Then, run the following commands to establish three(3) website containers.
$ podman run -d --name=websrv1 -e VIRTUAL_HOST=websrv1.naijalabs.net -p 8080:80 nginx
$ podman run -d --name=websrv2 -e VIRTUAL_HOST=websrv2.naijalabs.net -p 8081:80 nginx
$ podman run -d --name=websrv3 -e VIRTUAL_HOST=websrv3.naijalabs.net -p 8082:80 nginx
In this example, we’re using the VIRTUAL_HOST environment variable to specify the hostname associated with each container.
					$ podman ps
CONTAINER ID  IMAGE                           COMMAND               CREATED             STATUS             PORTS                 NAMES
4d5d52b23a37  docker.io/library/nginx:latest  nginx -g daemon o...  2 minutes ago       Up 2 minutes       0.0.0.0:8080->80/tcp  websrv1
ccdd861ff9da  docker.io/library/nginx:latest  nginx -g daemon o...  2 minutes ago       Up 2 minutes       0.0.0.0:8081->80/tcp  websrv2
78f0e8ff1099  docker.io/library/nginx:latest  nginx -g daemon o...  About a minute ago  Up About a minute  0.0.0.0:8082->80/tcp  websrv3
A quick status check using the podman ps command shows all three containers are up and running.
Next, we’ll pull down the HAProxy image and configure it to route incoming traffic based on the requested hostname:
$ podman pull docker.io/clearlinux/haproxy
Once the HAProxy image is pulled, follow these steps to configure HAProxy:
Create two sub-directories in your home directory with the following commands (below):
certs which will contain our SSL certificates and keys.configs which will contain our configuration files.
$ mkdir $HOME/certs
$ mkdir $HOME/configs
					$ ls -lh
total 8.0K
drwxr-xr-x. 2 admin admin 4.0K Feb 19 09:30 certs
drwxr-xr-x. 2 admin admin 4.0K Feb 19 09:30 configs
Using your favorite text editor, create a file called haproxy.cfg under the configs directory.
$ vim $HOME/configs/haproxy.cfg
Copy and paste the following entries (below) into haproxy.cfg.
					global
    daemon
    maxconn 256

defaults
    mode http
    timeout connect 5000ms
    timeout client 50000ms
    timeout server 50000ms

frontend http-in
    bind *:80
    default_backend servers

frontend https-in
    bind *:443 ssl crt /path/to/certificate.pem
    default_backend servers

backend servers
    server websrv1.naijalabs.net localhost:8080
    server websrv2.naijalabs.net localhost:8081
    server websrv3.naijalabs.net localhost:8082
This is a straightforward configuration for setting up HAProxy for HTTP (port 80). Now, we will examine how to set it up for HTTPS (port 443).
In the configuration file (above), we defined the frontend and backend sections to route incoming traffic to the appropriate backend servers based on the requested hostname. We will also need to replace /path/to/certificate.pem with the path to your SSL certificate file. This brings us to our next step. Run the following commands to install certbot:
$ sudo dnf install epel-release -y; sudo dnf install certbot -y
The certbot package belongs to the Extra Packages for Enterprise Linux (EPEL) repository. Therefore, we need to install it first, before installing certbot.
This is a good place to configure firewall rules to allow ports 8080, 8081, 8082, 80, and 443. These are all the ports we’ll need for this setup. Run the following commands to open these ports for access:
$ sudo firewall-cmd --permanent --add-port{8080,8081,8082,80,443}/tcp
$ sudo firewall-cmd --reload
With certbot installed and necessary ports open to allow traffic, we can now run the following commands to generate Letsencrypt certificates for each of our websites:
$ sudo certbot certonly --standalone -d websrv1.naijalabs.net -d websrv1.naijalabs.net
$ sudo certbot certonly --standalone -d websrv2.naijalabs.net -d websrv2.naijalabs.net
$ sudo certbot certonly --standalone -d websrv3.naijalabs.net -d websrv3.naijalabs.net
The image below displays the outputs resulting from running the certbot commands. Certbot will validate domain ownership and retrieve SSL certificates from Letsencrypt. These certificates are valid for 90 days and will be stored in /etc/letsencrypt/live.
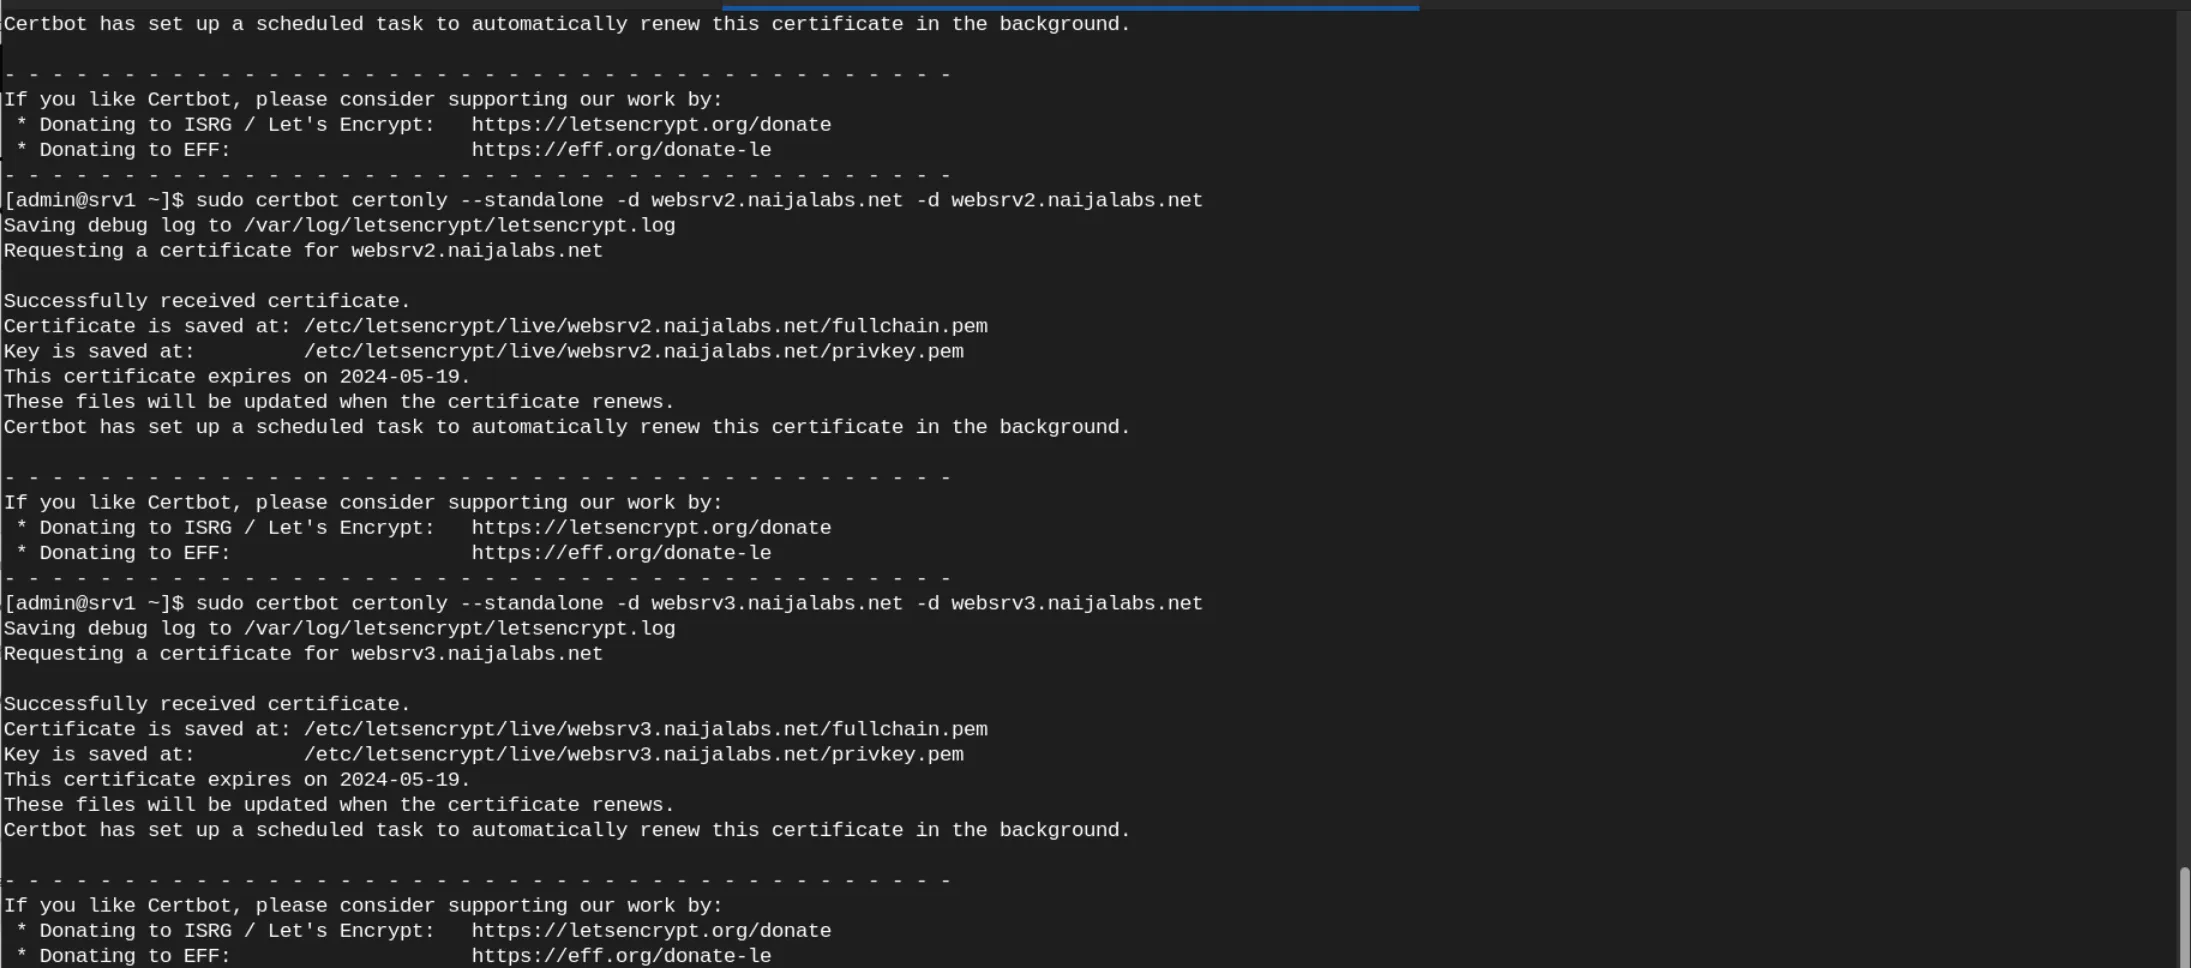
Photo by admingeek from Infotechys
Append the following entry to the /etc/sysctl.conf file.
net.ipv4.ip_unprivileged_port_start=80
Adding the net.ipv4.ip_unprivileged_port_start=80 entry will resolve a common issue with podman. Since podman is a rootless container, ports below 1024 are not accessible. Ports below 1024 are considered privileged ports and can only be bound to by processes with root privileges. Save and exit the file. Then, run the following command to apply the change.
$ sudo sysctl -p /etc/sysctl.conf
Run the following command to allow haproxy to bind to the necessary ports.
$ sudo setsebool -P haproxy_connect_any=1
After running this command, HAProxy should be able to connect to any port, which resolves common “Permission denied” errors (displayed below).
					[ALERT]    (1) : Binding [/usr/local/etc/haproxy/haproxy.cfg:12] for frontend http-in: cannot bind socket (Permission denied) for [0.0.0.0:80]
[ALERT]    (1) : Binding [/usr/local/etc/haproxy/haproxy.cfg:16] for frontend https-in: cannot bind socket (Permission denied) for [0.0.0.0:443]
[ALERT]    (1) : [haproxy.main()] Some protocols failed to start their listeners! Exiting.
Next, configure HAProxy (haproxy.cfg) to terminate SSL/TLS connections and forward decrypted traffic to the backend servers. Update your HAProxy configuration to include SSL termination and point to the SSL certificates obtained from Letsencrypt.
$ mv $HOME/configs/haproxy.cfg $HOME/configs/haproxy.cfg.http
$ vim $HOME/configs/haproxy.cfg
Copy and paste the following entries into haproxy.cfg
					global
    log stdout format raw local0

    # Increase the default DH parameter size to at least 2048 bits
    tune.ssl.default-dh-param 2048

defaults
    mode http
    log global
    timeout connect 5000ms
    timeout client 50000ms
    timeout server 50000ms

frontend http-in
    bind *:80
    redirect scheme https code 301 if !{ ssl_fc }

frontend https-in
    bind *:443 ssl crt /etc/letsencrypt/live/websrv1.naijalabs.net/fullchain.pem
    http-request set-header X-Forwarded-Proto https if { ssl_fc }

    acl host_websrv1 hdr(host) -i websrv1.naijalabs.net
    acl host_websrv2 hdr(host) -i websrv2.naijalabs.net
    acl host_websrv3 hdr(host) -i websrv3.naijalabs.net

    use_backend websrv1 if host_websrv1
    use_backend websrv2 if host_websrv2
    use_backend websrv3 if host_websrv3

backend websrv1
    server websrv1 websrv1.naijalabs.net:8080 ssl verify none

backend websrv2
    server websrv2 websrv2.naijalabs.net:8081 ssl crt /etc/letsencrypt/live/websrv2.naijalabs.net/fullchain.pem

backend websrv3
    server websrv3 websrv3.naijalabs.net:8082 ssl crt /etc/letsencrypt/live/websrv3.naijalabs.net/fullchain.pem
In this configuration, we’ve added a frontend for HTTPS traffic on port 443, specifying the SSL certificate chain (fullchain.pem) for each domain.
Navigate to your certs directory, run the following commands:
$ cd $HOME/certs
$ sudo chown -R admin:root /etc/letsencrypt/live
$ sudo chown -R admin:root /etc/letsencrypt/archive
Then, run the following commands to bundle the certificate and key for each website instance.
					$ cat /etc/letsencrypt/live/websrv1.naijalabs.net/fullchain.pem > ca-bundle.pem
$ cat /etc/letsencrypt/live/websrv1.naijalabs.net/privkey.pem >> ca-bundle.pem
					$ cat /etc/letsencrypt/live/websrv2.naijalabs.net/fullchain.pem > ca-bundle2.pem
$ cat /etc/letsencrypt/live/websrv2.naijalabs.net/privkey.pem >> ca-bundle2.pem
					$ cat /etc/letsencrypt/live/websrv3.naijalabs.net/fullchain.pem > ca-bundle3.pem
$ cat /etc/letsencrypt/live/websrv3.naijalabs.net/privkey.pem >> ca-bundle3.pem
The certs directory should now contain CA bundles for all three website containers.
					$ ls -lh ~/certs
total 12K
-rw-r--r--. 1 admin admin 3.5K Feb 19 21:02 ca-bundle2.pem
-rw-r--r--. 1 admin admin 3.5K Feb 19 21:03 ca-bundle3.pem
-rw-r--r--. 1 admin admin 3.5K Feb 19 20:55 ca-bundle.pem
$ sudo chown -R admin:root /etc/letsencrypt/live: This command changes the ownership of the /etc/letsencrypt/live directory and all its contents recursively to a user named admin and a group named root. The -R flag indicates recursive ownership change, meaning it will apply to all files and subdirectories within /etc/letsencrypt/live. This command is typically used to grant ownership permissions to a specific user or group for managing SSL/TLS certificates.
$ sudo chown -R admin:root /etc/letsencrypt/archive: Similar to the previous command, this command changes the ownership of the /etc/letsencrypt/archive directory and all its contents recursively to the admin user and root group. The /etc/letsencrypt/archive directory contains archived copies of your SSL/TLS certificates.
These commands are concatenating the contents of two files (fullchain.pem and privkey.pem) into a single file named ca-bundle.pem.
Let’s Encrypt certificates expire every 90 days, so it’s essential to set up automated renewal to ensure continuous HTTPS coverage. Certbot includes a built-in renewal mechanism that runs twice daily.
$ sudo certbot renew --dry-run
					Saving debug log to /var/log/letsencrypt/letsencrypt.log

- - - - - - - - - - - - - - - - - - - - - - - - - - - - - - - - - - - - - - - -
Processing /etc/letsencrypt/renewal/websrv1.naijalabs.net.conf
- - - - - - - - - - - - - - - - - - - - - - - - - - - - - - - - - - - - - - - -
Account registered.
Simulating renewal of an existing certificate for websrv1.naijalabs.net

- - - - - - - - - - - - - - - - - - - - - - - - - - - - - - - - - - - - - - - -
Processing /etc/letsencrypt/renewal/websrv2.naijalabs.net.conf
- - - - - - - - - - - - - - - - - - - - - - - - - - - - - - - - - - - - - - - -
Simulating renewal of an existing certificate for websrv2.naijalabs.net

- - - - - - - - - - - - - - - - - - - - - - - - - - - - - - - - - - - - - - - -
Processing /etc/letsencrypt/renewal/websrv3.naijalabs.net.conf
- - - - - - - - - - - - - - - - - - - - - - - - - - - - - - - - - - - - - - - -
Simulating renewal of an existing certificate for websrv3.naijalabs.net

- - - - - - - - - - - - - - - - - - - - - - - - - - - - - - - - - - - - - - - -
Congratulations, all simulated renewals succeeded:
  /etc/letsencrypt/live/websrv1.naijalabs.net/fullchain.pem (success)
  /etc/letsencrypt/live/websrv2.naijalabs.net/fullchain.pem (success)
  /etc/letsencrypt/live/websrv3.naijalabs.net/fullchain.pem (success)
- - - - - - - - - - - - - - - - - - - - - - - - - - - - - - - - - - - - - - - -
Test the renewal process to ensure it works correctly. Once confirmed, Certbot will automatically renew your certificates when they are close to expiration.
Now, for the moment of truth! Execute the following command to launch HAProxy, ensuring that you specify the location of the SSL certificate and include the HAProxy configuration file:
$ podman run -d --name haproxy -p 80:80 -p 443:443 -v $HOME/configs/haproxy.cfg:/usr/local/etc/haproxy/haproxy.cfg:Z -v $HOME/certs/ca-bundle.pem:/etc/letsencrypt/live/websrv1.naijalabs.net/fullchain.pem:Z -v $HOME/certs/ca-bundle2.pem:/etc/letsencrypt/live/websrv2.naijalabs.net/fullchain.pem:Z -v $HOME/certs/ca-bundle3.pem:/etc/letsencrypt/live/websrv3.naijalabs.net/fullchain.pem:Z haproxy
Perform a quick status check to confirm haproxy is running.
					$ podman ps
CONTAINER ID  IMAGE                                COMMAND               CREATED        STATUS            PORTS                                     NAMES
4d5d52b23a37  docker.io/library/nginx:latest       nginx -g daemon o...  11 hours ago   Up 46 minutes     0.0.0.0:8080->80/tcp                      websrv1
ccdd861ff9da  docker.io/library/nginx:latest       nginx -g daemon o...  11 hours ago   Up About an hour  0.0.0.0:8081->80/tcp                      websrv2
78f0e8ff1099  docker.io/library/nginx:latest       nginx -g daemon o...  11 hours ago   Up About an hour  0.0.0.0:8082->80/tcp                      websrv3
5a95a2a4eb99  docker.io/clearlinux/haproxy:latest  haproxy -f /usr/l...  2 seconds ago  Up 3 seconds      0.0.0.0:80->80/tcp, 0.0.0.0:443->443/tcp  haproxy
To verify that each website is operational, simply enter the URL of each website into your web browser.
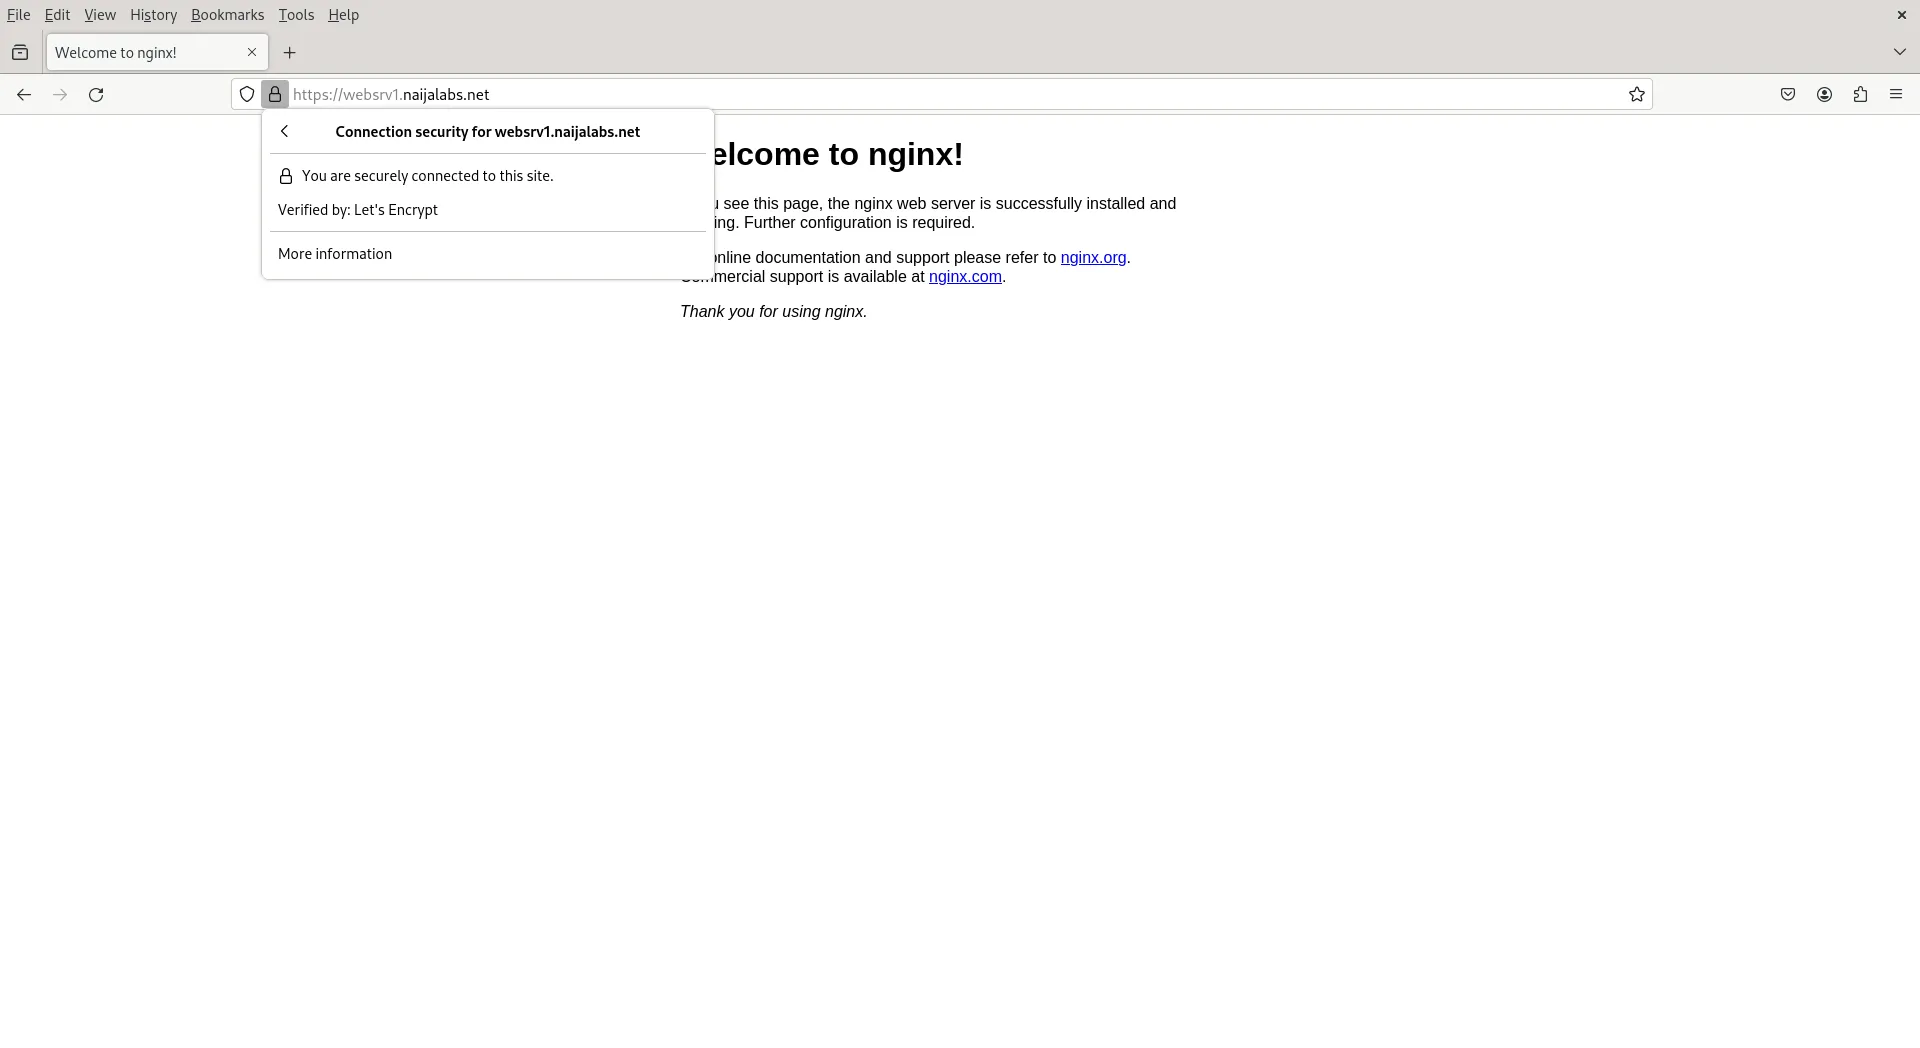
Photo by admingeek from Infotechys
Congratulations! You’ve successfully set up multiple websites using Podman and HAProxy. This approach offers scalability, flexibility, and enhanced security for hosting your web projects. As you continue to explore and expand your online presence, remember to monitor and maintain your containers and proxy configurations regularly. By following this guide, you’ve learned how to leverage modern containerization and load balancing technologies to streamline your web hosting workflow.
Did you find this article useful? Your feedback is invaluable to us! Please feel free to share your thoughts in the comments section below.
Related Posts
In this guide, we’ll walk you through the process of setting up a Caddy server using Podman, empowering you to host your websites with confidence.
In this guide, we’ll explore how to deploy a web server using Podman, a powerful containerization tool that provides a lightweight and secure environment for
Looking for a container management tool that integrates seamlessly with systemd? Podman containers with systemd support allow you to easily create, run, manage, and deploy