In this article, we will review how to install VMware Workstation Player on a RHEL7 or CentOS7 Linux machine, guiding you through the installation process

In today’s Ansible series, we will learn about automating changes using Ansible. Specifically, we will automate changes to the sshd config file.
In this exercise, we will examine a playbook that automates a config change (resolves common SSH vulnerabilities) and …specifically makes a change to the sshd (sshd_config) configuration file on Linux Machine.
Some examples of these types of SSH vulnerabilities are, SSH Weak Key Exchange Algorithms Enabled, and SSH Cipher Block Chaining (CBC) Mode Enabled. It also uses the change attributes utility (chattr) to lock up the file and prevent it from being overwritten or changed mistakenly after the change is implemented.
We will call this play sshd_config.yaml and it will be executable on any Linux (specifically written for CentOS7 and RHEL7) machine.
Let’s take a look at the sshd_config.yaml file. We will break down each line to gain a better understanding of what the play is doing (below):
					---
- name: Fixing SSH Weak Key Exchange Algorithms, Cipher Block Chaining (CBC), and MACs Enabled
  hosts: all
  serial: 7
  become: true

  tasks:
  # First, change attributes of the ssh config file to allow changes
  - name: Unlock the sshd configuration file
    command: chattr -i /etc/ssh/sshd_config

  # Do some housekeeping and remove any existing SSH cipher, kexalgorithm, and MAC entries
  - name: Removing old KexAlgorithms entry from the sshd configuration file
    lineinfile:
      path: /etc/ssh/sshd_config
      state: absent
      regexp: '^KexAlgorithms'

  - name: Removing old Ciphers entry from the sshd configuration file
    lineinfile:
      path: /etc/ssh/sshd_config
      state: absent
      regexp: '^Ciphers'

  - name: Removing old MACs entry from the sshd configuration file
    lineinfile:
      path: /etc/ssh/sshd_config
      state: absent
      regexp: '^MACs'

  # Add the new entries to the end of the sshd_config file
  - name: Adding new SSH Ciphers entry to the [sshd_config] file
    shell: echo "Ciphers aes128-ctr,aes192-ctr,aes256-ctr" >> /etc/ssh/sshd_config

  - name: Adding new SSH KexAlgorithms entry to the [sshd_config] file
    shell: echo "KexAlgorithms ecdh-sha2-nistp256,ecdh-sha2-nistp384,ecdh-sha2-nistp521,diffie-hellman-group-exchange-sha256,diffie-hellman-group16-sha512,diffie-hellman-group18-sha512,diffie-hellman-group14-sha256" >> /etc/ssh/sshd_config

  - name: Adding new SSH MACs entry to the [sshd_config] file
    shell: echo "MACs hmac-sha2-256,hmac-sha2-512" >> /etc/ssh/sshd_config

  # Restart SSH Service
  - name: Restarting sshd.service on {{ ansible_fqdn }}
    service:
      name: sshd
      state: restarted

  # Change attributes of the ssh config file to disallow changes
  - name: Lock the sshd configuration file
    command: chattr +i /etc/ssh/sshd_config
💡NOTE: Now that we have the entire playbook displayed (above), lets go through and analyze each line of code. We’ll start with the top few lines (below). |
🟢 Introduction: Header |
When you start writing an Ansible playbook, you will need to begin with the three dashes [—]. This signals the start of the yaml file and tells Ansible where to begin. Then, we use the [- name:] variable which serves as the header and states what the playbook aims to accomplish. In this case, we are running a playbook that will make entries in the sshd configuration file (/etc/ssh/sshd_config), and fix weak Ciphers, KexAlgorithms, and MAC settings that are enabled by default with SSH.
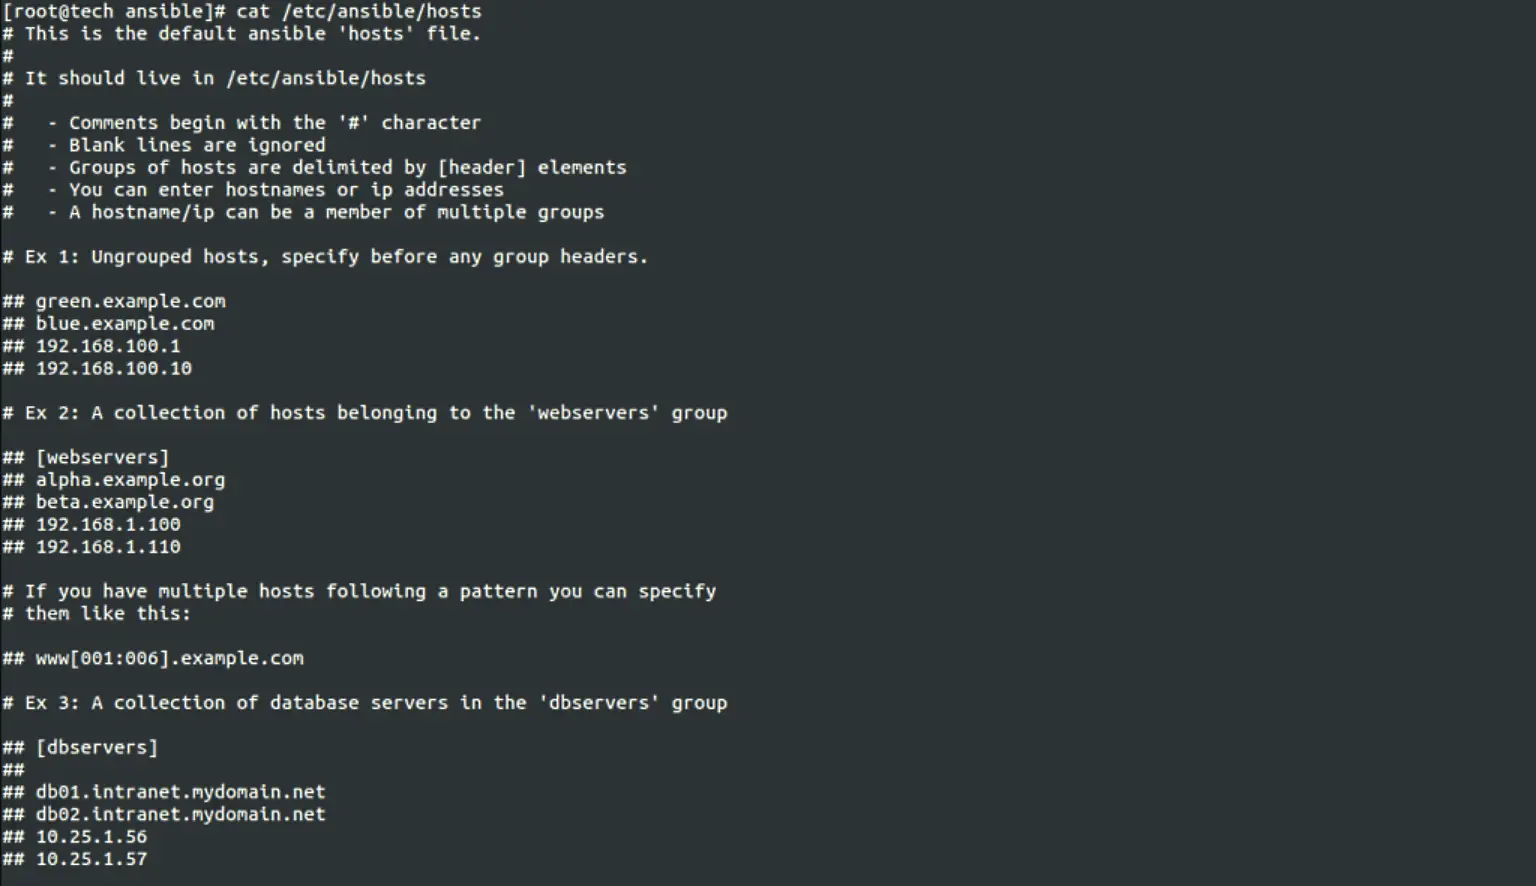
The [hosts: all] is where we declare what machine or group of machines we want to execute this play on. Expect in rare circumstances such as running on just one machine (e.g. localhost), should we ever need to change the “all” value. The hosts variable refers to the contents within the inventory file, which is where you should have an organized list of all the machines in your environment, separated in groups by webservers, database, development, testing, production, etc. |
This picture (below) displays the default inventory file in Ansible (/etc/ansible/hosts). However, you are not bound by the default inventory file. You can direct Ansible to use a different inventory file that you created by adding the path to that file, to the command-line (CLI) upon executing the playbook. If you do not provide a path to a different inventory file, Ansible will default to the /etc/ansible/hosts file for inventory. We’ll revisit this option later on in this post
					---
- name: Fixing SSH Weak Key Exchange Algorithms, Cipher Block Chaining (CBC), and MACs Enabled
  hosts: all
  serial: 7
  become: true
|
|
|
|
🟢 The Inventory |
The default /etc/ansible/hosts inventory file.
When we go to execute the play from the command-line (CLI), we can specify which group of machines (e.g. testing) we want to run the play on initially, before running it on every Linux machine in our environment. It is always best practice to first run the play on a group of test systems and verify functionality, before proceeding to the total inventory of systems in your environment.
The [serial: 7] variable directs the play to run in batches of seven(7) machines at a time. We’ve found that in mid to large size environments (100 to 1000+ machines), using this directive gets the playbook running faster. Depending on your situation, you may not need this option. For instance, if you’re running this play on a handful or a dozen or so systems, you would not need this option. Also, if you don’t mind the time it takes for Ansible to gather facts on each system and run other processes prior to making the change, then you can remove or comment (#) out this line.
Finally, the [become: true] variable is where we consider what types of privileges we’re going to need to successfully execute this play. In this case, we are making changes to a system config file which requires that we become root. By setting the become variable to “true”, we are signaling the play to expect to perform tasks on our Linux system that require the root permission. However, if our playbook only made changes to a regular file (not requiring root permissions for access), we can change the become value to “false”.

Photo by admingeek from Infotechys
💡NOTE: Now that we’ve specified how we want the playbook to run, we can now establish what we want it to do. |
First things first, we need to unlock the sshd configuration file. It is good security practice to restrict access to system configuration files or files that control important functions on a system. SSH is one of those important functions, because without it, connecting to a system remotely (via SSH) becomes impossible. Also, notice each task is commented. This is a good habit to develop in general when coding. It improves the readability of your code and allows others to follow and make changes/updates easily.
Again, the [- name: ] variable is our header and states what task we are executing here.
The [command:] variable is generally used for entering Linux commands. In this case, the chattr (change attributes) command with the minus (-i) flag or immutable option tells the system to unlock the file for use. Obviously, the (+i) flag locks the file and prevents it from being edited after the change–even by the root user.
🟢 Unlock the sshd configuration file: |
The playbook starts by unlocking the /etc/ssh/sshd_config file using the chattr command, removing any immutable attributes.
					  tasks:
  # First, change attributes of the ssh config file to allow changes
  - name: Unlock the sshd configuration file
    command: chattr -i /etc/ssh/sshd_config
🟢 Remove old KexAlgorithms, Ciphers, and MACs entries: |
Existing weak entries for KexAlgorithms, Ciphers, and MACs are removed using Ansible’s lineinfile module.
					- name: Removing old KexAlgorithms entry from the sshd configuration file
  lineinfile:
    path: /etc/ssh/sshd_config
    state: absent
    regexp: '^KexAlgorithms'
🟢 Add new entries to the sshd_config file: |
The playbook then adds more robust entries for SSH Ciphers, KexAlgorithms, and MACs to the end of the configuration file.
					- name: Adding new SSH Ciphers entry to the [sshd_config] file
  shell: echo "Ciphers aes128-ctr,aes192-ctr,aes256-ctr" >> /etc/ssh/sshd_config
🟢 Restart SSH Service: |
To apply the changes, the playbook restarts the SSH service (sshd) on the target host.
					- name: Restarting sshd.service on {{ ansible_fqdn }}
  service:
    name: sshd
    state: restarted
🟢 Lock the sshd configuration file: |
Finally, the playbook ensures the security of the configuration file by locking it again.
					- name: Lock the sshd configuration file
  command: chattr +i /etc/ssh/sshd_config
🟢 Cipher entries explained: |
The new entries aim to strengthen SSH security by specifying allowed encryption ciphers, key exchange algorithms, and message authentication codes.
aes128-ctr, aes192-ctr, aes256-ctr
					    ecdh-sha2-nistp256, ecdh-sha2-nistp384, ecdh-sha2-nistp521,
    diffie-hellman-group-exchange-sha256,
    diffie-hellman-group16-sha512, diffie-hellman-group18-sha512, diffie-hellman-group14-sha256
hmac-sha2-256, hmac-sha2-512
In essence, this Ansible playbook serves as a crucial tool in the arsenal of system administrators, ensuring that SSH remains a robust and secure means of accessing remote systems. By following these steps, you can fortify your infrastructure against potential vulnerabilities, contributing to a more resilient and secure IT environment.
Did you find this article helpful? Your feedback is invaluable to us! Feel free to share this post with those who may benefit, and let us know your thoughts in the comments section below.

In this article, we will review how to install VMware Workstation Player on a RHEL7 or CentOS7 Linux machine, guiding you through the installation process

NFS or Network File System is a commonly known method for network file sharing on Linux hosts. We will create and export an NFS server.

Installing RHEL7 or CentOS7 on a PC is fairly easy to do. In this tutorial, we will review the installation process step-by-step. Today’s focus will
