
Commands
Learn how to install and configure IPA/IdM on RHEL 9 and CentOS 9. This comprehensive guide covers prerequisites, step-by-step installation, user management, and enabling 2FA


Learn how to set up a local DNS server on CentOS 9 using BIND, with detailed instructions, CLI examples, and best practices for managing DNS zones and records.
In today’s world of networked systems, DNS (Domain Name System) is one of the most critical components. It helps resolve human-readable domain names (like dev.naijalabs.net) into machine-readable IP addresses. Setting up a local DNS server can improve network efficiency, security, and troubleshooting capabilities. BIND (Berkeley Internet Name Domain) is the most widely used DNS software and works seamlessly with CentOS 9.
In this guide, we will walk you through the process of setting up a local DNS server on CentOS 9 using BIND, covering installation, configuration, and DNS record management.
Why Set Up a Local DNS Server? |
Before we proceed, ensure you have the following prerequisites:
|
BIND is available directly from CentOS 9’s default repository, so installation is straightforward. Follow these steps to install it.
Step 1: Install BIND Package |
Start by updating your system to ensure all packages are up to date:
sudo dnf update -y && sudo systemctl reboot
Install the BIND package along with related tools:
sudo dnf install bind bind-utils -y
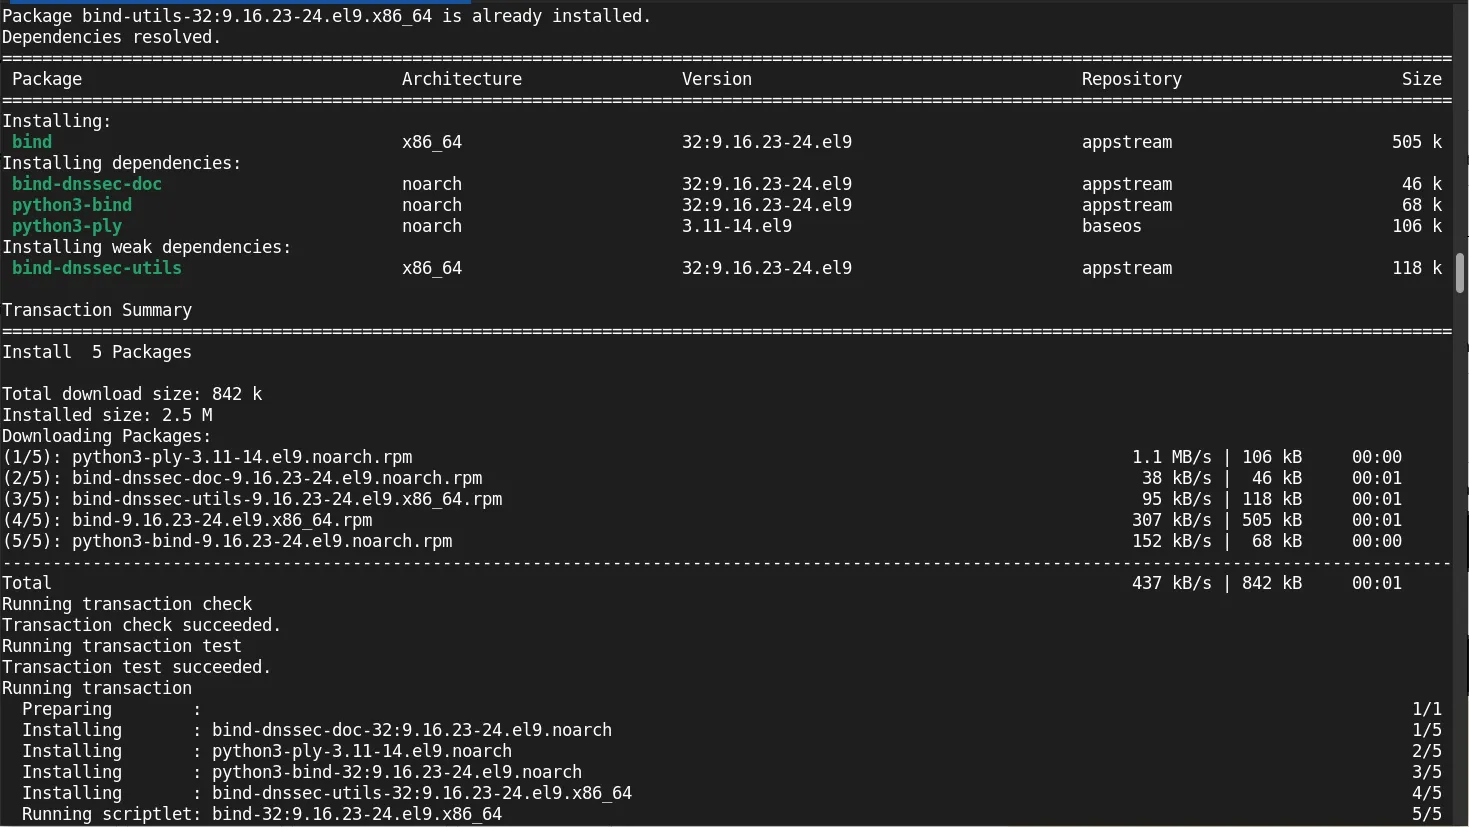
Photo by admingeek from Infotechys
bind: The main DNS server software.bind-utils: Utilities for testing and troubleshooting DNS.
Step 2: Enable and Start the BIND Service |
Once the installation is complete, enable and start the named service (the BIND daemon):
sudo systemctl enable --now named
To confirm the service is running:
sudo systemctl status named
					● named.service - Berkeley Internet Name Domain (DNS)
     Loaded: loaded (/usr/lib/systemd/system/named.service; enabled; preset: disabled)
     Active: active (running) since Tue 2025-02-11 19:33:43 EST; 13s ago
    Process: 28682 ExecStartPre=/bin/bash -c if [ ! "$DISABLE_ZONE_CHECKING" == "yes" ]; then /usr/sbin/named-checkconf -z "$NAMEDCONF"; else ec>
    Process: 28684 ExecStart=/usr/sbin/named -u named -c ${NAMEDCONF} $OPTIONS (code=exited, status=0/SUCCESS)
   Main PID: 28685 (named)
      Tasks: 8 (limit: 23127)
     Memory: 25.3M
        CPU: 114ms
     CGroup: /system.slice/named.service
             └─28685 /usr/sbin/named -u named -c /etc/named.conf
You should see a status indicating that the service is active and running.
The BIND configuration files are located in /etc/named.conf. We need to edit this file to set up our server.
Step 3: Modify the Configuration File |
Open the named.conf file using a text editor:
sudo vim /etc/named.conf
Within this file, you’ll define the zones, specify DNS settings, and configure security features. A basic configuration might look like this (replace dev.naijalabs.net with your actual domain):
					//
// named.conf
//
// Provided by Red Hat bind package to configure the ISC BIND named(8) DNS
// server as a caching only nameserver (as a localhost DNS resolver only).
//
// See /usr/share/doc/bind*/sample/ for example named configuration files.
//

options {
	listen-on port 53 { 127.0.0.1; };
	listen-on-v6 port 53 { ::1; };
	directory 	"/var/named";
	dump-file 	"/var/named/data/cache_dump.db";
	statistics-file "/var/named/data/named_stats.txt";
	memstatistics-file "/var/named/data/named_mem_stats.txt";
	secroots-file	"/var/named/data/named.secroots";
	recursing-file	"/var/named/data/named.recursing";
	allow-query     { localhost; };

	/*
	 - If you are building an AUTHORITATIVE DNS server, do NOT enable recursion.
	 - If you are building a RECURSIVE (caching) DNS server, you need to enable
	   recursion.
	 - If your recursive DNS server has a public IP address, you MUST enable access
	   control to limit queries to your legitimate users. Failing to do so will
	   cause your server to become part of large scale DNS amplification
	   attacks. Implementing BCP38 within your network would greatly
	   reduce such attack surface
	*/
	recursion yes;

	dnssec-validation yes;

	managed-keys-directory "/var/named/dynamic";
	geoip-directory "/usr/share/GeoIP";

	pid-file "/run/named/named.pid";
	session-keyfile "/run/named/session.key";

	/* https://fedoraproject.org/wiki/Changes/CryptoPolicy */
	include "/etc/crypto-policies/back-ends/bind.config";
};

logging {
        channel default_debug {
                file "data/named.run";
                severity dynamic;
        };
};

zone "." IN {
	type hint;
	file "named.ca";
};


include "/etc/named.rfc1912.zones";
include "/etc/named.root.key";
| Configuration Option | Explanation |
|---|---|
| listen-on | Specifies the IP addresses the server will listen to. |
| allow-query | Defines who can query the DNS server. |
| recursion | Allows the DNS server to perform recursive queries. |
| zone “.” | A root hint file used for directing queries to the root DNS servers. |
| localhost and reverse zones | Local zones to resolve local network names and reverse lookups (e.g., 127.0.0.in-addr.arpa for reverse DNS of 127.0.0.1). |
Step 4: Configure Local DNS Zones |
Now let’s set up custom DNS zones. In the example below, we create a zone for dev.naijalabs.net and its reverse DNS records.
Create Zone Files |
Navigate to /var/named and create a zone file for your domain.
sudo vim /var/named/dev.naijalabs.net.zone
This file might look like this:
					$TTL 86400
@	IN SOA ns1.dev.naijalabs.net. admin.dev.naijalabs.net. (
	     2025021101 ; Serial
	     3600       ; Refresh
	     1800       ; Retry
	     1209600	; Expire
	     86400 )	; Minimum TTL
	IN NS	ns1.dev.naijalabs.net.
	IN NS	ns2.dev.naijalabs.net.

@	IN A	192.168.1.10
ns1 IN A	192.168.1.11
ns2	IN A	192.168.1.12
Reverse DNS Zone File |
For reverse DNS lookups, create a zone file for the IP range:
sudo vim /var/named/1.168.192.in-addr.arpa.zone
Add the following entries:
					$TTL 86400
@	IN	SOA	ns1.dev.naijalabs.net. admin.dev.naijalabs.net. (
		  2025021101	; Serial
		  3600		; Refresh
		  1800		; Retry
		  1209600	; Expire
		  86400 )	; Minimum TTL

	IN	NS	ns1.dev.naijalabs.net.
	IN	NS	ns2.dev.naijalabs.net.

10	IN	PTR	dev.naijalabs.net.
11	IN	PTR	ns1.dev.naijalabs.net.
12	IN	PTR	ns2.dev.naijalabs.net.
Step 5: Update named.conf for New Zones |
Once you’ve created the zone files, update /etc/named.conf to include the new zones:
					zone "dev.naijalabs.net" IN {
	type master;
	file "dev.naijalabs.net.zone";
};

zone "1.168.192.in-addr.arpa" IN {
	type master;
	file "1.168.192.in-addr.arpa.zone";
};
Step 6: Open DNS Ports in the Firewall |
BIND operates over port 53. To allow DNS queries, you must configure the firewall to allow traffic on this port:
sudo firewall-cmd --permanent --zone=public --add-port=53/tcp
sudo firewall-cmd --permanent --zone=public --add-port=53/udp
sudo firewall-cmd --reload
Step 7: Adjust SELinux Settings |
By default, SELinux may block DNS queries. To configure SELinux properly, run the following command:
sudo setsebool -P named_tcp_bind_http_port 1
sudo setsebool -P named_write_master_zones 1
These settings ensure that BIND can bind to the necessary ports and modify zone files.
After configuring everything, it’s essential to test your DNS server to ensure it’s functioning correctly.
Step 8: Check BIND’s Configuration |
Run the following command to verify the syntax of the BIND configuration files:
sudo named-checkconf
This command will not produce any output if everything is configured correctly. Otherwise, it will return errors.
Step 9: Check Zone Files |
Verify the zone files to ensure there are no errors:
sudo named-checkzone dev.naijalabs.net /var/named/dev.naijalabs.net.zone
					zone dev.naijalabs.net/IN: loaded serial 2025021101
OK
If there are no errors, it will confirm the zone file is valid.
Step 10: Test DNS Resolution |
Use the dig or nslookup tool to test DNS resolution:
dig @localhost dev.naijalabs.net
The output should show the A record for dev.naijalabs.net and indicate successful resolution.
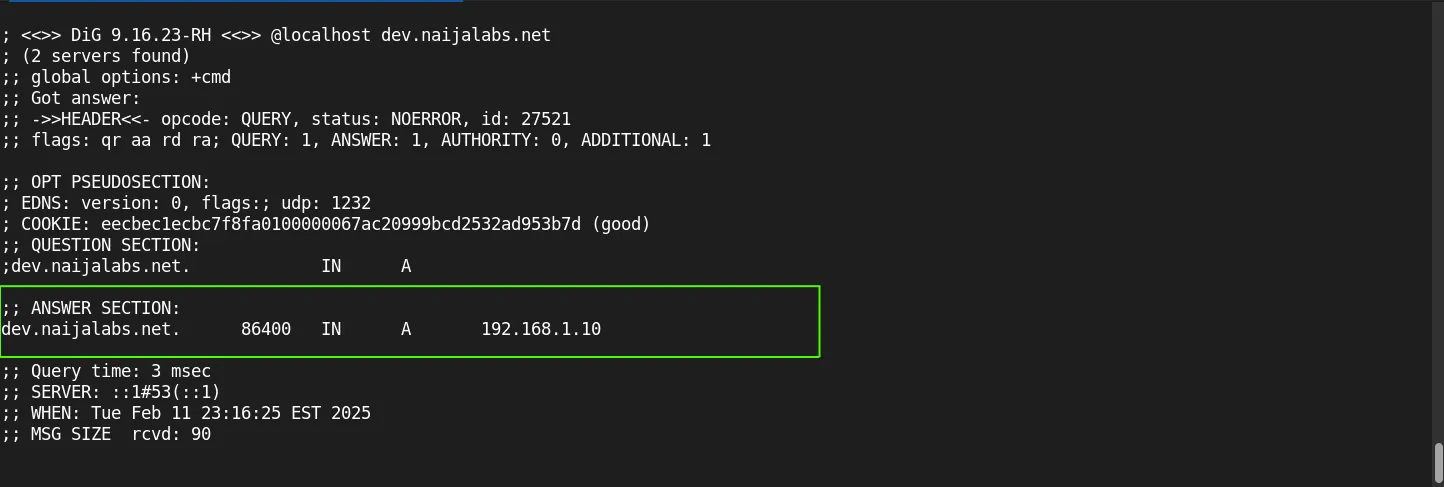
Photo by admingeek from Infotechys
The /etc/resolv.conf file on the other client machines might appear as follows:
					search router.naijalabs.net dev.naijalabs.net
nameserver 192.168.1.10 # DNS server IP address
nameserver 192.168.1.1
nameserver directives specify the IP addresses of DNS servers that the system will use for resolving domain names.
|
Run the nslookup command to verify:
nslookup ns1.dev.naijalabs.net
					Server:		192.168.1.10
Address:	192.168.1.10#53

Name:	ns1.dev.naijalabs.net
Address: 192.168.1.11
Setting up a local DNS server on CentOS 9 with BIND is a powerful way to manage domain resolution within your network. By following the steps outlined in this guide, you’ll gain control over DNS queries, improve performance, and enhance security for your network. Don’t forget to monitor the DNS server regularly and maintain backups of your configuration and zone files for disaster recovery.
Did you find this article useful? Your feedback is invaluable to us! Please feel free to share this post!
Learn how to install and configure IPA/IdM on RHEL 9 and CentOS 9. This comprehensive guide covers prerequisites, step-by-step installation, user management, and enabling 2FA

To ensure your website performs optimally, let’s delve into 10 reasons why your website is slow and how to fix it. Table of Contents Introduction
In this article, we will review how to change DNS settings using nmcli. In RHEL7 and CentOS7, modifying the ifcfg scripts or /etc/resolv.conf files directly