Commands
In this comprehensive guide, we’ll walk you through the process of creating and deploying a LAMP stack on Minikube, a tool that enables you to

Configure Kubernetes networking on Minikube: learn how to set up Pod networking, Service networking, ingress routing, and network policies step‑by‑step with CLI examples and troubleshooting insights.
Kubernetes networking can be complex—but when you’re running Kubernetes locally with Minikube, it’s much simpler. In this step‑by‑step guide, you’ll learn everything you need to configure Pod networking, Service networking, ingress, and network plugins like Calico, Cilium, and Flannel, all within a Minikube environment. Clear CLI examples, comparison tables, and real‑world use cases help you get your local dev clusters networking just right.
|
|
|
|
| Concept | Meaning | Why it matters on Minikube |
|---|---|---|
| Pod Networking | How pods communicate inside the cluster | Verifies CNI plugin functionality |
| Service Networking | Stable endpoints and virtual IPs for accessing pods | Tests services and ClusterIP / NodePort |
| Ingress | HTTP/HTTPS routing into Services | Simulates domain-based routing locally |
| Network Policies | Pod authorization via rules (deny/allow traffic) | Test Calico/Cilium policy enforcement |
| DNS Resolution | In-cluster DNS via kube-dns or CoreDNS | Ensures internal service discovery works |
If you’re trying to use a specific CNI like Calico, do it manually:
minikube start --driver=podman
Calico |
kubectl apply -f https://raw.githubusercontent.com/projectcalico/calico/v3.27.0/manifests/calico.yaml
Flannel |
kubectl apply -f https://raw.githubusercontent.com/flannel-io/flannel/master/Documentation/kube-flannel.yml
					clusterrole.rbac.authorization.k8s.io/flannel created
clusterrolebinding.rbac.authorization.k8s.io/flannel created
serviceaccount/flannel created
configmap/kube-flannel-cfg created
daemonset.apps/kube-flannel-ds created
Cilium (requires additional configuration): |
					# Use the official install guide for full setup:
curl -LO https://github.com/cilium/cilium-cli/releases/latest/download/cilium-linux-amd64.tar.gz
Use a simple busybox pod pair to verify connectivity:
kubectl run busy1 --image=python:3.9-slim --restart=Never -- python -m http.server 8080
kubectl run busy2 --image=python:3.9-slim --restart=Never -- python -m http.server 8080
kubectl expose pod busy2 --port=8080 --name=busy2-service
kubectl exec busy1 -- wget -qO- http://busy2-service:8080/
If you see output (below) from busy2, pod networking is working. If not—check the logs:
					<!DOCTYPE HTML PUBLIC "-//W3C//DTD HTML 4.01//EN" "http://www.w3.org/TR/html4/strict.dtd">
<html>
<head>
<meta http-equiv="Content-Type" content="text/html; charset=utf-8">
<title>Directory listing for /</title>
</head>
<body>
<h1>Directory listing for /</h1>
<hr>
<ul>
<li><a href="bin/">bin@</a></li>
<li><a href="boot/">boot/</a></li>
<li><a href="dev/">dev/</a></li>
<li><a href="etc/">etc/</a></li>
<li><a href="home/">home/</a></li>
<li><a href="lib/">lib@</a></li>
<li><a href="lib64/">lib64@</a></li>
<li><a href="media/">media/</a></li>
<li><a href="mnt/">mnt/</a></li>
<li><a href="opt/">opt/</a></li>
<li><a href="proc/">proc/</a></li>
<li><a href="root/">root/</a></li>
<li><a href="run/">run/</a></li>
<li><a href="sbin/">sbin@</a></li>
<li><a href="srv/">srv/</a></li>
<li><a href="sys/">sys/</a></li>
<li><a href="tmp/">tmp/</a></li>
<li><a href="usr/">usr/</a></li>
<li><a href="var/">var/</a></li>
</ul>
<hr>
</body>
</html>
For example, to check the CoreDNS logs, first run this command (below) to get the list of running pods in your cluster:
kubectl get pods -A
					NAMESPACE     NAME                               READY   STATUS    RESTARTS      AGE
default       busy1                              1/1     Running   0             27m
default       busy2                              1/1     Running   0             31m
kube-system   coredns-674b8bbfcf-bswpn           1/1     Running   0             51m
kube-system   etcd-minikube                      1/1     Running   0             77m
kube-system   kindnet-2pckn                      1/1     Running   0             76m
kube-system   kube-apiserver-minikube            1/1     Running   0             77m
kube-system   kube-controller-manager-minikube   1/1     Running   1 (77m ago)   77m
kube-system   kube-proxy-bb2ts                   1/1     Running   0             76m
kube-system   kube-scheduler-minikube            1/1     Running   0             77m
kube-system   storage-provisioner                1/1     Running   2 (30m ago)   76m
Once you’ve identified the pod you want to check (e.g. CoreDNS in this case), run the following:
kubectl logs -n kube-system coredns-674b8bbfcf-bswpn
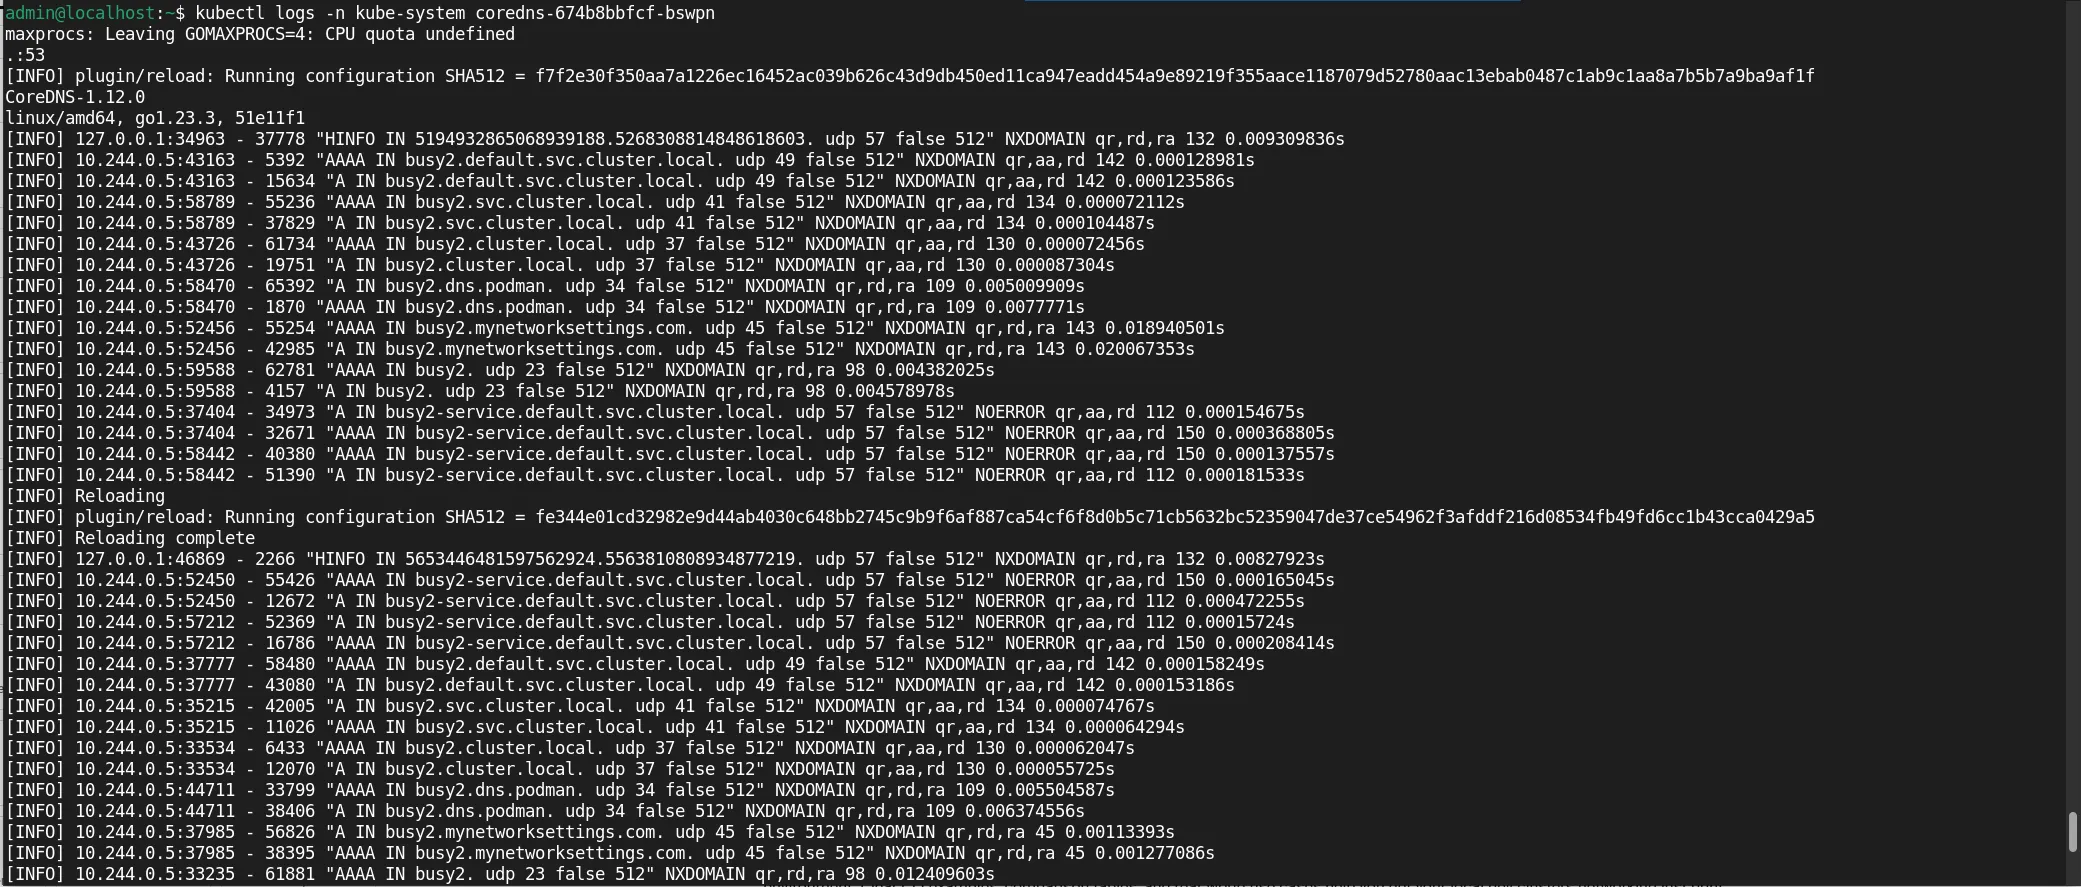
Photo by admingeek from Infotechys
Deploy a simple service to test Service and ClusterIP networking (using your preferred editor, open a file called nginx-deployment.yaml):
vim nginx-deployment.yaml
Populate the file with the following content:
					# nginx-deployment.yaml
apiVersion: apps/v1
kind: Deployment
metadata:
  name: nginx-deployment
spec:
  replicas: 2
  selector:
    matchLabels:
      app: nginx
  template:
    metadata:
      labels:
        app: nginx
    spec:
      containers:
      - name: nginx
        image: nginx:latest
        ports:
        - containerPort: 80
Repeat the same process for nginx-service.yaml
vim nginx-service.yaml
And paste this into the file:
					# nginx-service.yaml
apiVersion: v1
kind: Service
metadata:
  name: nginx
spec:
  selector:
    app: nginx
  ports:
    - port: 80
      targetPort: 80
Run the following commands for deployment:
kubectl apply -f nginx-deployment.yaml
deployment.apps/nginx-deployment created
vim nginx-service.yaml
service/nginx created
kubectl get svc nginx
					NAME    TYPE        CLUSTER-IP      EXTERNAL-IP   PORT(S)   AGE
nginx   ClusterIP   10.102.199.86   <none>        80/TCP    17s
Check that you see a ClusterIP and the service is accessibly inside the cluster. For NodePort access:
kubectl expose deployment nginx --type=NodePort --port=80
curl $(minikube ip):<nodePort>
Ingress allows HTTP/S routing based on host and path:
Enable built-in ingress addon: |
minikube addons enable ingress
					💡  ingress is an addon maintained by Kubernetes. For any concerns contact minikube on GitHub.
You can view the list of minikube maintainers at: https://github.com/kubernetes/minikube/blob/master/OWNERS
    ▪ Using image registry.k8s.io/ingress-nginx/kube-webhook-certgen:v1.5.3
    ▪ Using image registry.k8s.io/ingress-nginx/controller:v1.12.2
    ▪ Using image registry.k8s.io/ingress-nginx/kube-webhook-certgen:v1.5.3
🔎  Verifying ingress addon...
Then deploy an example app:
					kubectl apply -f - <<EOF
apiVersion: networking.k8s.io/v1
kind: Ingress
metadata:
  name: example
spec:
  rules:
  - host: example.local
    http:
      paths:
      - path: /
        pathType: Prefix
        backend:
          service:
            name: nginx
            port:
              number: 80
EOF
Add host entry on your host:
echo "$(minikube ip) example.local" | sudo tee -a /etc/hosts
Now test via:
curl http://example.local/
Calico or Cilium allow enforcing policies to isolate pods.
Example Calico policy to allow only specific pods: |
					apiVersion: projectcalico.org/v3
kind: NetworkPolicy
metadata:
  name: allow-nginx
spec:
  selector: app == 'nginx'
  ingress:
  - action: Allow
    source:
      selector: app == 'busy1'
Execute the following commands:
					kubectl apply -f policy.yaml
kubectl exec busy2 -- wget -qO- http://nginx/
If busy2 cannot connect—policy is operational. Test connectivity and isolation.
Ensure service discovery works:
					kubectl exec busy1 -- nslookup nginx
kubectl exec busy1 -- nslookup kubernetes.default
Failing DNS could indicate missing or misconfigured CNI plugin.
| Symptom | Possible Cause | Diagnostic Command | Solution |
|---|---|---|---|
| Pods cannot reach each other | CNI not loaded or misconfigured | kubectl logs -n kube-system | Check plugin DaemonSet, reinstall or config |
| Services failing resolution | ClusterIP DNS resolution failing | nslookup, get svc, kubectl get pods | Ensure CoreDNS is healthy, restart if needed |
| Ingress not routing | Ingress controller not functioning | kubectl logs -n kube-system | Re-enable ingress addon or check config |
| Policy not enforced | Policy plugin not installed/activated | kubectl get networkpolicies | Enable Calico/Cilium via addon or manifest |
|
|
|
|
|
Configuring Kubernetes networking on Minikube gives you robust local infrastructure emulating real-world behavior. Whether you’re testing microservices, ingress routing, or network policies, this setup offers a production‑like environment to validate configurations before deploying to full-scale clusters.
Did you find this article helpful? Your feedback is invaluable to us! Feel free to share this post with those who may benefit, and let us know your thoughts in the comments section below.
In this comprehensive guide, we’ll walk you through the process of creating and deploying a LAMP stack on Minikube, a tool that enables you to

Step‑by‑step guide to installing Minikube on CentOS Stream 10: Docker or KVM2 setup, prerequisites, kubectl, starting a local Kubernetes cluster, dashboard, and troubleshooting. Table of Contents

Learn how to install Minikube on Ubuntu 24.04 with this comprehensive step-by-step guide. Discover prerequisites, installation methods, resource management, and troubleshooting tips to set up