Commands
In today’s article, we will review the step-by-step process involved with a Kubernetes cluster install on Ubuntu server version 20.04. However, this procedure will work

In this comprehensive guide, we’ll walk you through the process of creating and deploying a LAMP stack on Minikube, a tool that enables you to run Kubernetes clusters locally.
In the fast-paced landscape of modern technology, Kubernetes has emerged as the de facto standard for managing containerized applications at scale. Its robust features and flexibility make it an indispensable tool for DevOps engineers and developers alike. However, while Kubernetes offers immense power, mastering its intricacies can be a daunting task, especially for beginners.
One of the fundamental challenges faced by newcomers to Kubernetes is setting up and deploying common application stacks, such as the ubiquitous LAMP (Linux, Apache, MySQL, PHP) stack. Traditionally, configuring and managing a LAMP stack involves manual installation and configuration on a single server or virtual machine. However, with the rise of containerization and orchestration tools like Kubernetes, deploying and scaling LAMP applications has become more streamlined and efficient.
In this comprehensive guide, we’ll take you through the process of creating and deploying a LAMP stack on Minikube, a tool that enables you to run Kubernetes clusters locally. Whether you’re a seasoned Kubernetes pro looking to expand your skills or a newcomer eager to explore container orchestration, this step-by-step tutorial will provide you with the knowledge and confidence to deploy a LAMP stack on Kubernetes with ease.
Before we embark on our journey to deploy a LAMP stack on Minikube, there are a few prerequisites that you’ll need to have in place:
Familiarity with Kubernetes: While this guide is designed to be beginner-friendly, having a basic understanding of Kubernetes concepts such as pods, deployments, and services will be beneficial.
Minikube Installation: Ensure that Minikube is installed on your local machine. You can download and install Minikube by following the instructions provided here.
Kubectl Installation: kubectl is the command-line tool used to interact with Kubernetes clusters. Make sure you have kubectl installed and configured to communicate with your Minikube cluster.
Docker Installation: Since Kubernetes relies on containerization, you’ll need Docker installed on your system to build and run container images.
By fulfilling these prerequisites, you’ll be well-prepared to follow along with the steps outlined in this guide and deploy your own LAMP stack on Minikube. If you haven’t already completed these steps, take some time to do so before proceeding further. Once you’re ready, let’s dive into the exciting world of Kubernetes and LAMP stack deployment!
We’ve configured our Minikube cluster (used to deploy LAMP) with the following settings:
| Hostname | mkube-srv3.infotechys.com |
| IP address | 192.168.1.162 |
| RAM | 8 GB |
| Cores | 4 |
| Storage | 50 GB |
| Kubectl version | Client Version: v1.29.1 Kustomize Version: v5.0.4-0.20230601165947-6ce0bf390ce3 Server Version: v1.28.3 |
| Minikube version | minikube version: v1.32.0 commit: 8220a6eb95f0a4d75f7f2d7b14cef975f050512d |
| Operating System | CentOS Stream release 9 : Working Directory (~/LAMP) |
Assuming you’ve satisfied the prerequisites section, we can now begin the process of deploying LAMP on Minikube.
Once Minikube is installed, start your Minikube cluster using the following command:
$ minikube start
					😄  minikube v1.32.0 on Centos 9 (vbox/amd64)
✨  Automatically selected the docker driver. Other choices: none, ssh
📌  Using Docker driver with root privileges
👍  Starting control plane node minikube in cluster minikube
🚜  Pulling base image ...
💾  Downloading Kubernetes v1.28.3 preload ...
    > preloaded-images-k8s-v18-v1...:  403.35 MiB / 403.35 MiB  100.00% 13.72 M
    > gcr.io/k8s-minikube/kicbase...:  453.90 MiB / 453.90 MiB  100.00% 14.47 M
🔥  Creating docker container (CPUs=2, Memory=2900MB) ...
🐳  Preparing Kubernetes v1.28.3 on Docker 24.0.7 ...
    ▪ Generating certificates and keys ...
    ▪ Booting up control plane ...
    ▪ Configuring RBAC rules ...
🔗  Configuring bridge CNI (Container Networking Interface) ...
    ▪ Using image gcr.io/k8s-minikube/storage-provisioner:v5
🔎  Verifying Kubernetes components...
🌟  Enabled addons: default-storageclass, storage-provisioner
🏄  Done! kubectl is now configured to use "minikube" cluster and "default" namespace by default
Now, let’s create the deployment YAML files for each component of our LAMP stack: Linux, Apache, MySQL, and PHP. But first, if you haven’t already, create a directory that will house all deployment files and navigate to it:
$ mkdir -p ~/LAMP; cd ~/LAMP
Next, we’ll craft a kustomization.yaml file, which will include our MySQL database password stored as a secret. Additionally, it will encompass deployments for Apache, PHP, and MySQL. Run the following command (replace YOUR_PASSWORD with an actual password):
					$ cat <<EOF >./kustomization.yaml
secretGenerator:
- name: mysql-pass
  literals:
  - password=YOUR_PASSWORD
EOF
Then, copy and paste the contents (below) into a file called mysql.yaml or your preferred name.
					apiVersion: v1
kind: Service
metadata:
  name: lamp-mysql
  labels:
    app: lamp
spec:
  ports:
    - port: 3306
  selector:
    app: lamp
    tier: mysql
  clusterIP: None
---
apiVersion: v1
kind: PersistentVolumeClaim
metadata:
  name: mysql-pv-claim
  labels:
    app: lamp
spec:
  accessModes:
    - ReadWriteOnce
  resources:
    requests:
      storage: 5Gi
---
apiVersion: apps/v1
kind: Deployment
metadata:
  name: lamp-mysql
  labels:
    app: lamp
spec:
  selector:
    matchLabels:
      app: lamp
      tier: mysql
  strategy:
    type: Recreate
  template:
    metadata:
      labels:
        app: lamp
        tier: mysql
    spec:
      containers:
      - image: mysql:8.0
        name: mysql
        env:
        - name: MYSQL_ROOT_PASSWORD
          valueFrom:
            secretKeyRef:
              name: mysql-pass
              key: password
        - name: MYSQL_DATABASE
          value: testdb
        - name: MYSQL_USER
          value: testuser
        - name: MYSQL_PASSWORD
          valueFrom:
            secretKeyRef:
              name: mysql-pass
              key: password
        ports:
        - containerPort: 3306
          name: mysql
        volumeMounts:
        - name: mysql-persistent-storage
          mountPath: /var/lib/mysql
      volumes:
      - name: mysql-persistent-storage
        persistentVolumeClaim:
          claimName: mysql-pv-claim
This YAML file describes the deployment of a MySQL database instance in a Kubernetes cluster. Let’s break down its contents:
					apiVersion: v1
kind: Service
metadata:
  name: lamp-mysql
  labels:
    app: lamp
spec:
  ports:
    - port: 3306
  selector:
    app: lamp
    tier: mysql
  clusterIP: None
---
lamp-mysql) and labels it with app: lamp.app: lamp and tier: mysql.None, indicating that the service is headless and doesn’t have a cluster-internal IP address.
					apiVersion: v1
kind: PersistentVolumeClaim
metadata:
  name: mysql-pv-claim
  labels:
    app: lamp
spec:
  accessModes:
    - ReadWriteOnce
  resources:
    requests:
      storage: 5Gi
---
mysql-pv-claim and labels it with app: lamp.
					apiVersion: apps/v1
kind: Deployment
metadata:
  name: lamp-mysql
  labels:
    app: lamp
spec:
  selector:
    matchLabels:
      app: lamp
      tier: mysql
  strategy:
    type: Recreate
  template:
    metadata:
      labels:
        app: lamp
        tier: mysql
    spec:
      containers:
      - image: mysql:8.0
        name: mysql
        env:
        - name: MYSQL_ROOT_PASSWORD
          valueFrom:
            secretKeyRef:
              name: mysql-pass
              key: password
        - name: MYSQL_DATABASE
          value: testdb
        - name: MYSQL_USER
          value: testuser
        - name: MYSQL_PASSWORD
          valueFrom:
            secretKeyRef:
              name: mysql-pass
              key: password
        ports:
        - containerPort: 3306
          name: mysql
        volumeMounts:
        - name: mysql-persistent-storage
          mountPath: /var/lib/mysql
      volumes:
      - name: mysql-persistent-storage
        persistentVolumeClaim:
          claimName: mysql-pv-claim
lamp-mysql and labels it with app: lamp.app: lamp and tier: mysql).Recreate, meaning existing pods are killed before new ones are created.app: lamp and tier: mysql.mysql:8.0).mysql.mysql-pass.mysql-pv-claim to the container’s /var/lib/mysql directory.mysql-pv-claim.Overall, this YAML file sets up a MySQL database deployment with a persistent volume claim for data storage, exposing the MySQL service within the Kubernetes cluster.
Copy and Paste the contents below to a file called lamp.yaml or your preferred name.
					apiVersion: v1
kind: Service
metadata:
  name: lamp
  labels:
    app: lamp
spec:
  ports:
    - port: 80
  selector:
    app: lamp
    tier: frontend
  type: LoadBalancer
---
apiVersion: v1
kind: PersistentVolumeClaim
metadata:
  name: lamp-pv-claim
  labels:
    app: lamp
spec:
  accessModes:
    - ReadWriteOnce
  resources:
    requests:
      storage: 5Gi
---
apiVersion: apps/v1
kind: Deployment
metadata:
  name: lamp
  labels:
    app: lamp
spec:
  selector:
    matchLabels:
      app: lamp
      tier: frontend
  strategy:
    type: Recreate
  template:
    metadata:
      labels:
        app: lamp
        tier: frontend
    spec:
      containers:
      - image: webdevops/php-apache-dev:latest
        name: lamp
        env:
        - name: LAMP_DB_HOST
          value: lamp-mysql
        - name: LAMP_DB_PASSWORD
          valueFrom:
            secretKeyRef:
              name: mysql-pass
              key: password
        - name: LAMP_DB_USER
          value: testuser
        ports:
        - containerPort: 80
          name: lamp
        volumeMounts:
        - name: lamp-persistent-storage
          mountPath: /app/files
      volumes:
      - name: lamp-persistent-storage
        persistentVolumeClaim:
          claimName: lamp-pv-claim
In summary, this YAML file defines a Kubernetes deployment for the remaining components in the stack (PHP and Apache), utilizing persistent storage for storing application files. Additionally, it configures a service for exposing the application externally via a LoadBalancer type service.
Now that we’ve prepared YAML files for all components of our LAMP stack, let’s proceed to update the kustomization.yaml file using the following command:
					cat <<EOF >>./kustomization.yaml
resources:
  - mysql.yaml
  - lamp.yaml
EOF
Finally, apply the contents of the kustomization.yaml file with the following command:
$ kubectl apply -k ./
Executing this command will apply the secrets, persistent storage volumes, and LAMP stack deployments as displayed below.
					secret/mysql-pass-df44tkf8t9 created
service/lamp created
service/lamp-mysql created
persistentvolumeclaim/lamp-pv-claim created
persistentvolumeclaim/mysql-pv-claim created
deployment.apps/lamp created
deployment.apps/lamp-mysql created
Check and verify the status of all running deployments using the following command:
$ kubectl get pods; kubectl get pvc; kubectl get secret; kubectl get deployments
					NAME                          READY   STATUS    RESTARTS   AGE
lamp-f9dcbdbbb-x4lqq          1/1     Running   0          5m12s
lamp-mysql-776f49f4cc-w4cg8   1/1     Running   0          5m12s
					NAME             STATUS   VOLUME                                     CAPACITY   ACCESS MODES   STORAGECLASS   AGE
lamp-pv-claim    Bound    pvc-442d30ce-7989-4430-bac6-7022214c62ee   5Gi        RWO            standard       5m13s
mysql-pv-claim   Bound    pvc-a0dd0958-fcb4-4a59-bf4c-a6ba78985ab5   5Gi        RWO            standard       5m13s
					NAME                    TYPE     DATA   AGE
mysql-pass-df44tkf8t9   Opaque   1      5m13s
					NAME         READY   UP-TO-DATE   AVAILABLE   AGE
lamp         1/1     1            1           5m13s
lamp-mysql   1/1     1            1           5m13s
Once we’ve confirmed that all deployments are up and running, execute the following command:
$ minikube service lamp
					|-----------|------|-------------|---------------------------|
| NAMESPACE | NAME | TARGET PORT |            URL            |
|-----------|------|-------------|---------------------------|
| default   | lamp |          80 | http://192.168.49.2:30751 |
|-----------|------|-------------|---------------------------|
🎉  Opening service default/lamp in default browser...
👉  http://192.168.49.2:30751
This command opens a default web browser and navigates to the endpoint of the lamp service deployed within your Minikube cluster (http://192.168.49.2:30751), allowing you to interact with your LAMP stack application.
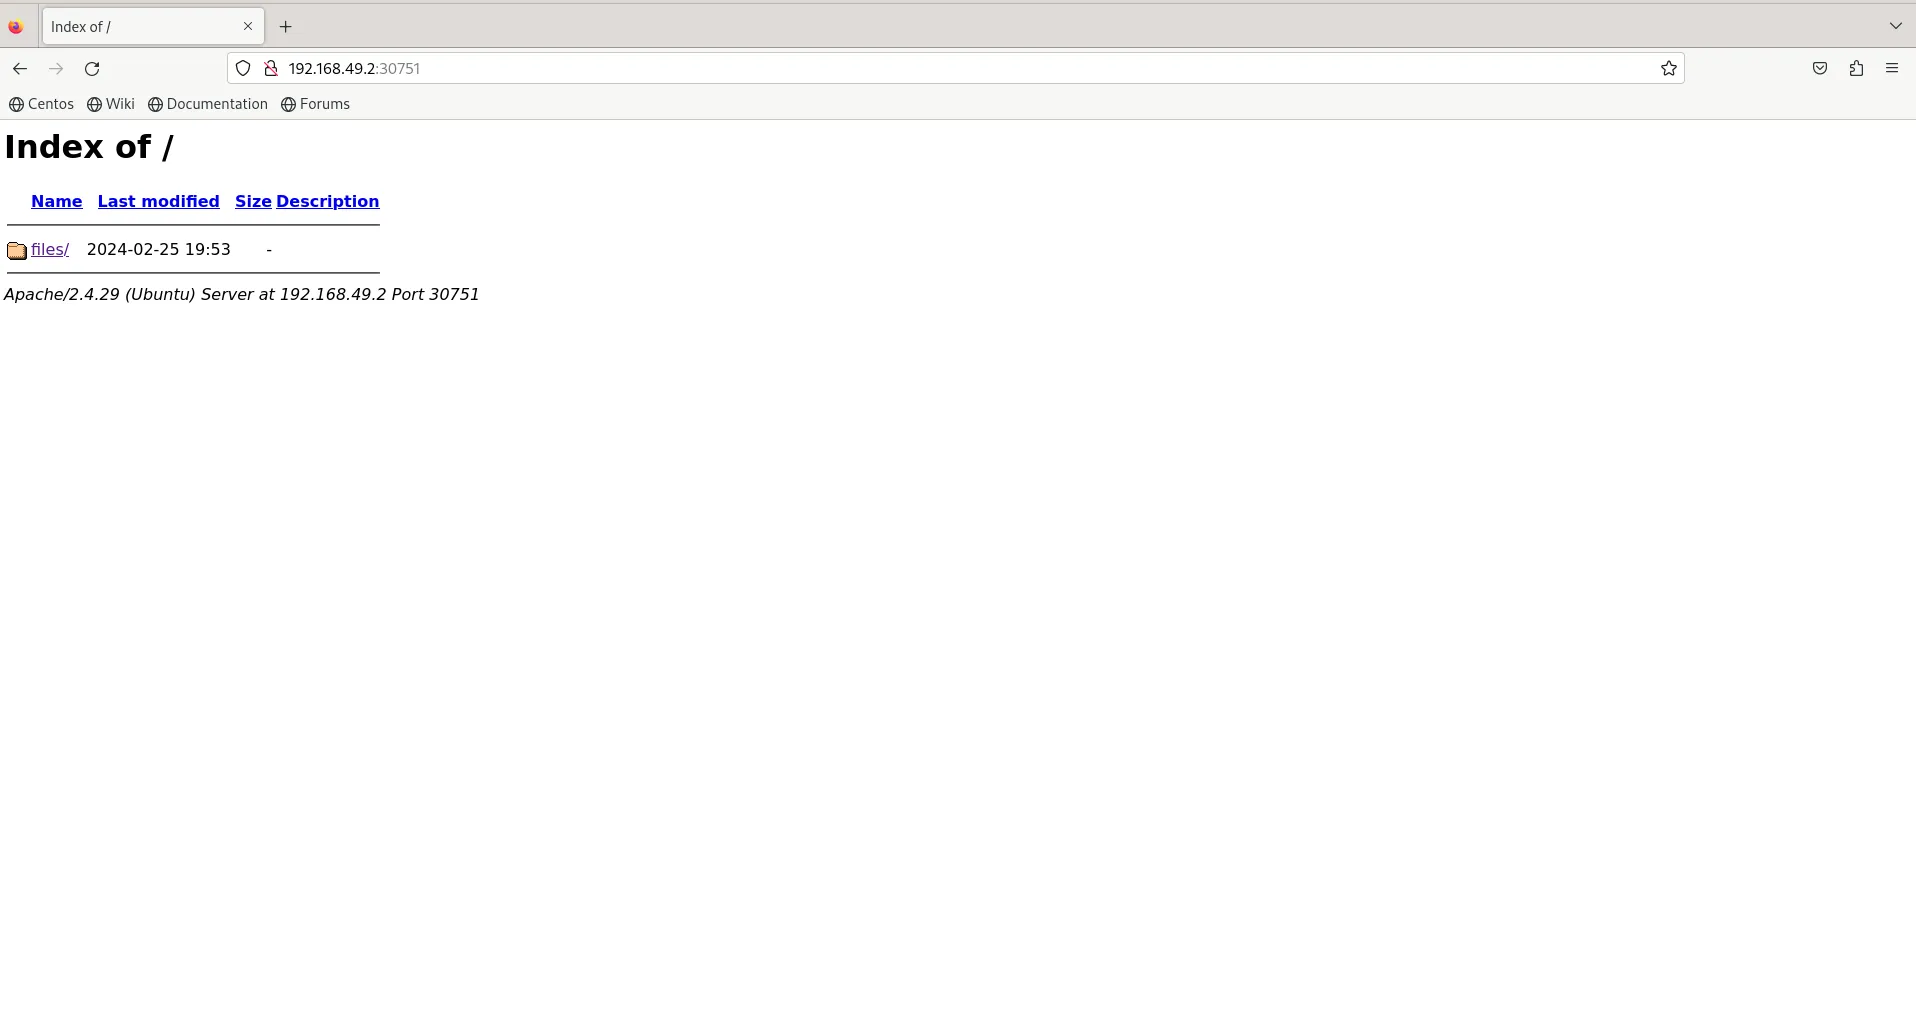
Photo by admingeek from Infotechys
Perfect! Apache web server is running as expected! Run the following commands to verify PHP and MySQL:
					$ kubectl get pods
NAME                          READY   STATUS    RESTARTS   AGE
lamp-f9dcbdbbb-x4lqq          1/1     Running   0          38m
lamp-mysql-776f49f4cc-w4cg8   1/1     Running   0          38m
First, we use the kubectl get pods command to find the relevant containers. Once identified, we run exec commands against them. Specifically, we target the container lamp-f9dcbdbbb-x4lqq for our Apache and PHP deployments, while lamp-mysql-776f49f4cc-w4cg8 is associated with the database.
$ kubectl exec -it lamp-f9dcbdbbb-x4lqq -- bash -c 'apachectl -v'
					Server version: Apache/2.4.29 (Ubuntu)
Server built:   2020-03-13T12:26:16
Apache Server version: 2.4.29
$ kubectl exec -it lamp-f9dcbdbbb-x4lqq -- bash -c 'php -v'
					PHP 7.2.24-0ubuntu0.18.04.3 (cli) (built: Feb 11 2020 15:55:52) ( NTS )
Copyright (c) 1997-2018 The PHP Group
Zend Engine v3.2.0, Copyright (c) 1998-2018 Zend Technologies
    with the ionCube PHP Loader + ionCube24 v10.3.9, Copyright (c) 2002-2019, by ionCube Ltd.
    with Zend OPcache v7.2.24-0ubuntu0.18.04.3, Copyright (c) 1999-2018, by Zend Technologies
    with Xdebug v2.6.0, Copyright (c) 2002-2018, by Derick Rethans
PHP version: 7.2.24
$ kubectl exec -it lamp-mysql-776f49f4cc-w4cg8 -- bash -c 'mysql -u root -p'
					Enter password:
Welcome to the MySQL monitor.  Commands end with ; or \g.
Your MySQL connection id is 11
Server version: 8.0.36 MySQL Community Server - GPL

Copyright (c) 2000, 2024, Oracle and/or its affiliates.

Oracle is a registered trademark of Oracle Corporation and/or its
affiliates. Other names may be trademarks of their respective
owners.

Type 'help;' or '\h' for help. Type '\c' to clear the current input statement.

mysql>
MySQL version: 8.0.36
The Minikube dashboard provides a graphical user interface (GUI) for managing and monitoring your Kubernetes cluster deployed using Minikube. It offers a visual representation of your cluster’s resources and allows you to interact with them efficiently.
$ minikube dashboard
					🤔  Verifying dashboard health ...
🚀  Launching proxy ...
🤔  Verifying proxy health ...
🎉  Opening http://127.0.0.1:40307/api/v1/namespaces/kubernetes-dashboard/services/http:kubernetes-dashboard:/proxy/ in your default browser...
👉  http://127.0.0.1:40307/api/v1/namespaces/kubernetes-dashboard/services/http:kubernetes-dashboard:/proxy/
With the Minikube dashboard, you can:
View Cluster Status: Check the current state of your cluster, including nodes, pods, services, deployments, and other resources.
Monitor Resources: Keep track of CPU and memory usage, pod status, and other metrics to ensure smooth operation of your applications.
Manage Workloads: Create, update, and delete deployments, replica sets, pods, and other workload-related resources.
Manage Services: Create and manage services, including exposing applications internally or externally.
Access Logs and Events: View logs and events generated by pods and other cluster components for monitoring and troubleshooting purposes.
Inspect Configurations: Examine configurations of various Kubernetes objects such as pods, deployments, and services.
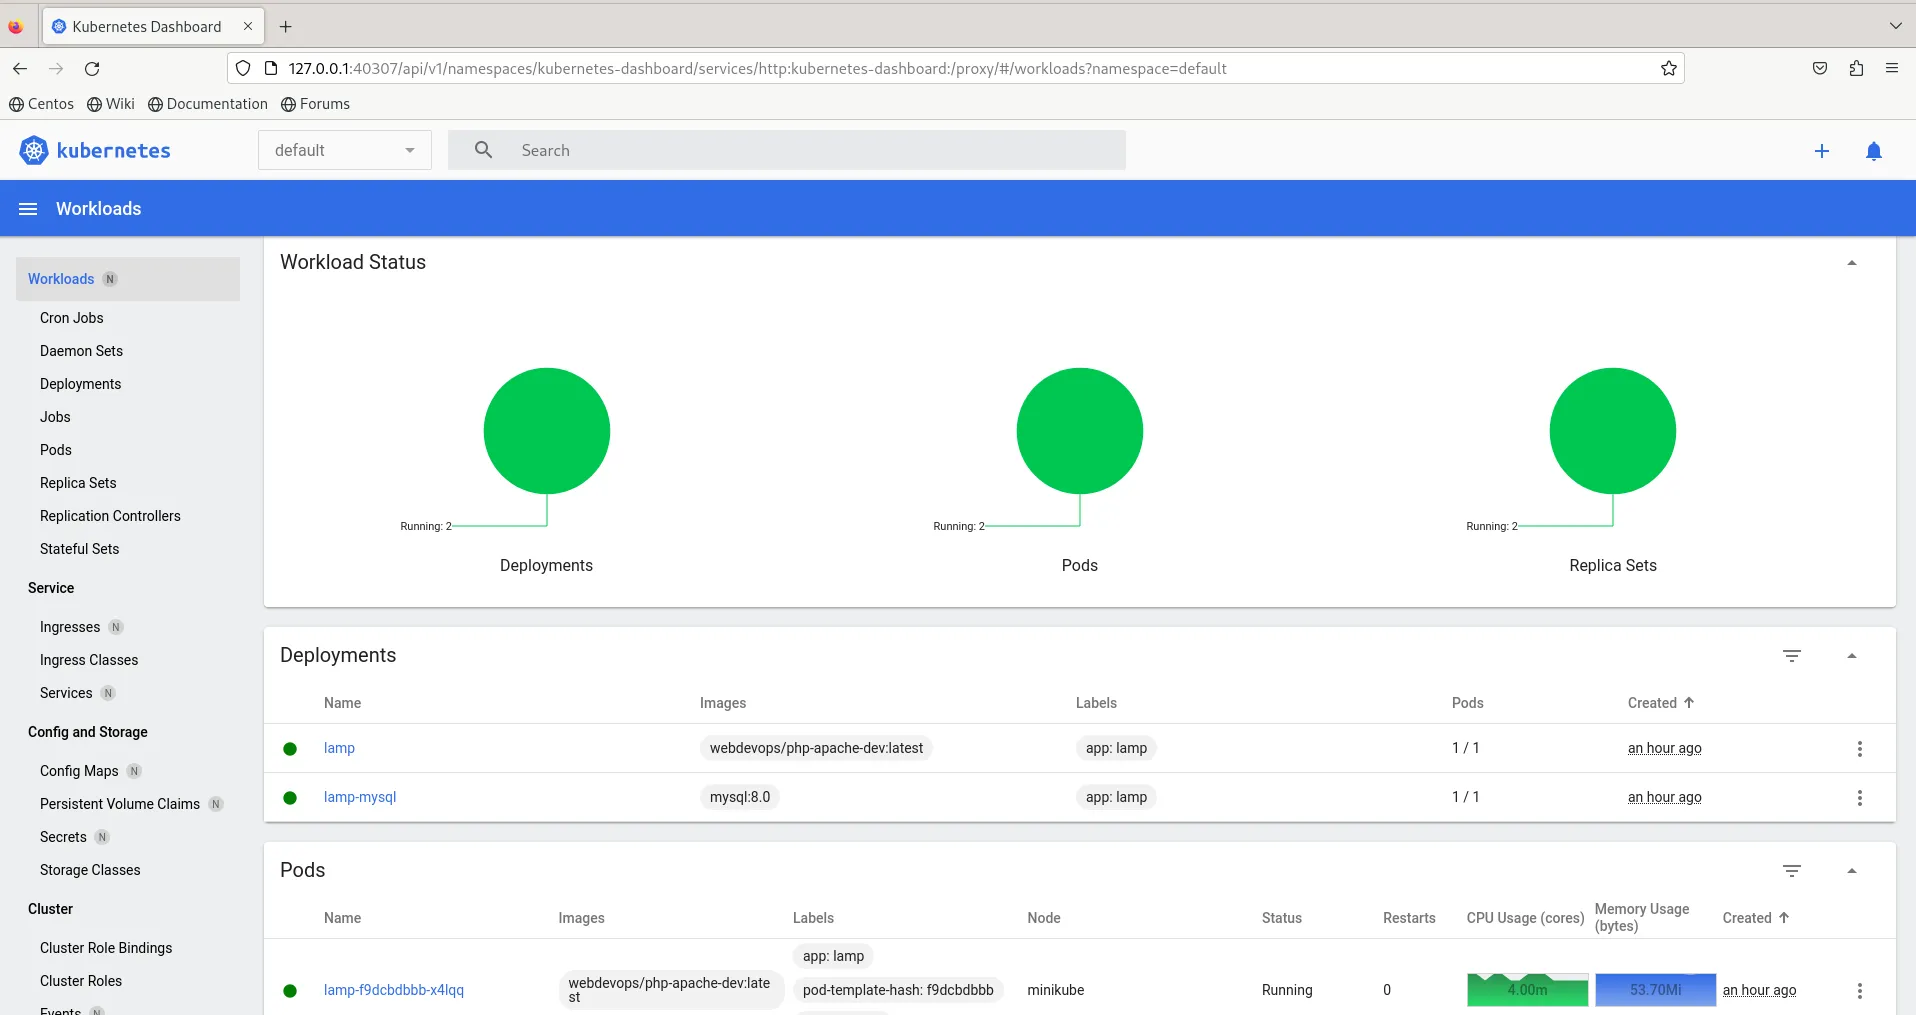
Photo by admingeek from Infotechys
Congratulations! You’ve successfully created and deployed a LAMP stack on Minikube. By following these step-by-step instructions, you’ve gained valuable insights into Kubernetes deployment practices. Feel free to explore further by customizing your LAMP stack configuration or experimenting with other Kubernetes features.
Did you find this article useful? Your feedback is invaluable to us! Please feel free to share your thoughts in the comments section below.
Related Posts
In today’s article, we will review the step-by-step process involved with a Kubernetes cluster install on Ubuntu server version 20.04. However, this procedure will work

As the demand for skilled Kubernetes professionals continues to surge, obtaining a Kubernetes certification has become a pivotal step in advancing your career in the
In this article, we will review how to install minikube-v1.32.0 on RHEL9. This is the most recent stable release as of the date of this