HOWTO
Secure your network and protect your sensitive data by learning how to install SSL certificates on Redhat Satellite 6.10. Table of Contents Introduction In today’s


Are you looking to secure your Cockpit server and protect sensitive data? Follow these steps to Install SSL Certificates on Cockpit and protect your server infrastructure.
Cockpit is a popular open-source web-based interface for managing Linux systems. It is designed to make Linux system administration tasks easy and user-friendly. Cockpit was first introduced in 2013 and has since become an indispensable tool for Linux professionals. One of the features that make Cockpit stand out is its ability to support SSL/TLS encryption for secure connections. In this article, we will provide a step-by-step guide on how to install SSL certificates in Cockpit.
Before we begin, you need to ensure that you have the following:
Cockpit is a web-based interface that allows you to manage your Linux server through a web browser. It offers a simple and intuitive user interface that makes it easy to manage your server, monitor its performance, and troubleshoot issues. In this article, we will focus primarily on the RHEL or CentOS operating system.
Some of its most popular features include:
Follow these steps carefully to install a self-signed SSL certificate on your Cockpit Server.
Log in (SSH) to your Linux server and open a terminal window.
A self-signed SSL certificate is useful for testing or development purposes. To generate a self-signed certificate, use the following command:
$ sudo openssl req -x509 -nodes -days 365 -newkey rsa:2048 -keyout /etc/cockpit/ws-certs.d/cockpit-selfsigned.key -out /etc/cockpit/ws-certs.d/cockpit-selfsigned.cert
This command generates a self-signed certificate that is valid for 365 days and saves it in the specified directory.
To install the self-signed SSL certificate, run the following command (s):
					$ sudo mkdir -p /etc/systemd/system/cockpit.service.d/
$ sudo vim /etc/systemd/system/cockpit.service.d/override.conf
Add the following lines to the file:
					[Service]
Environment=COCKPIT_HTTPS_CERT=/etc/cockpit/ws-certs.d/cockpit-selfsigned.cert
Environment=COCKPIT_HTTPS_KEY=/etc/cockpit/ws-certs.d/cockpit-selfsigned.key
Save and close the file.
Restart the Cockpit service by typing the following command:
					$ sudo systemctl daemon-reload
$ sudo systemctl restart cockpit
For production use, it is recommended to use a non self-signed SSL certificate from a trusted Certificate Authority (CA). Here is how to generate a non self-signed SSL certificate:
Purchase an SSL certificate from a trusted CA such as DigiCert, GlobalSign, or Verisign.
Download the certificate (provided by the CA). The private key should reside on your Cockpit server (see Generate CSR and Keys section).
Copy the certificate and key files to the following directory /etc/cockpit/ws-certs.d/:
					$ sudo mkdir /etc/cockpit/ws-certs.d/
$ sudo cp /path/to/<your_cockpit_hostname>.crt /etc/cockpit/ws-certs.d/
$ sudo cp /path/to/<your_cockpit_hostname>.key /etc/cockpit/ws-certs.d/
Replace <your_cockpit_hostname> with the actual hostname of your cockpit server. In this instance, our hostname is: node1.dev.infotechys.com.
CAs generally require a Certificate Signing Request (CSR) from which they can generate and provide you with a SSL certificate. Here’s how we can generate a CSR file in two steps and avoid having to answer the usual prompts.
1. Log onto your cockpit server
2. Using your favorite text editor, open a file and call it what you want. For the purpose of this exercise we’re calling it csr_form.txt
3. Copy and paste the following entries (below) to that file and replace it with your information.
					[req]
default_bits = 2048
prompt = no
default_md = sha256
req_extensions = req_ext
distinguished_name = dn

[ dn ]
C=US
ST=California
L=San Diego
O=DEV
OU=INFOTECHYS
emailAddress=info@infotechys.com
CN = node1.dev.infotechys.com

[ req_ext ]
subjectAltName = @alt_names

[ alt_names ]
DNS.1 = node1.dev.infotechys.com
IP.1 = 192.168.4.4
Run the following command to generate a CSR and key file (this is for illustrative purposes, your csr_form.txt will vary depending on your environment):
$ openssl req -new -sha256 -nodes -out $HOSTNAME.csr -newkey rsa:2048 -keyout $HOSTNAME.key -config <( cat csr_form.txt )
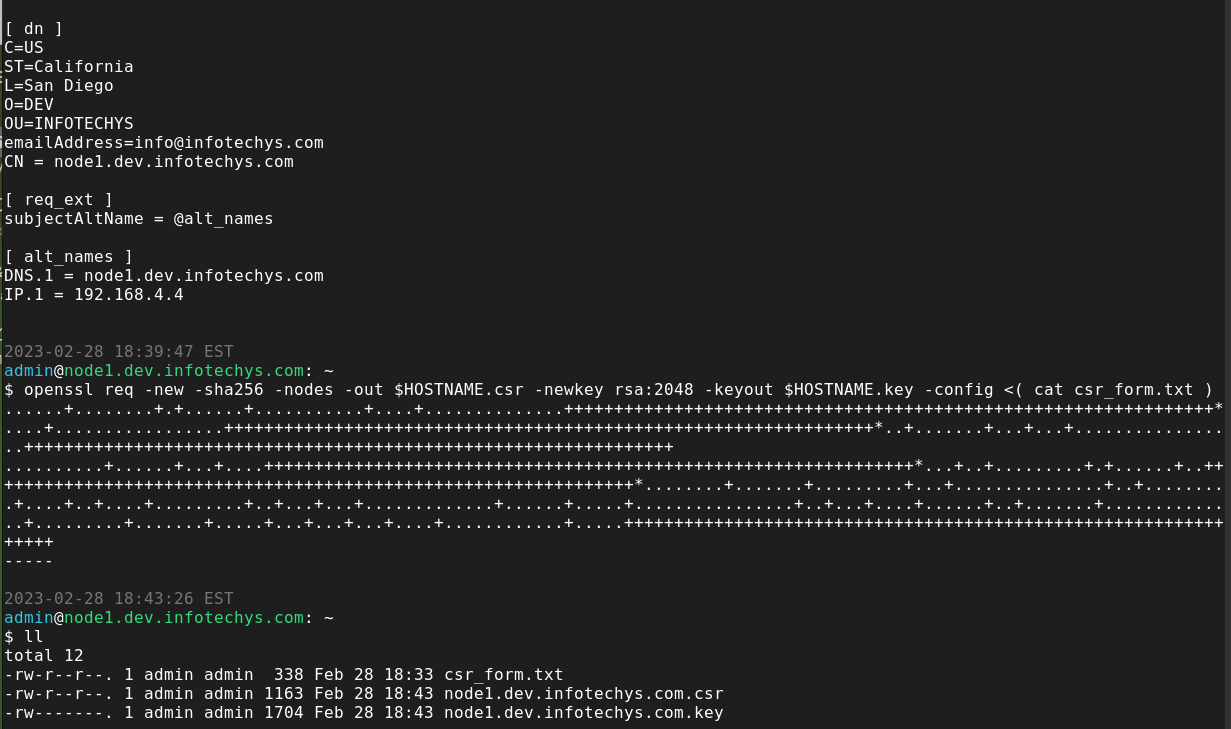
Photo by admingeek from Infotechys
That’s it. You’ve successfully generated a CSR and key file.
Run this command to check the contents of your .csr file.
$ openssl req -in node1.dev.infotechys.com.csr -noout -text
The output (below) shows the contents of the node1.dev.infotechys.com.csr file.
					$ openssl req -in node1.dev.infotechys.com.csr -noout -text
Certificate Request:
    Data:
        Version: 1 (0x0)
        Subject: C = US, ST = California, L = San Diego, O = DEV, OU = INFOTECHYS, emailAddress = info@infotechys.com, CN = node1.dev.infotechys.com
        Subject Public Key Info:
            Public Key Algorithm: rsaEncryption
                Public-Key: (2048 bit)
                Modulus:
                    00:99:f6:76:19:0f:7a:4a:7e:44:55:6d:f5:15:38:
                    4c:67:02:14:88:6b:49:9e:08:d9:8e:37:dd:4a:fb:
                    62:a0:9f:4b:97:b3:80:0a:5a:55:33:4b:a1:c5:2b:
                    05:94:8e:7c:02:38:7c:16:82:a4:5a:92:ad:53:c4:
                    af:9e:ee:37:e0:33:e8:52:d9:b9:57:f3:c6:a6:82:
                    87:68:1e:8b:e8:ef:00:65:b9:3b:ce:ec:ae:cd:6a:
                    7a:fd:3b:9a:87:c0:f6:db:b8:13:9b:4e:4e:b4:95:
                    c5:fd:a6:ff:6c:e5:ba:7b:bd:e1:cc:cb:6a:fe:7b:
                    5e:6d:54:dc:76:40:55:4c:9a:9e:c0:d2:62:0c:06:
                    8c:88:39:23:0a:ca:a0:15:32:69:54:2c:b2:2c:47:
                    0f:00:3a:92:05:2b:d7:a4:fe:9a:45:20:9e:52:5f:
                    8d:20:6d:b9:eb:e1:f5:df:27:c3:7c:0b:7a:8e:20:
                    4f:a6:f6:45:a7:77:90:4f:cf:14:c8:55:a7:94:69:
                    8a:e3:f1:7e:9f:eb:61:d1:87:f7:7a:c4:5e:5d:42:
                    7d:b6:ec:55:30:65:79:f5:33:1f:70:92:62:09:de:
                    52:d2:d6:2e:b7:ed:51:41:0f:86:8b:fc:e3:b9:40:
                    84:65:4f:52:cc:be:28:ff:33:8d:70:6f:d5:76:1a:
                    b2:a3
                Exponent: 65537 (0x10001)
        Attributes:
            Requested Extensions:
                X509v3 Subject Alternative Name:
                    DNS:node1.dev.infotechys.com, IP Address:192.168.4.4
    Signature Algorithm: sha256WithRSAEncryption
    Signature Value:
        6e:1a:c5:d4:42:91:33:52:cd:b4:af:4f:5a:1c:f5:db:31:33:
        8e:52:3b:e2:1a:09:ed:9e:6e:28:a6:24:38:74:3b:3e:c0:78:
        29:f0:f0:b5:ab:74:8e:8c:e9:b2:10:23:80:af:e2:d3:4a:e7:
        d3:f3:98:1f:69:e5:e3:ec:99:07:68:fa:e9:2e:3b:3d:50:0e:
        1d:11:cc:b5:88:dd:ba:55:f1:06:51:94:01:b8:67:2c:49:66:
        7f:68:a8:f7:09:c9:e3:17:97:10:97:e4:5c:95:0e:f1:70:f0:
        81:6e:b5:80:54:cb:5a:83:24:39:45:e9:80:0a:90:7e:7d:2e:
        af:98:0f:cb:6b:76:b5:e8:79:2a:ef:ae:3d:b3:14:d0:53:a8:
        8f:1a:14:1c:4d:ec:d4:11:76:97:1b:e3:ac:3b:f6:18:74:1c:
        65:22:d0:71:2e:ab:4f:ce:3e:59:fe:97:7b:cc:29:f3:3c:fd:
        87:a5:8e:a2:95:d0:fd:45:0b:b5:dc:84:27:6b:ef:81:1f:3f:
        bf:8a:e0:8a:33:5a:ff:81:a7:ec:60:3f:19:69:b0:05:62:2d:
        1b:17:54:c8:79:05:4c:70:91:05:39:b8:da:99:dc:52:d4:e1:
        1b:aa:84:86:5e:7c:72:8a:9e:c8:e9:6a:07:d1:16:73:f2:1a:
        91:5d:ff:5c
As the root user, navigate to the /etc/cockpit/ws-certs.d directory:
# cd /etc/cockpit/ws-certs.d/
Combine both the .crt and .key files into one 0-<your_cockpit_hostname>.cert file. We’ll use our hostname (node1.dev.infotechys.com) as an example (below):
					$ cat node1.dev.infotechys.com.crt >> 0-node1.dev.infotechys.com.cert
$ cat node1.dev.infotechys.com.key >> 0-node1.dev.infotechys.com.cert
Now, change the 0-<your_cockpit_hostname>.cert file ownership to cockpit-ws.
$ chown :cockpit-ws /etc/cockpit/ws-certs.d/0-node1.dev.infotechys.com.cert
Set the correct permissions on the files by typing the following command:
					$ chmod 640 /etc/cockpit/ws-certs.d/0-node1.dev.infotechys.com.cert
$ chmod 600 /etc/cockpit/ws-certs.d/node1.dev.infotechys.com.crt
$ chmod 600 /etc/cockpit/ws-certs.d/node1.dev.infotechys.com.key
Again, replace (node1.dev.infotechys.com) with the actual hostname of your cockpit server.
Restart the Cockpit service by typing the following command
$ systemctl restart cockpit
Open a web browser and navigate to the Cockpit web interface by typing the IP address or domain name of your server (along with the cockpit port 9090) in the address bar (https://<your_cockpit_hostname>:9090). The Cockpit interface should now be accessible over an SSL/TLS encrypted connection.
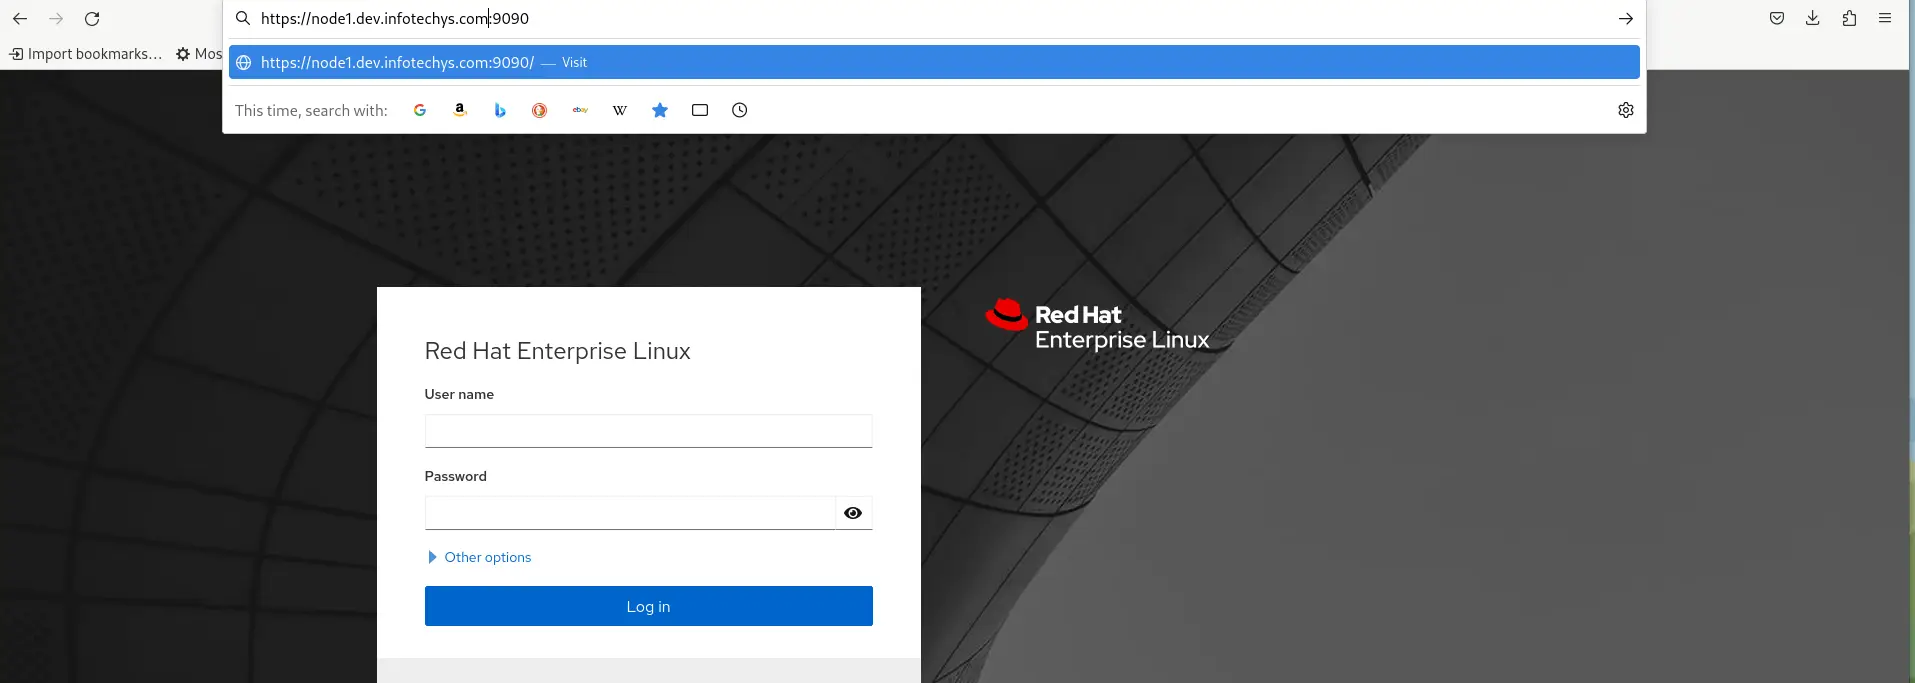
Photo by admingeek from Infotechys
Here are some best practices to follow when installing SSL certificates in Cockpit:
Securing a Cockpit server with SSL certificates is essential for protecting sensitive data and preventing unauthorized access. In this article, we provided step-by-step procedures for installing both self-signed and non self-signed SSL certificates.
We also discussed some best practices for ensuring maximum server security. By following these guidelines, Linux professionals can confidently manage their servers with Cockpit and ensure the security of their system.
Was this article helpful to you? If so, leave us a comment below and share!
Related Posts
Secure your network and protect your sensitive data by learning how to install SSL certificates on Redhat Satellite 6.10. Table of Contents Introduction In today’s
Are you looking to enhance the security of your server? Learn how to enable tls1.2 on your cockpit server using Ansible and keep your data

Want to secure your Jenkins environment and protect sensitive data? Learn how to install SSL certificates on Jenkins and enhance the security of your continuous