Learn how to effortlessly deploy and manage a LAMP stack on RHEL9 using Ansible. Streamline your server setup with automation! Table of Contents Introduction Hey
Learn how to install PHP 8.3 on RHEL 9 | CentOS 9 with step-by-step instructions. Enable repositories, configure Apache, and optimize your server for performance.
In this comprehensive guide, we’ll walk you through the steps to install PHP 8.3 on Red Hat Enterprise Linux (RHEL) 9 and CentOS 9. Whether you’re a developer, a system administrator, or simply someone looking to leverage the latest features of PHP, this tutorial will equip you with the knowledge to set up PHP 8.3 efficiently. We’ll also delve into some of the new features and improvements in PHP 8.3, making it an essential read.
Why Upgrade to PHP 8.3? |
PHP 8.3 brings several enhancements and new features, making it a significant upgrade from its predecessors. Some of the highlights include:
Upgrading to PHP 8.3 ensures that you’re utilizing the latest advancements, providing better performance and security for your applications.
Prerequisites |
Before proceeding with the installation, ensure that you have the following:
PHP 8.3 is not available in the default repositories of RHEL and CentOS, so you need to enable the Remi repository, which provides the latest PHP versions. Here’s how to do it:
Install EPEL Repository: |
First, you need to install the EPEL (Extra Packages for Enterprise Linux) repository, which is required by the Remi repository.
sudo dnf install epel-release -y
Install Remi Repository: |
Now, install the Remi repository:
sudo dnf install https://rpms.remirepo.net/enterprise/remi-release-9.rpm -y

Photo by admingeek from Infotechys
Enable the Remi Repository: |
Use the following commands to enable the Remi repository for PHP 8.3:
sudo dnf module reset php
sudo dnf module enable php:remi-8.3 -y
| Step | Command |
|---|---|
| Install EPEL | sudo dnf install epel-release -y |
| Install Remi | sudo dnf install https://rpms.remirepo.net/enterprise/remi-release-9.rpm -y |
| Enable Remi for PHP 8.3 | sudo dnf module reset phpsudo dnf module enable php:remi-8.3 -y |
Once the repositories are set up, you can install PHP 8.3 along with commonly used extensions. Execute the following command:
sudo dnf install php php-cli php-fpm php-mysqlnd php-xml php-mbstring php-json php-zip -y
Key Extensions Overview |
| Extension | Description |
|---|---|
php-cli | Command line interface for PHP |
php-fpm | FastCGI Process Manager for PHP |
php-mysqlnd | MySQL Native Driver for PHP |
php-xml | XML support for PHP |
php-mbstring | Multibyte string support for PHP |
php-json | JSON support for PHP |
php-zip | Zip file support for PHP |
Verifying the Installation |
After installation, you can verify that PHP 8.3 is installed correctly by checking the version:
php -v
You should see output similar to this:
					PHP 8.3.12 (cli) (built: Sep 24 2024 18:08:04) (NTS gcc x86_64)
Copyright (c) The PHP Group
Zend Engine v4.3.12, Copyright (c) Zend Technologies
    with Zend OPcache v8.3.12, Copyright (c), by Zend Technologies
Configuration of PHP is managed through the php.ini file, which is typically located in /etc/php.ini. You can edit this file to change settings such as memory limits, error reporting, and more.
To edit the php.ini file, use a text editor like nano or vim:
sudo vim /etc/php.ini
Recommended Configuration Changes
|
After making changes, save and exit the editor.
If you’re using the Apache web server, you’ll need to install and configure PHP to work with Apache.
1. Ensure Apache is installed |
sudo dnf install httpd -y
2. Install Apache PHP Module |
sudo dnf install php php-fpm -y
After installation, start and enable both Apache and PHP-FPM:
sudo systemctl enable --now httpd && sudo systemctl enable --now php-fpm
					Created symlink /etc/systemd/system/multi-user.target.wants/httpd.service → /usr/lib/systemd/system/httpd.service.
Created symlink /etc/systemd/system/multi-user.target.wants/php-fpm.service → /usr/lib/systemd/system/php-fpm.service.
3. Test PHP with Apache |
To test if PHP is working with Apache, create a simple info.php file in your web root directory:
sudo vim /var/www/html/info.php
Add the following PHP code:
					<?php
phpinfo();
?>
Save the file and exit. Now open your browser and navigate to http://your_server_ip/info.php.
Important: If your firewall is active, use the following commands to allow HTTP traffic.
sudo firewall-cmd --permanent --add-port=80/tcp --add-port=443/tcp && sudo firewall-cmd --reload
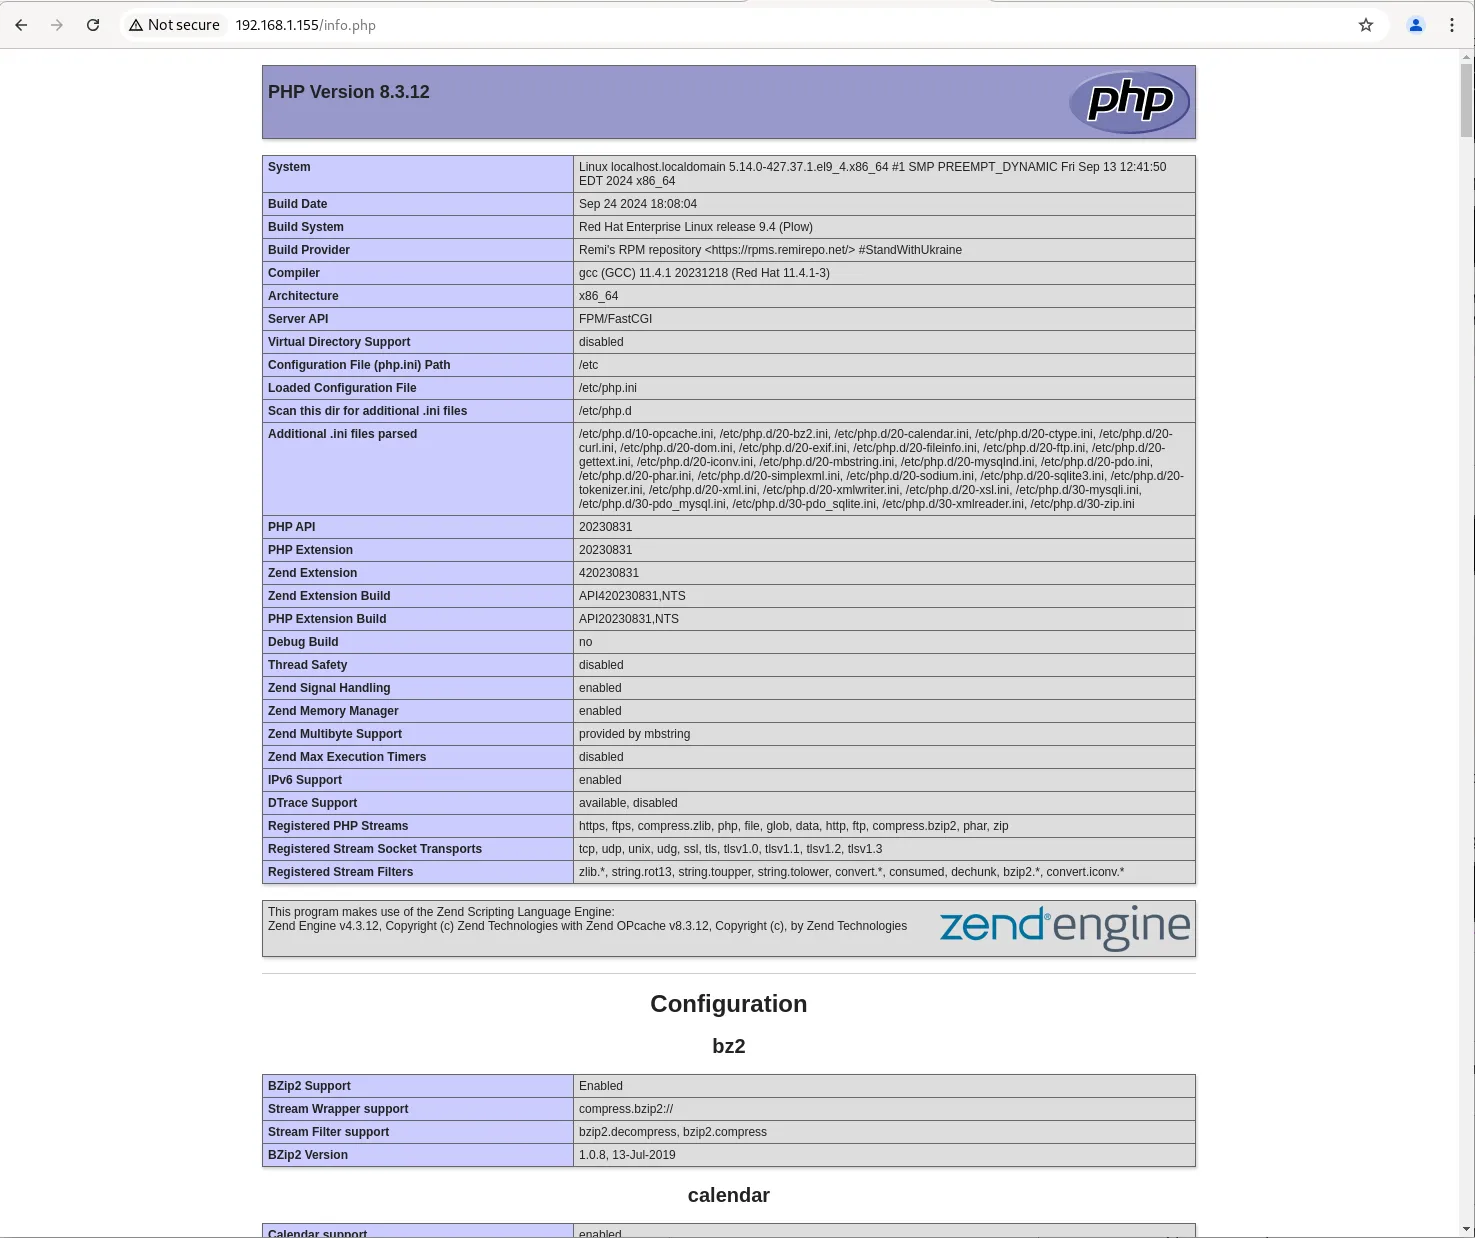
Photo by admingeek from Infotechys
You should see the PHP information page, which confirms that PHP is working correctly with Apache.
PHP 8.3 introduces several exciting features that developers will appreciate. Here are some highlights:
Readonly Properties |
With the introduction of readonly properties, you can define properties that can only be written once. This is particularly useful for data integrity.
					class User {
    public readonly string $name;

    public function __construct(string $name) {
        $this->name = $name;
    }
}
Improved Fibers |
Fibers provide a lightweight mechanism for concurrent programming. PHP 8.3 improves fiber support, making it easier to write non-blocking code.
New Functions and Improvements |
PHP 8.3 includes several new functions and enhancements, including:
array_is_list(): Determines if an array is a list.str_contains(): Checks if a string contains a specific substring.Example Usage of New Functions |
					$myArray = [1, 2, 3];
if (array_is_list($myArray)) {
    echo "This is a list!";
}

if (str_contains("Hello, world!", "world")) {
    echo "Substring found!";
}
Installing PHP 8.3 on RHEL 9 or CentOS 9 is a straightforward process that can significantly enhance your development environment. By taking advantage of the latest features and improvements, you can ensure your applications are performant and secure.
Follow the steps outlined in this guide, and you’ll be up and running with PHP 8.3 in no time. Don’t forget to explore the new features and consider how they can improve your projects.
Did you find this article useful? Your feedback is invaluable to us! Please feel free to share your thoughts in the comments section below.

Learn how to effortlessly deploy and manage a LAMP stack on RHEL9 using Ansible. Streamline your server setup with automation! Table of Contents Introduction Hey
Protecting your valuable data is crucial in the digital age, and one of the most important steps you can take is securing your PostgreSQL database
In this article, we will review how to Install PHP7 on CentOS7 or RHEL7, empowering you to harness the speed, efficiency, and enhanced features of
