
Commands
Learn how to install a Kubernetes cluster on RHEL 9 | CentOS 9. Explore step-by-step instructions, best practices, and considerations for smooth deployment and operation.


Learn how to install Kubernetes using Ansible on Ubuntu 24.04. This comprehensive guide covers prerequisites, setup, and configuration, ensuring a streamlined and consistent deployment process.
Deploying Kubernetes on Ubuntu 24.04 can be a complex task. However, using Ansible roles simplifies this process significantly. Ansible, an open-source automation tool, allows you to automate and manage configuration tasks efficiently. In a previous article, we reviewed how to manually deploy Kubernetes on Ubuntu 23.10. In this guide, we will walk through the steps to deploy a Kubernetes cluster on Ubuntu 24.04 using Ansible roles.
Ansible roles are modular and reusable units of automation. They allow you to separate your configuration into reusable components. This modularity simplifies the management and maintenance of your infrastructure. Additionally, using Ansible roles ensures consistency across different environments.
Before we begin, ensure you have the following:
|
For demonstration purposes, we have set up our Ubuntu 24.04 instances as follows:
| Hostname | RAM | Cores | OS |
| control.naijalabs.net | 4 | 2 | Ubuntu 24.04 (Noble Numbat) |
| master.naijalabs.net | 4 | 2 | Ubuntu 24.04 (Noble Numbat) |
| worker1.naijalabs.net | 4 | 2 | Ubuntu 24.04 (Noble Numbat) |
| worker2.naijalabs.net | 4 | 2 | Ubuntu 24.04 (Noble Numbat) |
| worker3.naijalabs.net | 4 | 2 | Ubuntu 24.04 (Noble Numbat) |
👀IMPORTANT NOTE: If you don’t have a DNS server, you need to add the following entries to the |
					# Kubernetes Cluster
192.168.1.168 control.naijalabs.net   control  # Ansible Control Node
192.168.1.169 master.naijalabs.net    master
192.168.1.170 worker1.naijalabs.net   worker1
192.168.1.171 worker2.naijalabs.net   worker2
192.168.1.172 worker3.naijalabs.net   worker3
👀To clarify, replace the IP addresses and hostnames with those specific to your environment. The provided information is intended to give you an idea of what our |
Let’s proceed with the installation. First things first, update all nodes with the following command (below). Please read each instruction carefully before executing:
sudo apt update -y && sudo apt upgrade -y
Step 1: Setting Up Your Workspace |
Before we start, let’s set up a workspace on the control node to store all the files needed for our Kubernetes deployment. Create a directory named k8s and navigate into it by running the following commands:
mkdir -p k8s && cd k8s
Note: If you haven’t done so already, ensure you have a user account with sudo privileges to become root on all nodes before setting up your workspace. You can create an account and apply the appropriate permissions with the following commands (otherwise, skip to step #2):
sudo adduser sysadmin
					info: Adding user `sysadmin' ...
info: Selecting UID/GID from range 1000 to 59999 ...
info: Adding new group `sysadmin' (1000) ...
info: Adding new user `sysadmin' (1000) with group `sysadmin (1000)' ...
info: Creating home directory `/home/sysadmin' ...
info: Copying files from `/etc/skel' ...
New password:
Retype new password:
passwd: password updated successfully
Changing the user information for sysadmin
Enter the new value, or press ENTER for the default
	Full Name []:
	Room Number []:
	Work Phone []:
	Home Phone []:
	Other []:
Is the information correct? [Y/n] Y
info: Adding new user `sysadmin' to supplemental / extra groups `users' ...
info: Adding user `sysadmin' to group `users' ...
For this demonstration, we created an account named sysadmin and pressed the [Enter] key multiple times to accept all defaults. Next, add the new user to the sudo group:
sudo usermod -aG sudo sysadmin
Finally, verify that the user has sudo privileges by switching to the new user:
su - sysadmin
This command should produce no errors:
sudo -v
Step 2: Setting Up Your Environment |
First, update your package lists and install Ansible on your control node only:
sudo apt install ansible -y
Next, set up SSH keys to allow passwordless access to your nodes. Generate an SSH key pair if you haven’t already:
ssh-keygen -t rsa -b 4096 -C "your_email@example.com"
					Generating public/private rsa key pair.
Enter file in which to save the key (/home/sysadmin/.ssh/id_rsa):
Enter passphrase (empty for no passphrase):
Enter same passphrase again:
Your identification has been saved in /home/sysadmin/.ssh/id_rsa
Your public key has been saved in /home/sysadmin/.ssh/id_rsa.pub
The key fingerprint is:
SHA256:ZCOCj3nJH4acPXTcNG7uc2P8TrGHyW9fbfWnfFNI874 Infotechystaff@gmail.com
The key's randomart image is:
+---[RSA 4096]----+
|          o      |
|   .   . + .     |
|  . . o * +      |
|   * B = +    o  |
|  o O = S .  ..+.|
|   . o o . . ..=*|
|      .   o = *.O|
|           + = **|
|             .=E*|
+----[SHA256]-----+
Now that you’ve created a public key on your control node, copy that key to each of your nodes:
ssh-copy-id your_privileged_user@your_master_node_ip_address
ssh-copy-id your_privileged_user@your_worker_node_ip_address
Step 3: Define Your Inventory File |
Using your preferred text editor, create an inventory file to list your nodes. This file, typically named hosts or inventory, should look like this:
vim hosts
Then, copy and Paste the following entries (below) and modify to suit your environment.
					[master_nodes]
master  ansible_host=192.168.1.169

[worker_nodes]
worker1 ansible_host=192.168.1.170
worker2 ansible_host=192.168.1.171
worker3 ansible_host=192.168.1.172

[all:vars]
ansible_python_interpreter=/usr/bin/python3
Step 4: Create Ansible Roles |
Now, let’s create Ansible roles for the Kubernetes master, network and worker nodes.
Role for Kubernetes Master |
Create a directory structure for the master role with the following command:
ansible-galaxy init kubernetes_master
Edit the tasks/main.yml file in the kubernetes_master role:
vim kubernetes_master/tasks/main.yml
Copy and paste the following entries into the main.yml file (then, save and exit the file):
					---
# tasks file for kubernetes_master
- name: Install required packages
  apt:
    name:
      - curl
      - gnupg2
      - software-properties-common
      - apt-transport-https
      - ca-certificates
    state: present
    update_cache: yes

- name: Install Docker
  apt:
    name: docker.io
    state: present
    update_cache: yes

- name: Remove Keyrings Directory (if it exists)
  ansible.builtin.shell: rm -rf /etc/apt/keyrings

- name: Remove Existing Kubernetes Directory (if it exists)
  ansible.builtin.shell: sudo rm -rf /etc/apt/sources.list.d/pkgs_k8s_io_core_stable_v1_30_deb.list

- name: Disable swap
  ansible.builtin.command:
    cmd: swapoff -a

- name: Ensure swap is disabled on boot
  ansible.builtin.command:
    cmd: sudo sed -i -e '/\/swap.img\s\+none\s\+swap\s\+sw\s\+0\s\+0/s/^/#/' /etc/fstab

- name: Add kernel modules for Containerd
  ansible.builtin.copy:
    dest: /etc/modules-load.d/containerd.conf
    content: |
      overlay
      br_netfilter

- name: Load kernel modules for Containerd
  ansible.builtin.shell:
    cmd: modprobe overlay && modprobe br_netfilter
  become: true

- name: Add kernel parameters for Kubernetes
  ansible.builtin.copy:
    dest: /etc/sysctl.d/kubernetes.conf
    content: |
      net.bridge.bridge-nf-call-ip6tables = 1
      net.bridge.bridge-nf-call-iptables = 1
      net.ipv4.ip_forward = 1

- name: Load kernel parameter changes
  ansible.builtin.command:
    cmd: sudo sysctl --system

- name: Configuring Containerd (building the configuration file)
  ansible.builtin.command:
    cmd: sudo sh -c "containerd config default > /opt/containerd/config.toml"

- name: Configuring Containerd (Setting SystemdCgroup Variable to True)
  ansible.builtin.command:
    cmd: sudo sed -i 's/SystemdCgroup = false/SystemdCgroup = true/' /opt/containerd/config.toml

- name: Reload systemd configuration
  ansible.builtin.command:
    cmd: systemctl daemon-reload

- name: Restart containerd service
  ansible.builtin.service:
    name: containerd
    state: restarted

- name: Allow 6443/tcp through firewall
  ansible.builtin.command:
    cmd: sudo ufw allow 6443/tcp

- name: Allow 2379:2380/tcp through firewall
  ansible.builtin.command:
    cmd: sudo ufw allow 2379:2380/tcp

- name: Allow 22/tcp through firewall
  ansible.builtin.command:
    cmd: sudo ufw allow 22/tcp

- name: Allow 8080/tcp through firewall
  ansible.builtin.command:
    cmd: sudo ufw allow 8080/tcp

- name: Allow 10250/tcp through firewall
  ansible.builtin.command:
    cmd: sudo ufw allow 10250/tcp

- name: Allow 10251/tcp through firewall
  ansible.builtin.command:
    cmd: sudo ufw allow 10251/tcp

- name: Allow 10252/tcp through firewall
  ansible.builtin.command:
    cmd: sudo ufw allow 10252/tcp

- name: Allow 10255/tcp through firewall
  ansible.builtin.command:
    cmd: sudo ufw allow 10255/tcp

- name: Allow 5473/tcp through firewall
  ansible.builtin.command:
    cmd: sudo ufw allow 5473/tcp

- name: Enable the firewall
  ansible.builtin.ufw:
    state: enabled

- name: Reload the firewall
  ansible.builtin.command:
    cmd: sudo ufw reload

- name: Prepare keyrings directory and update permissions
  file:
    path: /etc/apt/keyrings
    state: directory
    mode: '0755'

- name: Download Kubernetes GPG key securely
  ansible.builtin.shell: curl -fsSL https://pkgs.k8s.io/core:/stable:/v1.30/deb/Release.key | sudo gpg --dearmor -o /etc/apt/keyrings/kubernetes-apt-keyring.gpg

- name: Add Kubernetes repository
  ansible.builtin.apt_repository:
    repo: "deb [signed-by=/etc/apt/keyrings/kubernetes-apt-keyring.gpg] https://pkgs.k8s.io/core:/stable:/v1.30/deb/ /"
    state: present

- name: Install kubeadm, kubelet, kubectl
  ansible.builtin.apt:
    name:
      - kubelet
      - kubeadm
      - kubectl
    state: present
    update_cache: yes

- name: Hold kubelet, kubeadm, kubectl packages
  ansible.builtin.command:
    cmd: sudo apt-mark hold kubelet kubeadm kubectl

- name: Replace /etc/default/kubelet contents
  ansible.builtin.copy:
    dest: /etc/default/kubelet
    content: 'KUBELET_EXTRA_ARGS="--cgroup-driver=cgroupfs"'

- name: Reload systemd configuration
  ansible.builtin.command:
    cmd: systemctl daemon-reload

- name: Restart kubelet service
  ansible.builtin.service:
    name: kubelet
    state: restarted

- name: Update System-Wide Profile for Kubernetes
  ansible.builtin.copy:
    dest: /etc/profile.d/kubernetes.sh
    content: |
      export KUBECONFIG=/etc/kubernetes/admin.conf
      export ANSIBLE_USER="sysadmin"

- name: Reboot the system
  ansible.builtin.reboot:
    msg: "Reboot initiated by Ansible for Kubernetes setup"
    reboot_timeout: 150

- name: Replace Docker daemon.json configuration
  ansible.builtin.copy:
    dest: /etc/docker/daemon.json
    content: |
      {
        "exec-opts": ["native.cgroupdriver=systemd"],
        "log-driver": "json-file",
        "log-opts": {
          "max-size": "100m"
        },
        "storage-driver": "overlay2"
      }

- name: Reload systemd configuration
  ansible.builtin.command:
    cmd: systemctl daemon-reload

- name: Restart Docker service
  ansible.builtin.service:
    name: docker
    state: restarted

- name: Update Kubeadm Environment Variable
  ansible.builtin.command:
    cmd: sudo sed -i -e '/^\[Service\]/a Environment="KUBELET_EXTRA_ARGS=--fail-swap-on=false"' /usr/lib/systemd/system/kubelet.service.d/10-kubeadm.conf

- name: Reload systemd configuration
  ansible.builtin.command:
    cmd: systemctl daemon-reload

- name: Restart kubelet service
  ansible.builtin.service:
    name: kubelet
    state: restarted

- name: Pull kubeadm container images
  ansible.builtin.command:
    cmd: sudo kubeadm config images pull

- name: Initialize Kubernetes control plane
  ansible.builtin.command:
    cmd: kubeadm init --pod-network-cidr=10.244.0.0/16
    creates: /tmp/kubeadm_output
  register: kubeadm_init_output
  become: true
  changed_when: false

- name: Set permissions for Kubernetes Admin
  file:
    path: /etc/kubernetes/admin.conf
    state: file
    mode: '0755'

- name: Store Kubernetes initialization output to file
  copy:
    content: "{{ kubeadm_init_output.stdout }}"
    dest: /tmp/kubeadm_output
  become: true
  delegate_to: localhost

- name: Generate the Join Command
  ansible.builtin.shell: cat /tmp/kubeadm_output | tail -n 2 | sed ':a;N;$!ba;s/\\\n\s*/ /g' > /tmp/join-command
  delegate_to: localhost

- name: Set permissions for the Join Executable
  file:
    path: /tmp/join-command
    state: file
    mode: '0755'
  delegate_to: localhost
Note: If your user account differs from sysadmin, ensure that you update the ANSIBLE_USER variable in the main.yml file to reflect your user account.
export ANSIBLE_USER="your_privileged_user"
Role for Kubernetes Worker |
Create a directory structure for the worker role:
ansible-galaxy init kubernetes_worker
Edit the tasks/main.yml file in the kubernetes_worker role:
vim kubernetes_worker/tasks/main.yml
Copy and paste the following to the file (save and exit the file):
					---
# tasks file for kubernetes_worker
- name: Install required packages
  apt:
    name:
      - curl
      - gnupg2
      - software-properties-common
      - apt-transport-https
      - ca-certificates
    state: present
    update_cache: yes

- name: Install Docker
  apt:
    name: docker.io
    state: present
    update_cache: yes

- name: Remove Keyrings Directory (if it exists)
  ansible.builtin.shell: rm -rf /etc/apt/keyrings

- name: Remove Existing Kubernetes Directory (if it exists)
  ansible.builtin.shell: sudo rm -rf /etc/apt/sources.list.d/pkgs_k8s_io_core_stable_v1_30_deb.list

- name: Disable swap
  ansible.builtin.command:
    cmd: swapoff -a

- name: Ensure swap is disabled on boot
  ansible.builtin.command:
    cmd: sudo sed -i -e '/\/swap.img\s\+none\s\+swap\s\+sw\s\+0\s\+0/s/^/#/' /etc/fstab

- name: Add kernel modules for Containerd
  ansible.builtin.copy:
    dest: /etc/modules-load.d/containerd.conf
    content: |
      overlay
      br_netfilter

- name: Load kernel modules for Containerd
  ansible.builtin.shell:
    cmd: modprobe overlay && modprobe br_netfilter
  become: true

- name: Add kernel parameters for Kubernetes
  ansible.builtin.copy:
    dest: /etc/sysctl.d/kubernetes.conf
    content: |
      net.bridge.bridge-nf-call-ip6tables = 1
      net.bridge.bridge-nf-call-iptables = 1
      net.ipv4.ip_forward = 1

- name: Load kernel parameter changes
  ansible.builtin.command:
    cmd: sudo sysctl --system

- name: Configuring Containerd (building the configuration file)
  ansible.builtin.command:
    cmd: sudo sh -c "containerd config default > /opt/containerd/config.toml"

- name: Configuring Containerd (Setting SystemdCgroup Variable to True)
  ansible.builtin.command:
    cmd: sudo sed -i 's/SystemdCgroup = false/SystemdCgroup = true/' /opt/containerd/config.toml

- name: Reload systemd configuration
  ansible.builtin.command:
    cmd: systemctl daemon-reload

- name: Restart containerd service
  ansible.builtin.service:
    name: containerd
    state: restarted

- name: Allow 6443/tcp through firewall
  ansible.builtin.command:
    cmd: sudo ufw allow 6443/tcp

- name: Allow 2379:2380/tcp through firewall
  ansible.builtin.command:
    cmd: sudo ufw allow 2379:2380/tcp

- name: Allow 22/tcp through firewall
  ansible.builtin.command:
    cmd: sudo ufw allow 22/tcp

- name: Allow 8080/tcp through firewall
  ansible.builtin.command:
    cmd: sudo ufw allow 8080/tcp

- name: Allow 10250/tcp through firewall
  ansible.builtin.command:
    cmd: sudo ufw allow 10250/tcp

- name: Allow 10251/tcp through firewall
  ansible.builtin.command:
    cmd: sudo ufw allow 10251/tcp

- name: Allow 10252/tcp through firewall
  ansible.builtin.command:
    cmd: sudo ufw allow 10252/tcp

- name: Allow 10255/tcp through firewall
  ansible.builtin.command:
    cmd: sudo ufw allow 10255/tcp

- name: Allow 5473/tcp through firewall
  ansible.builtin.command:
    cmd: sudo ufw allow 5473/tcp

- name: Enable the firewall
  ansible.builtin.ufw:
    state: enabled

- name: Reload the firewall
  ansible.builtin.command:
    cmd: sudo ufw reload

- name: Prepare keyrings directory and update permissions
  file:
    path: /etc/apt/keyrings
    state: directory
    mode: '0755'

- name: Download Kubernetes GPG key securely
  ansible.builtin.shell: curl -fsSL https://pkgs.k8s.io/core:/stable:/v1.30/deb/Release.key | sudo gpg --dearmor -o /etc/apt/keyrings/kubernetes-apt-keyring.gpg

- name: Add Kubernetes repository
  ansible.builtin.apt_repository:
    repo: "deb [signed-by=/etc/apt/keyrings/kubernetes-apt-keyring.gpg] https://pkgs.k8s.io/core:/stable:/v1.30/deb/ /"
    state: present

- name: Install kubeadm, kubelet, kubectl
  ansible.builtin.apt:
    name:
      - kubelet
      - kubeadm
      - kubectl
    state: present
    update_cache: yes

- name: Hold kubelet, kubeadm, kubectl packages
  ansible.builtin.command:
    cmd: sudo apt-mark hold kubelet kubeadm kubectl

- name: Replace /etc/default/kubelet contents
  ansible.builtin.copy:
    dest: /etc/default/kubelet
    content: 'KUBELET_EXTRA_ARGS="--cgroup-driver=cgroupfs"'

- name: Reload systemd configuration
  ansible.builtin.command:
    cmd: systemctl daemon-reload

- name: Restart kubelet service
  ansible.builtin.service:
    name: kubelet
    state: restarted

- name: Reboot the system
  ansible.builtin.reboot:
    msg: "Reboot initiated by Ansible for Kubernetes setup"
    reboot_timeout: 150

- name: Copy join-command file to worker nodes
  copy:
    src: /tmp/join-command
    dest: /tmp/join-command
    mode: 0755

- name: Join Worker Nodes
  ansible.builtin.shell: sh /tmp/join-command
  become: yes
Role for Kubernetes Network |
Create a directory structure for the network role:
ansible-galaxy init kubernetes_network
Edit the tasks/main.yml file in the kubernetes_network role:
vim kubernetes_network/tasks/main.yml
Populate that file with the following (then, save and exit the file):
					---
# tasks file for kubernetes_network
- name: Install Flannel network plugin
  ansible.builtin.shell: su - $ANSIBLE_USER -c "kubectl apply -f https://raw.githubusercontent.com/coreos/flannel/master/Documentation/kube-flannel.yml"

- name: Taint master node to prevent workload scheduling
  ansible.builtin.shell: su - $ANSIBLE_USER -c "kubectl taint nodes --all node-role.kubernetes.io/control-plane-"
Step 5: Create a Playbook to Run the Roles |
Create a playbook to run these roles. Create a file named site.yml:
vim site.yml
Populate that file with the following contents (below) then save and exit the file:
					---
- name: Configure Kubernetes Master
  hosts: master_nodes
  become: yes
  roles:
    - kubernetes_master

- name: Configure Kubernetes Network
  hosts: master_nodes
  become: yes
  roles:
    - kubernetes_network

- name: Configure Kubernetes Worker
  hosts: worker_nodes
  become: yes
  roles:
    - kubernetes_worker
👀If you are running virtual machines, this is a good time to take snapshots of your master and worker nodes. This will allow you to revert to this current state if any unforeseen issues arise during the installation. |
In this section, we break down the tasks required for setting up the Kubernetes master, network and worker nodes using Ansible. As part of this process, we will gain a deeper understanding of the various configuration steps involved with preparing a node for Kubernetes deployment. If you prefer to skip this section and continue with the installation, click this link to navigate to playbook execution section.
1. Install Required Packages |
First, we need to install several essential packages:
					- name: Install required packages
  apt:
    name:
      - curl
      - gnupg2
      - software-properties-common
      - apt-transport-https
      - ca-certificates
    state: present
    update_cache: yes
These packages are necessary for fetching and verifying Kubernetes components.
2. Install Docker |
Next, we install Docker, which is a container runtime required by Kubernetes:
					- name: Install Docker
  apt:
    name: docker.io
    state: present
    update_cache: yes
3. Remove Existing Directories (if they exist) |
We ensure the removal of any existing directories that might interfere with our installation:
					- name: Remove Keyrings Directory (if it exists)
  ansible.builtin.shell: rm -rf /etc/apt/keyrings

- name: Remove Existing Kubernetes Directory (if it exists)
  ansible.builtin.shell: sudo rm -rf /etc/apt/sources.list.d/pkgs_k8s_io_core_stable_v1_30_deb.list
Important Note: These tasks were added to ensure idempotence. Without them, running the playbook multiple times could result in hung processes or errors when updating the package lists or GPG signing issues. By removing these specific directories, we guarantee that each execution of the playbook starts with a clean slate, allowing the secure GPG key and Kubernetes repository to be added afresh every time.
4. Disable Swap |
Kubernetes requires swap to be disabled:
					- name: Disable swap
  ansible.builtin.command:
    cmd: swapoff -a

- name: Ensure swap is disabled on boot
  ansible.builtin.command:
    cmd: sudo sed -i -e '/\/swap.img\s\+none\s\+swap\s\+sw\s\+0\s\+0/s/^/#/' /etc/fstab
In this step, swap is deactivated and also disabled on boot.
Note: Depending on how your Ubuntu 24.04 instances were configured or the platform you are using, your swap entries may vary. Make sure to disable swap (and ensuring swap remains disabled upon reboot) before running the playbook to prevent unnecessary errors.
5. Load Kernel Parameters |
Configure kernel parameters required by Containerd and Kubernetes:
					- name: Load kernel parameters for Containerd
  ansible.builtin.copy:
    dest: /etc/modules-load.d/containerd.conf
    content: |
      overlay
      br_netfilter

- name: Load kernel parameters for Kubernetes
  ansible.builtin.copy:
    dest: /etc/sysctl.d/kubernetes.conf
    content: |
      net.bridge.bridge-nf-call-ip6tables = 1
      net.bridge.bridge-nf-call-iptables = 1
      net.ipv4.ip_forward = 1

- name: Reload Parameter Changes
  ansible.builtin.command:
    cmd: sudo sysctl --system
These tasks configure and load the necessary kernel parameters for Containerd and Kubernetes. First, it creates a configuration file at /etc/modules-load.d/containerd.conf to load the overlay and br_netfilter modules. Next, it sets kernel parameters for Kubernetes by creating /etc/sysctl.d/kubernetes.conf with settings to enable IP forwarding and bridge network calls to iptables. Finally, it applies these changes system-wide by running sudo sysctl --system.
6. Configure Containerd |
Set up Containerd, the container runtime used by Kubernetes:
					- name: Configuring Containerd (building the configuration file)
  ansible.builtin.command:
    cmd: sudo sh -c "containerd config default > /opt/containerd/config.toml"

- name: Configuring Containerd (Setting SystemdCgroup Variable to True)
  ansible.builtin.command:
    cmd: sudo sed -i 's/SystemdCgroup = false/SystemdCgroup = true/' /opt/containerd/config.toml

- name: Reload systemd configuration
  ansible.builtin.command:
    cmd: systemctl daemon-reload

- name: Restart containerd service
  ansible.builtin.service:
    name: containerd
    state: restarted
These tasks configure Containerd for use with Kubernetes. First, it creates a default configuration file for Containerd at /opt/containerd/config.toml. Next, it modifies this file to set the SystemdCgroup variable to true, ensuring that Containerd uses systemd for managing cgroups. Then, it reloads the systemd configuration to apply any changes. Finally, it restarts the Containerd service to ensure that the new configuration is in effect.
7. Configure Firewall |
Open necessary ports for Kubernetes components:
					- name: Allow 6443/tcp through firewall
  ansible.builtin.command:
    cmd: sudo ufw allow 6443/tcp

- name: Allow 2379:2380/tcp through firewall
  ansible.builtin.command:
    cmd: sudo ufw allow 2379:2380/tcp

- name: Allow 8080/tcp through firewall
  ansible.builtin.command:
    cmd: sudo ufw allow 8080/tcp

- name: Allow 22/tcp through firewall
  ansible.builtin.command:
    cmd: sudo ufw allow 22/tcp

- name: Allow 10250/tcp through firewall
  ansible.builtin.command:
    cmd: sudo ufw allow 10250/tcp

- name: Allow 10251/tcp through firewall
  ansible.builtin.command:
    cmd: sudo ufw allow 10251/tcp

- name: Allow 10252/tcp through firewall
  ansible.builtin.command:
    cmd: sudo ufw allow 10252/tcp

- name: Allow 10255/tcp through firewall
  ansible.builtin.command:
    cmd: sudo ufw allow 10255/tcp

- name: Allow 5473/tcp through firewall
  ansible.builtin.command:
    cmd: sudo ufw allow 5473/tcp

- name: Enable the firewall
  ansible.builtin.ufw:
    state: enabled

- name: Reload the firewall
  ansible.builtin.command:
    cmd: sudo ufw reload
8. Add Kubernetes Repository |
Add the Kubernetes APT repository and install the Kubernetes components:
					- name: Create directory for APT keys
  file:
    path: /etc/apt/keyrings
    state: directory
    mode: '0755'

- name: Download Kubernetes GPG key securely
  ansible.builtin.shell: curl -fsSL https://pkgs.k8s.io/core:/stable:/v1.30/deb/Release.key | sudo gpg --dearmor -o /etc/apt/keyrings/kubernetes-apt-keyring.gpg

- name: Add Kubernetes repository
  ansible.builtin.apt_repository:
    repo: "deb [signed-by=/etc/apt/keyrings/kubernetes-apt-keyring.gpg] https://pkgs.k8s.io/core:/stable:/v1.30/deb/ /"
    state: present

- name: Install kubeadm, kubelet, kubectl
  ansible.builtin.apt:
    name:
      - kubelet
      - kubeadm
      - kubectl
    state: present
    update_cache: yes

- name: Hold kubelet, kubeadm, kubectl packages
  ansible.builtin.command:
    cmd: sudo apt-mark hold kubelet kubeadm kubectl
9. Configure Kubelet |
Set the cgroup driver for Kubelet:
					- name: Replace /etc/default/kubelet contents
  ansible.builtin.copy:
    dest: /etc/default/kubelet
    content: 'KUBELET_EXTRA_ARGS="--cgroup-driver=cgroupfs"'

- name: Reload systemd configuration
  ansible.builtin.command:
    cmd: systemctl daemon-reload

- name: Restart kubelet service
  ansible.builtin.service:
    name: kubelet
    state: restarted
These tasks update the configuration for the kubelet service. First, the contents of /etc/default/kubelet are replaced to set the KUBELET_EXTRA_ARGS environment variable to use the cgroupfs cgroup driver. Next, the systemd configuration is reloaded to apply these changes. Finally, the kubelet service is restarted to ensure that it runs with the updated configuration.
10. Reboot the System |
Reboot the system and confirm all changes:
					- name: Reboot the system
  ansible.builtin.reboot:
    msg: "Reboot initiated by Ansible for Kubernetes setup"
    reboot_timeout: 150
This is an ideal time to verify that services are running as expected after the reboot and to ensure that configuration changes, such as the disabling of swap, remain in effect.
👀All the tasks reviewed so far apply to both master and worker nodes. The following tasks, starting from Step #11, are intended to run exclusively on the master node. |
11. Configure Docker |
Set Docker daemon options:
					- name: Replace Docker daemon.json configuration
  ansible.builtin.copy:
    dest: /etc/docker/daemon.json
    content: |
      {
        "exec-opts": ["native.cgroupdriver=systemd"],
        "log-driver": "json-file",
        "log-opts": {
          "max-size": "100m"
        },
        "storage-driver": "overlay2"
      }

- name: Reload systemd configuration
  ansible.builtin.command:
    cmd: systemctl daemon-reload

- name: Restart Docker service
  ansible.builtin.service:
    name: docker
    state: restarted
12. Update Kubeadm Environment Variable |
Ensure Kubeadm does not fail due to swap:
					- name: Update Kubeadm Environment Variable
  ansible.builtin.command:
    cmd: sudo sed -i -e '/^\[Service\]/a Environment="KUBELET_EXTRA_ARGS=--fail-swap-on=false"' /usr/lib/systemd/system/kubelet.service.d/10-kubeadm.conf

- name: Reload systemd configuration
  ansible.builtin.command:
    cmd: systemctl daemon-reload

- name: Restart kubelet service
  ansible.builtin.service:
    name: kubelet
    state: restarted
13. Pull Kubernetes Container Images |
Pull the required container images:
					- name: Pull Kubernetes container images
  ansible.builtin.command:
    cmd: sudo kubeadm config images pull
14. Initialize Kubernetes Control Plane |
Initializing the Kubernetes control plane is crucial to the entire installation process. If this step fails, you won’t be able to successfully set up the Kubernetes cluster, as it won’t generate the necessary tokens for joining the worker nodes.
					- name: Initialize Kubernetes control plane
  ansible.builtin.command:
    cmd: kubeadm init --pod-network-cidr=10.244.0.0/16
    creates: /tmp/kubeadm_output
  register: kubeadm_init_output
  become: true
  changed_when: false
This task initializes the Kubernetes control plane by running the kubeadm init command with a specified pod network CIDR. It creates an output file /tmp/kubeadm_output to store the command’s result, registers this output in the kubeadm_init_output variable, and executes the command with elevated privileges. The changed_when: false directive indicates that the task’s status is not considered changed, even if it runs successfully.
15. Store the initialization output |
This task uses the copy module to save the output of the Kubernetes initialization command (stored in kubeadm_init_output.stdout) to a file at /tmp/kubeadm_output on the control node. The become: true directive ensures that the task is executed with elevated privileges, and delegate_to: localhost specifies that the task should be run on the local control node.
					- name: Store Kubernetes initialization output to file
  copy:
    content: "{{ kubeadm_init_output.stdout }}"
    dest: /tmp/kubeadm_output
  become: true
  delegate_to: localhost
16. Generate the Join Token |
To generate the join command from the Kubernetes initialization output and store it in /tmp/join-command, you can use the following Ansible task:
					- name: Generate the Join Command
  ansible.builtin.shell: cat /tmp/kubeadm_output | tail -n 2 | sed ':a;N;$!ba;s/\\\n\s*/ /g' > /tmp/join-command
  delegate_to: localhost
This task does the following:
ansible.builtin.shell module to execute a shell command on the control node (localhost)./tmp/kubeadm_output using tail -n 2.sed to remove line breaks (\\\n) and concatenate the lines into a single line./tmp/join-command.17. Make the join-command file executable |
To set permissions for the join command executable (/tmp/join-command), ensuring it has the correct mode (755), you can use the following Ansible task:
					- name: Set permissions for the Join Executable
  file:
    path: /tmp/join-command
    state: file
    mode: '0755'
  delegate_to: localhost
It ensures that /tmp/join-command is executable by its owner and suitable for executing the Kubernetes join command.
18. Configuring Kubernetes Network Environment |
The provided Ansible tasks are designed for configuring networking in a Kubernetes environment. The first task installs the Flannel network plugin using kubectl apply, ensuring network connectivity and pod communication within the cluster.
The second task taints the Kubernetes master node to prevent scheduling of workloads on it, which is a common practice to reserve the master node exclusively for control plane operations rather than running user workloads. These tasks are typically executed with elevated privileges (su - $ANSIBLE_USER) to ensure proper access and execution permissions within the Kubernetes environment managed by Ansible.
					---
# tasks file for kubernetes_network
- name: Install Flannel network plugin
  ansible.builtin.shell: su - $ANSIBLE_USER -c "kubectl apply -f https://raw.githubusercontent.com/coreos/flannel/master/Documentation/kube-flannel.yml"

- name: Taint master node to prevent workload scheduling
  ansible.builtin.shell: su - $ANSIBLE_USER -c "kubectl taint nodes --all node-role.kubernetes.io/control-plane-"
19. Copy Join-command executable to worker nodes |
This task ensures that the join-command file is copied to the destination /tmp/join-command on the worker nodes with executable permissions (mode 0755).
					- name: Copy join-command file to worker nodes
  copy:
    src: /tmp/join-command
    dest: /tmp/join-command
    mode: 0755
20. Join Worker Nodes |
The join-command file contains the kubeadm join command needed to join the worker nodes to the Kubernetes cluster:
					- name: Join Worker Nodes
  ansible.builtin.shell: sh /tmp/join-command
  become: yes
Now that we have reviewed each Ansible role necessary for configuring a Kubernetes cluster, we will proceed with executing the playbook. Please note that this process may take anywhere from 10 to 15 minutes to complete, depending on your network and system resources.
ansible-playbook -i hosts site.yml -K
The command ansible-playbook is used to run a playbook with specific options. Here’s a breakdown of each part of the command:
| Command Option | Description |
|---|---|
ansible-playbook | This is the Ansible command used to run playbooks. A playbook is a file containing a series of tasks that Ansible will execute on the specified hosts. |
-i hosts | The -i option specifies the inventory file. In this case, hosts is the inventory file that lists the target hosts and their groupings. This file tells Ansible which machines to run the tasks on. |
site.yml | This is the name of the playbook file. site.yml contains the tasks and roles that Ansible will execute on the specified hosts. |
-K | This option prompts the user for the sudo password. It stands for “ask for privilege escalation password.” This is necessary when tasks in the playbook require elevated privileges (sudo) to execute. |
Putting it all together, this command runs the site.yml playbook on the hosts specified in the hosts inventory file, and it will prompt you to enter the sudo password to execute tasks that require elevated privileges.
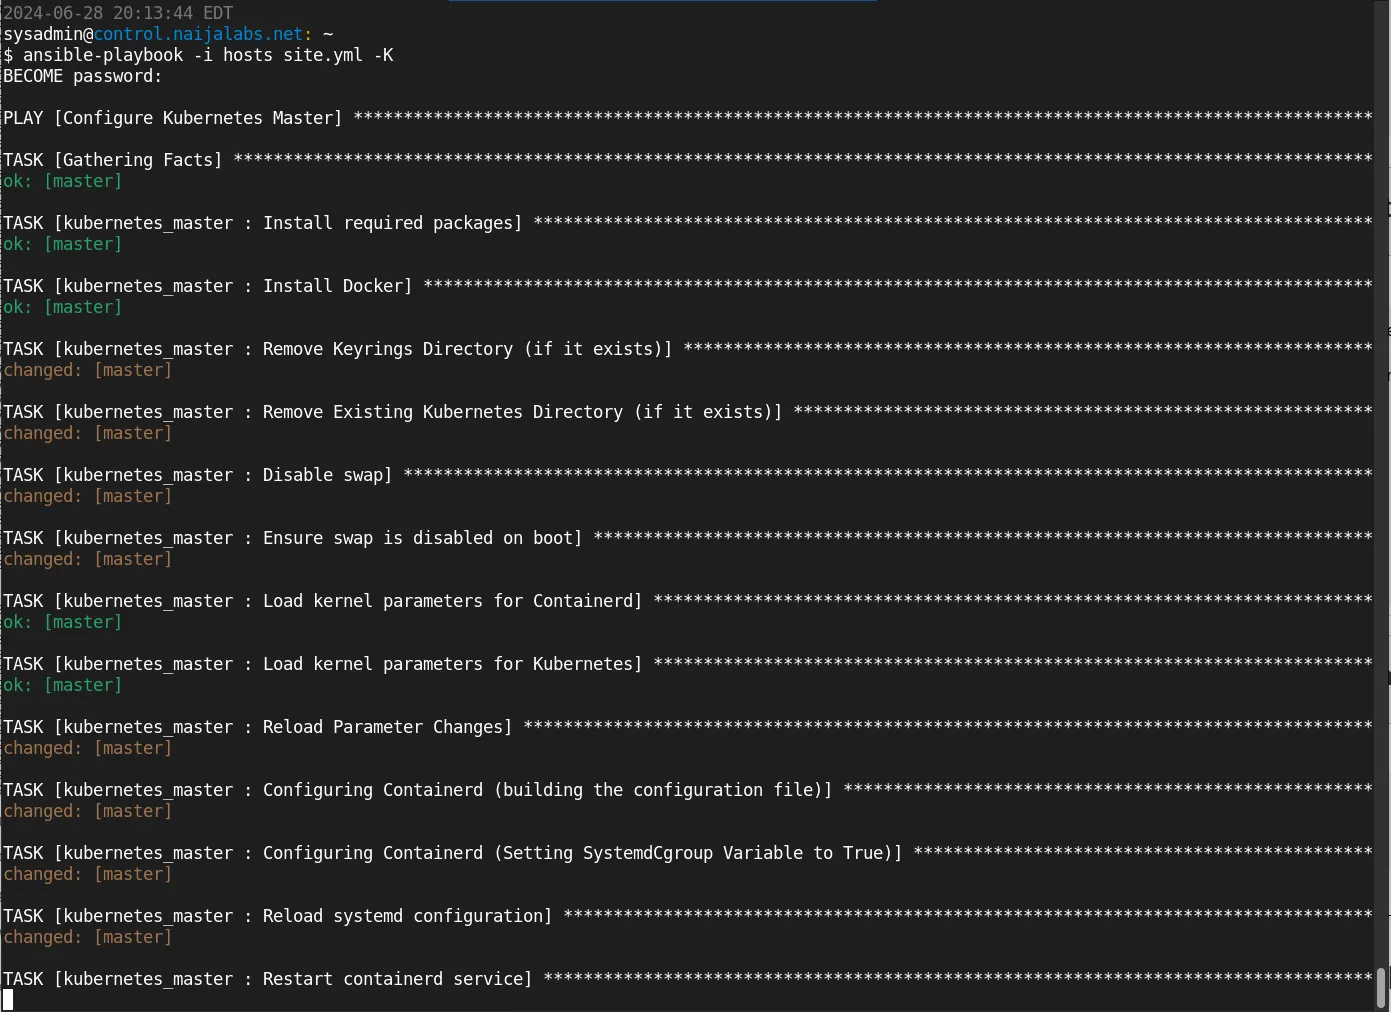
Photo by admingeek from Infotechys
Once the playbook has finished running, there are several ways to verify if we have successfully configured a Kubernetes cluster.
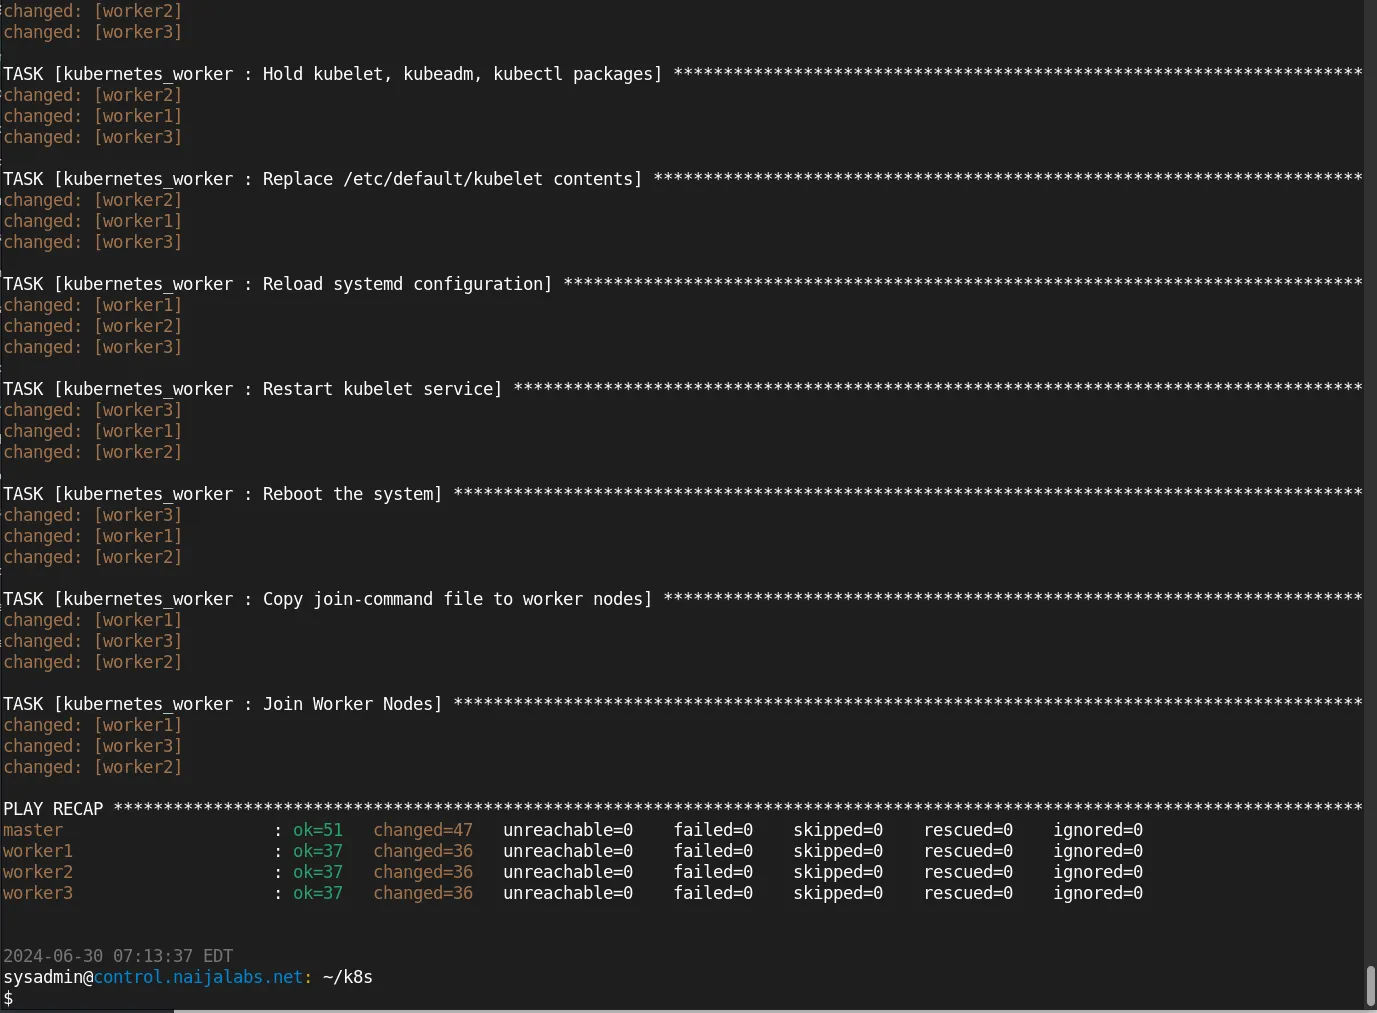
Photo by admingeek from Infotechys
Use Kubectl Commands |
SSH to the master node and run the following command to check the status of the nodes:
kubectl get nodes
					NAME                    STATUS   ROLES           AGE   VERSION
master.naijalabs.net    Ready    control-plane   37m   v1.30.2
worker1.naijalabs.net   Ready    <none>          32m   v1.30.2
worker2.naijalabs.net   Ready    <none>          32m   v1.30.2
worker3.naijalabs.net   Ready    <none>          32m   v1.30.2
Additionally, you can list the pods in all namespaces with this command:
kubectl get pods --all-namespaces
					NAMESPACE      NAME                                           READY   STATUS    RESTARTS   AGE
kube-flannel   kube-flannel-ds-f67vw                          1/1     Running   0          36m
kube-flannel   kube-flannel-ds-f6mr2                          1/1     Running   0          36m
kube-flannel   kube-flannel-ds-mvdvf                          1/1     Running   0          41m
kube-flannel   kube-flannel-ds-r96dj                          1/1     Running   0          36m
kube-system    coredns-7db6d8ff4d-cq9wq                       1/1     Running   0          41m
kube-system    coredns-7db6d8ff4d-n5h8d                       1/1     Running   0          41m
kube-system    etcd-master.naijalabs.net                      1/1     Running   0          41m
kube-system    kube-apiserver-master.naijalabs.net            1/1     Running   0          41m
kube-system    kube-controller-manager-master.naijalabs.net   1/1     Running   0          41m
kube-system    kube-proxy-4b8tj                               1/1     Running   0          36m
kube-system    kube-proxy-dflsd                               1/1     Running   0          36m
kube-system    kube-proxy-nclxg                               1/1     Running   0          41m
kube-system    kube-proxy-vrl9s                               1/1     Running   0          36m
kube-system    kube-scheduler-master.naijalabs.net            1/1     Running   0          41m
Run this command to view services:
kubectl get services
					NAME         TYPE        CLUSTER-IP   EXTERNAL-IP   PORT(S)   AGE
kubernetes   ClusterIP   10.96.0.1    <none>        443/TCP   10h
Dashboard Access |
Access the Kubernetes dashboard (if installed) through a web browser: http://localhost:8001/api/v1/namespaces/kubernetes-dashboard/services/https:kubernetes-dashboard:/proxy
kubectl proxy
Starting to serve on 127.0.0.1:8001
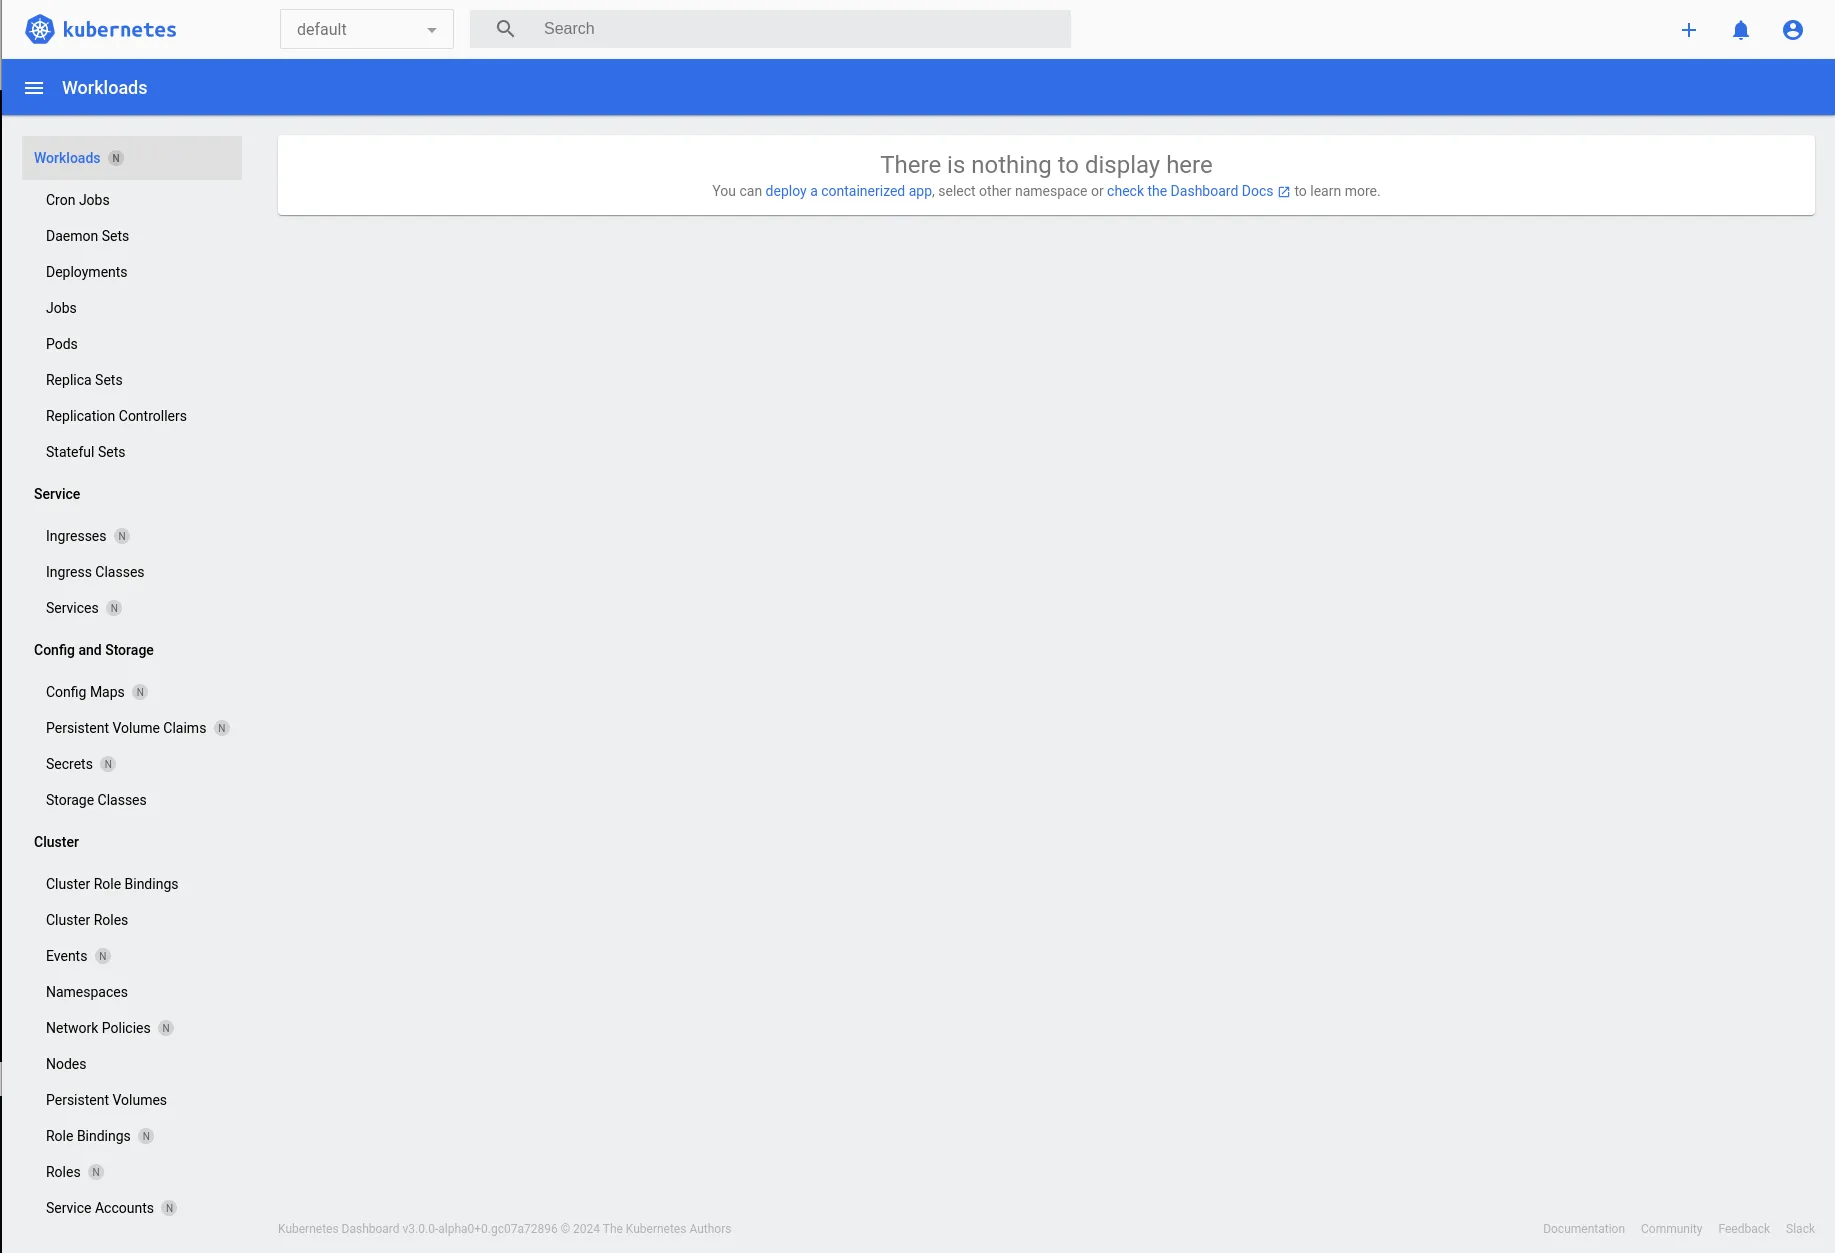
Photo by admingeek from Infotechys
Cluster API Responses |
Verify responses from the Kubernetes API server using kubectl or directly accessing the API endpoint:
kubectl cluster-info
					Kubernetes control plane is running at https://192.168.1.169:6443
CoreDNS is running at https://192.168.1.169:6443/api/v1/namespaces/kube-system/services/kube-dns:dns/proxy
Get API versions:
kubectl api-versions
					admissionregistration.k8s.io/v1
apiextensions.k8s.io/v1
apiregistration.k8s.io/v1
apps/v1
authentication.k8s.io/v1
authorization.k8s.io/v1
autoscaling/v1
autoscaling/v2
batch/v1
certificates.k8s.io/v1
...omitted for brevity...
View Kubernetes configuration:
kubectl config view
					apiVersion: v1
clusters:
- cluster:
    certificate-authority-data: DATA+OMITTED
    server: https://192.168.1.169:6443
  name: kubernetes
contexts:
- context:
    cluster: kubernetes
    user: kubernetes-admin
  name: kubernetes-admin@kubernetes
current-context: kubernetes-admin@kubernetes
kind: Config
preferences: {}
users:
- name: kubernetes-admin
  user:
    client-certificate-data: DATA+OMITTED
    client-key-data: DATA+OMITTED
These methods provide comprehensive ways to ensure that the Kubernetes cluster is operational and configured correctly after running the playbook.
Congratulations! You’ve successfully completed the automated deployment of a Kubernetes cluster using Ansible. If you’ve reached this point, you might be interested in exploring further. This exercise is designed to spark your interest by introducing Kubernetes from a beginner’s perspective. To make this cluster truly “production-ready,” additional customizations are necessary, and we’ve only just scratched the surface with the information covered here. Be sure to check out the provided resources for troubleshooting and more in-depth tutorials.
Did you find this article useful? Your feedback is invaluable to us! Please feel free to share your thoughts in the comments section below.
Here are some helpful links to help you along your automation journey!
| Kubernetes Documentation | The official page for Kubernetes |
| Ansible Documentation | The official page for Ansible |
| Flannel Documentation | The GitHub resource page for Flannel |
Idempotent |
In the context of Ansible, “idempotent” refers to the ability of tasks to be run multiple times without changing the result beyond the initial application. An idempotent operation ensures that no matter how many times it is executed, the system’s state will remain the same after the first application.
In other words, if you apply an idempotent Ansible playbook or task to a system that is already in the desired state, the playbook or task will not make any changes or perform any actions. This is crucial for configuration management and automation, as it ensures that repeated runs of a playbook will not lead to unintended side effects or changes.
Here’s why idempotence is important in Ansible:
|
Why should I use Ansible for Kubernetes deployment? |
Ansible simplifies the deployment and management process, ensuring consistency and reducing the chances of human error.
Can I use this setup for production environments? |
Yes, with proper customization and security measures, this setup can be used for production environments.
What if I encounter issues during deployment? |
Refer to the official Kubernetes and Ansible documentation for troubleshooting. Additionally, community forums and resources can provide valuable support.
Related Posts
Learn how to install a Kubernetes cluster on RHEL 9 | CentOS 9. Explore step-by-step instructions, best practices, and considerations for smooth deployment and operation.
Are you looking to set up a Kubernetes development environment with Vagrant quickly and efficiently? Look no further! In this guide, we’ll walk through how
This blog post covers setting up a Kubernetes cluster on Ubuntu 23.10. Follow our step-by-step guide to set up a robust and scalable Kubernetes environment