
Commands
In this tutorial, we’ll guide you through the step-by-step installation of RHEL9 on KVM. The process is uncomplicated, and we’ll present it in a format

A detailed, step‑by‑step guide to setting up GPU passthrough on KVM for Linux hosts. Learn how to enable IOMMU, bind your GPU to VFIO, configure hosts and guests, avoid common issues, and unlock near‑native GPU performance in your virtual machine.
If you want to squeeze out every bit of performance in a virtual machine—whether for gaming, 3D rendering, video editing, machine learning, or other GPU‑intensive work—GPU passthrough on KVM/VFIO is one of your best bets. This guide gives you a step‑by‑step, practical walkthrough (with commands, tables, and tips) to get GPU passthrough working correctly. I’ve designed it so you can follow it reliably, avoid common pitfalls, and achieve near‑native GPU performance in your guest VM.
GPU passthrough is a technique by which you dedicate a physical GPU (and its associated devices, like audio over HDMI/DisplayPort) to a virtual machine so that the guest OS can drive it directly. The result: the guest gets almost native performance since the virtualization overhead is minimized.
Benefits include:
|
|
|
Key drawbacks / requirements:
|
|
|
Here are the minimum and recommended hardware/software requirements:
| Component | Minimum Requirement | Recommended / Best Practice |
|---|---|---|
| CPU | Supports Intel VT‑d (for Intel) or AMD‑V/AMD‑Vi / IOMMU | Latest generation with good IOMMU grouping, hardware interrupt remapping |
| Motherboard / BIOS/UEFI | BIOS that can enable VT‑d / IOMMU, secure boot (optional) | UEFI firmware, good PCIe passthrough support, ACS (Access Control Services) if required |
| GPU(s) | One discrete GPU for host, another to passthrough to guest, or using iGPU for host | Two discrete GPUs (one modest for host), or iGPU + discrete GPU combo; vendor drivers that work under VFIO |
| Memory | Enough RAM to be shared between host + VM comfortably | Plenty of RAM (e.g. 32 GB+), with support for hugepages |
| Linux Host | Recent kernel (5.x or newer), support for VFIO, libvirt / QEMU, OVMF / UEFI for guest if needed | Stable distro, up‑to‑date kernel, virt‑manager / virsh, good AMD/NVIDIA driver support (if needed) |
🔄 Step 1: Enable Virtualization & IOMMU in BIOS/UEFI |
|
|
|
|
🔄 Step 2: Configure Kernel Boot Parameters |
You need to pass the correct parameters so the host kernel enables IOMMU and VFIO early. Start with editing the /etc/default/grub file:
sudo vim /etc/default/grub
Find the line starting with GRUB_CMDLINE_LINUX_DEFAULT (or analogous). Append these parameters:
|
					intel_iommu=on iommu=pt
vfio-pci.ids=XXXX:YYYY,AAAA:BBBB
|
					amd_iommu=on iommu=pt
vfio-pci.ids=XXXX:YYYY,AAAA:BBBB
Replace XXXX:YYYY etc. with the vendor:device IDs of your GPU + GPU audio device (you’ll get those in the next step). iommu=pt (pass‑through mode) helps reduce overhead. Then update GRUB and reboot:
sudo update-grub # Debian/Ubuntu
sudo grub2-mkconfig -o /boot/grub2/grub.cfg # for RHEL/CentOS/AlmaLinux/Fedora
sudo reboot
🔄 Step 3: Identify the GPU & IOMMU Groups |
You need to find out which PCI devices correspond to the GPU, its associated audio device, and which IOMMU group they are in.
					# List PCI devices with numeric IDs
lspci -nn
					# For grouping:
for g in /sys/kernel/iommu_groups/*/devices/*; do
    grp=${g#*/iommu_groups/*}; grp=${grp%%/*}
    echo "IOMMU Group $grp:"
    lspci -nns ${g##*/} | sed 's/^/\t/'
done
You’ll see output listing IOMMU groups. Example:
					IOMMU Group 3:
    01:00.0 VGA compatible controller [0300]: NVIDIA Corporation RTX 3080 [10de:2206]
    01:00.1 Audio device [0403]: NVIDIA Corporation Device [10de:1aef]
💡Make note of all devices in the same group—you’ll need to passthrough all of them (audio + GPU) for correct behavior. If other unrelated devices are in the same group, you may need to use ACS patch or accept those extra devices being passed through. |
🔄 Step 4: Prevent Host from Loading GPU Drivers / Bind the GPU to VFIO |
You need to prevent the host from using the GPU. That means blocking or disabling default drivers (e.g. nouveau, nvidia, amdgpu) and binding the device to vfio-pci.
✅ Example: Create vfio config |
Create a file /etc/modprobe.d/vfio.conf:
sudo vim /etc/modprobe.d/vfio.conf
Add lines like:
options vfio-pci ids=10de:2206,10de:1aef
✋NOTE: Replace with your GPU vendor:device IDs, including its audio function. |
Also disable conflicting drivers (e.g. for NVIDIA):
sudo vim /etc/modprobe.d/disable‑nvidia.conf
Add the following lines:

Photo by admingeek from Infotechys
✅ Update initramfs, reboot |
sudo update-initramfs -u # Debian / Ubuntu
sudo dracut -f --kver $(uname -r) # Fedora / RHEL / AlmaLinux
sudo reboot
🔄 Step 5: Verify Binding |
After reboot, check that the GPU is using vfio-pci:
lspci -nnk -d <GPU_VENDOR>:<GPU_DEVICE>
Example output should show something like:
					01:00.0 VGA compatible controller [0300]: NVIDIA Corporation RTX 3080 [10de:2206]
    Subsystem: ...
    Kernel driver in use: vfio-pci
    Kernel modules: nvidia, nouveau, vfio_pci
Also check dmesg for IOMMU:
dmesg | grep -e DMAR -e IOMMU
Ensure that there are lines indicating IOMMU is active.
🔄 Step 6: Create / Configure VM with GPU Passthrough |
Now it’s time to set up or modify your VM so that it uses this GPU.
🔹Using |
|
|
|
|
|
|
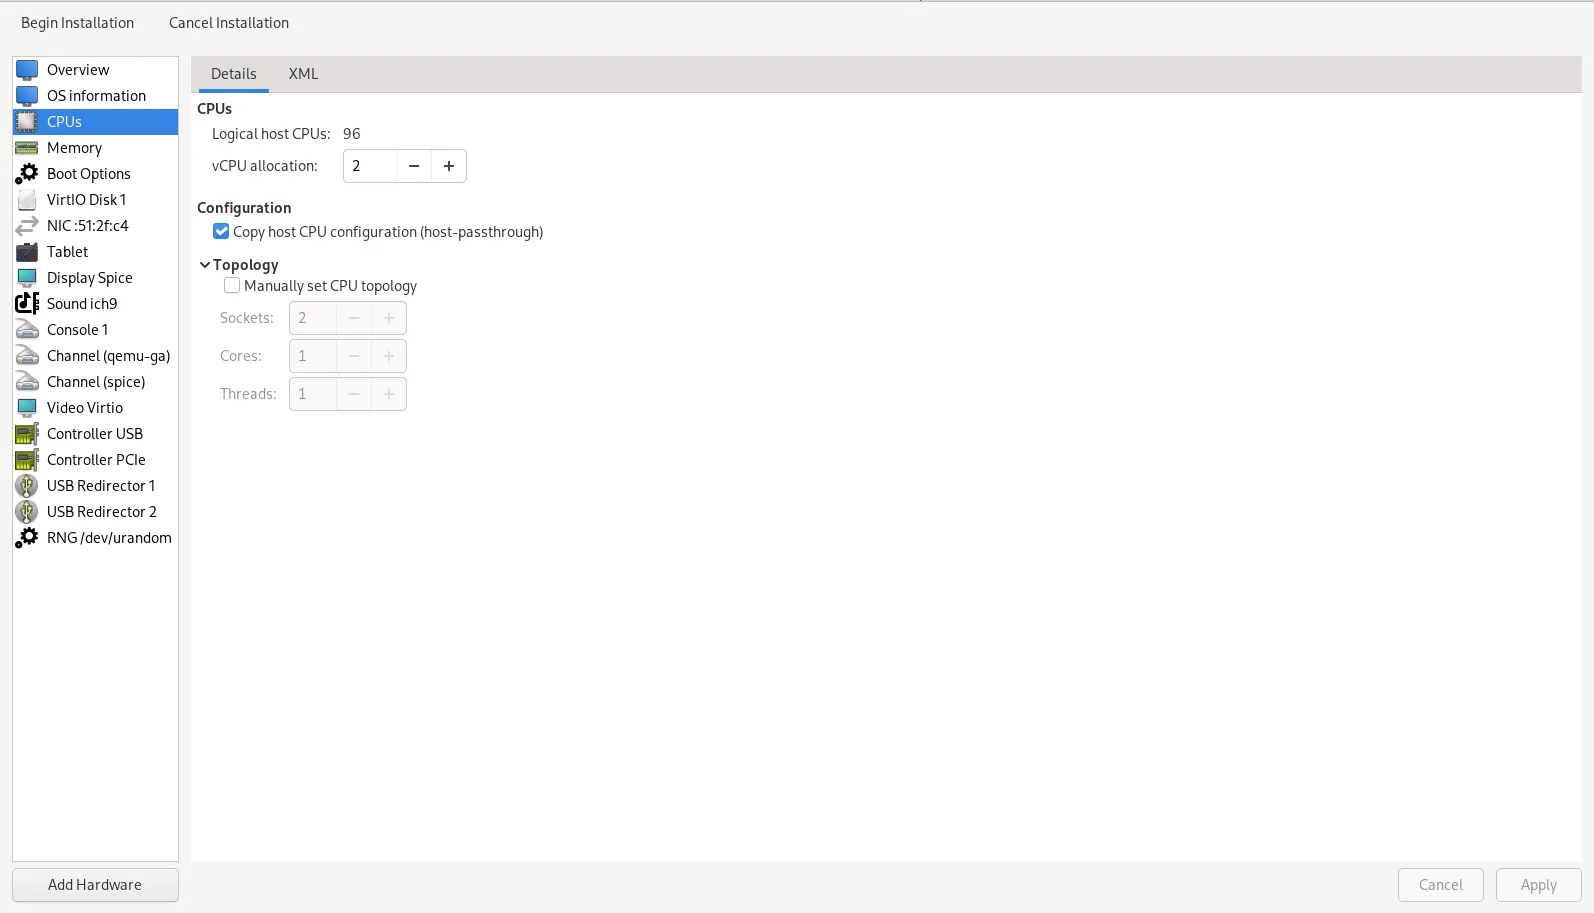
Photo by admingeek from Infotechys
🔹Using XML ( |
You may want to edit the VM’s XML to include something like:
					<cpu mode='host-passthrough' check='partial'/>
<features>
    <kvm>
        <hidden state='on'/>
    </kvm>
    <hyperv>
        <relaxed state='on'/>
        <vapic state='on'/>
        <spinlocks state='on' retries='8191'/>
        <vendor_id state='on' value='YOUR‑VENDOR′ID'/>
    </hyperv>
</features>

<devices>
  <hostdev mode='subsystem' type='pci' managed='yes'>
    <source>
       <address domain='0x0000' bus='0x01' slot='0x00' function='0x0'/>
    </source>
    <rom file='/usr/share/qemu/gpu‑dump.rom'/>
  </hostdev>
  <hostdev mode='subsystem' type='pci' managed='yes'>
    <source>
       <address domain='0x0000' bus='0x01' slot='0x00' function='0x1'/>
    </source>
  </hostdev>
</devices>
The ROM file line is optional but helps with some NVIDIA cards or where you see instability / driver issues.
🔄 Step 7: Guest OS Installation & Drivers |
|
|
|
| Area | What to Tune | Example / Reason |
|---|---|---|
| Memory Backing | Use hugepages or hugeTLB so that guest memory is backed more efficiently | Add <memoryBacking><hugepages/></memoryBacking> to VM XML; reserve hugepages on host temporarily for the VM. |
| Disk I/O | Use virtio‑scsi or virtio‑blk with cache=none and multiple queues | In XML or via virt‑manager, pick virtio‑scsi, set appropriate io threads and queue count. |
| CPU Pinning | Pin vCPUs to specific physical cores for consistency and less resource contention | Use virsh vcpupin or define in XML. |
| GPU ROM / Vendor ID tweaks | For NVIDIA or other cards, using dumped ROM or setting custom vendor_id avoids driver detection issues | The ROM file line in hostdev section; patching/passing vendor_id in hyperv features. |
| Symptom | Possible Cause | Solution |
|---|---|---|
| Black screen / guest won’t boot with GPU passed | GPU still bound to host or BIOS/UEFI settings wrong | Check lspci -nnk, check driver binding; ensure BIOS settings correct |
| Guest shows low resolution or no display output | Firmware mismatch (BIOS vs UEFI), wrong GPU ROM, missing audio device | Use OVMF, correct ROM, include all hostdev functions (audio + graphics) |
| Windows Code 43 / driver blocking | Virtualization detection, CPU model not host‑passthrough | Add hyperv features, disable hypervisor bit, set CPU model to host‑passthrough |
| IOMMU group includes unwanted devices | Shared group, motherboard limitation | If possible, enable ACS or use motherboard with better isolation; else pass all devices or accept the grouping |
GPU passthrough with KVM is a powerful way to give a virtual machine almost native graphics performance. The steps are technical, and there are many places where things can go wrong, but if you follow through in a structured way—confirming hardware support, identifying devices properly, binding drivers, setting up the VM with the right CPU and firmware options—you’ll arrive at a stable, high‑performance guest.
Did you find this article helpful? Your feedback is invaluable to us! Feel free to share this post with those who may benefit, and let us know your thoughts in the comments section below.
In this tutorial, we’ll guide you through the step-by-step installation of RHEL9 on KVM. The process is uncomplicated, and we’ll present it in a format

Learn how to install and configure DeepSeek locally on RHEL 9 or CentOS 9 with step-by-step instructions, CLI examples, and tips for an optimal setup. Enhance

Ever pondered the distinctions between GPT1 and GPT4? This article delves into the evolution of Generative Pre-trained Transformers, from its initial iteration to the cutting-edge