Commands
In this tutorial, we will review the Kubernetes cluster install on CentOS8. This procedure will mirror our previous article about this subject. Install a Kubernetes

In this guide, we’ll walk you through the process of deploying WordPress on Minikube, enabling you to develop and test your WordPress sites with ease.
In the ever-evolving landscape of web development, containerization has become a game-changer. Kubernetes, the de facto standard for container orchestration, provides a robust platform for deploying and managing containerized applications. However, setting up Kubernetes clusters for development and testing purposes can be complex and resource-intensive. Enter Minikube – a tool that allows you to run Kubernetes clusters locally.
Minikube is a lightweight Kubernetes implementation that runs a single-node Kubernetes cluster on your local machine. It’s perfect for development, testing, and learning Kubernetes concepts without the need for a full-fledged cluster.
Before we dive into deploying WordPress on Minikube, ensure you have the following (listed below):
A minikube instance ready to deploy–preferably with 12GiB of RAM and 4 CPUs to ensure a smoother operating experience.
Your minikube instance should have
xorg-x11-xauthpackage installed for forwarding X11 and a browser of your choice (e.g. Firefox, google, etc..)
We’ve configured our minikube instance with the following settings:
| Hostname | mkube-srv2.localdomain |
| IP address | 192.168.1.156 |
| RAM | 12 |
| Cores | 4 |
| Docker Version | Docker version 25.0.1, build 29cf629 |
| Kubectl Version | Client Version: v1.29.1 Kustomize Version: v5.0.4-0.20230601165947-6ce0bf390ce3 Server Version: v1.28.3 |
| Working Directory | /home/admin/wordpress-deployment |
| Minikube Version | v1-32.0 |
Now, let’s delve into the process of deploying WordPress on your Minikube instance.
First, start Minikube by running the following command in your terminal:
$ minikube start
This command will spin up a local Kubernetes cluster using the Minikube VM. Run the following command (below) to check the running status of the various kubernetes components running on your Minikube instance:
$ kubectl get pods --all-namespaces
					NAMESPACE     NAME                               READY   STATUS    RESTARTS       AGE
kube-system   coredns-5dd5756b68-gbnw5           1/1     Running   0              3h5m
kube-system   etcd-minikube                      1/1     Running   0              3h5m
kube-system   kube-apiserver-minikube            1/1     Running   0              3h6m
kube-system   kube-controller-manager-minikube   1/1     Running   0              3h5m
kube-system   kube-proxy-s9vzj                   1/1     Running   0              3h5m
kube-system   kube-scheduler-minikube            1/1     Running   0              3h6m
kube-system   storage-provisioner                1/1     Running   0              3h5m
$ mkdir -p wordpress-deployment; cd wordpress-deployment
					[admin@mkube-srv2 wordpress-deployment]$ cat <<EOF >./kustomization.yaml
secretGenerator:
- name: mysql-pass
  literals:
  - password=YOUR_PASSWORD
EOF
WordPress relies on a MySQL database to store its data. Let’s deploy MySQL to our Minikube cluster using the following YAML manifest:
					apiVersion: v1
kind: Service
metadata:
  name: wordpress-mysql
  labels:
    app: wordpress
spec:
  ports:
    - port: 3306
  selector:
    app: wordpress
    tier: mysql
  clusterIP: None
---
apiVersion: v1
kind: PersistentVolumeClaim
metadata:
  name: mysql-pv-claim
  labels:
    app: wordpress
spec:
  accessModes:
    - ReadWriteOnce
  resources:
    requests:
      storage: 5Gi
---
apiVersion: apps/v1
kind: Deployment
metadata:
  name: wordpress-mysql
  labels:
    app: wordpress
spec:
  selector:
    matchLabels:
      app: wordpress
      tier: mysql
  strategy:
    type: Recreate
  template:
    metadata:
      labels:
        app: wordpress
        tier: mysql
    spec:
      containers:
      - image: mysql:8.0
        name: mysql
        env:
        - name: MYSQL_ROOT_PASSWORD
          valueFrom:
            secretKeyRef:
              name: mysql-pass
              key: password
        - name: MYSQL_DATABASE
          value: wordpress
        - name: MYSQL_USER
          value: wordpress
        - name: MYSQL_PASSWORD
          valueFrom:
            secretKeyRef:
              name: mysql-pass
              key: password
        ports:
        - containerPort: 3306
          name: mysql
        volumeMounts:
        - name: mysql-persistent-storage
          mountPath: /var/lib/mysql
      volumes:
      - name: mysql-persistent-storage
        persistentVolumeClaim:
          claimName: mysql-pv-claim
Save the above YAML manifest to a file named mysql.yaml, we’ll apply it in the later sections.
Now, let’s deploy WordPress to our Minikube cluster. Save the following YAML manifest to a file named wordpress.yaml:
					apiVersion: v1
kind: Service
metadata:
  name: wordpress
  labels:
    app: wordpress
spec:
  ports:
    - port: 80
  selector:
    app: wordpress
    tier: frontend
  type: LoadBalancer
---
apiVersion: v1
kind: PersistentVolumeClaim
metadata:
  name: wp-pv-claim
  labels:
    app: wordpress
spec:
  accessModes:
    - ReadWriteOnce
  resources:
    requests:
      storage: 5Gi
---
apiVersion: apps/v1
kind: Deployment
metadata:
  name: wordpress
  labels:
    app: wordpress
spec:
  selector:
    matchLabels:
      app: wordpress
      tier: frontend
  strategy:
    type: Recreate
  template:
    metadata:
      labels:
        app: wordpress
        tier: frontend
    spec:
      containers:
      - image: wordpress:6.2.1-apache
        name: wordpress
        env:
        - name: WORDPRESS_DB_HOST
          value: wordpress-mysql
        - name: WORDPRESS_DB_PASSWORD
          valueFrom:
            secretKeyRef:
              name: mysql-pass
              key: password
        - name: WORDPRESS_DB_USER
          value: wordpress
        ports:
        - containerPort: 80
          name: wordpress
        volumeMounts:
        - name: wordpress-persistent-storage
          mountPath: /var/www/html
      volumes:
      - name: wordpress-persistent-storage
        persistentVolumeClaim:
          claimName: wp-pv-claim
Once you’ve finished both the MySQL and WordPress YAML manifests, it’s time to update our kustomization file with the relevant information. Execute the following command to incorporate entries into the file:
					[admin@mkube-srv2 wordpress-deployment]$ cat <<EOF >>./kustomization.yaml
resources:
  - mysql.yaml
  - wordpress.yaml
EOF
Finally, apply the contents of the kustomization.yaml file with the following command:
$ kubectl apply -k ./
Executing this command will apply the secrets, persistent storage volumes, MySQL, and WordPress deployments as displayed in the output below.
					secret/mysql-pass-df44tkf8t9 created
service/wordpress created
service/wordpress-mysql created
persistentvolumeclaim/mysql-pv-claim created
persistentvolumeclaim/wp-pv-claim created
deployment.apps/wordpress created
deployment.apps/wordpress-mysql created
Check and verify the status of all running deployments using the following command:
$ kubectl get pods; kubectl get pvc; kubectl get secret; kubectl get deployments
					NAME                               READY   STATUS    RESTARTS   AGE
wordpress-cd74ffcf-b4wmb           1/1     Running   0          16m
wordpress-mysql-86f59dbdd7-l6qgz   1/1     Running   0          16m

NAME             STATUS   VOLUME                                     CAPACITY   ACCESS MODES   STORAGECLASS   AGE
mysql-pv-claim   Bound    pvc-850f1849-363d-4e54-bc2b-7413051edcb1   5Gi        RWO            standard       16m
wp-pv-claim      Bound    pvc-77ab030d-c54b-4332-a18d-6226482719a8   5Gi        RWO            standard       16m

NAME                    TYPE     DATA   AGE
mysql-pass-df44tkf8t9   Opaque   1      16m

NAME              READY   UP-TO-DATE   AVAILABLE   AGE
wordpress         1/1     1            1           16m
wordpress-mysql   1/1     1            1           16m
Once all deployments are up and running, you can access WordPress by running:
$ minikube service wordpress
					|-----------|-----------|-------------|---------------------------|
| NAMESPACE |   NAME    | TARGET PORT |            URL            |
|-----------|-----------|-------------|---------------------------|
| default   | wordpress |          80 | http://192.168.49.2:31251 |
|-----------|-----------|-------------|---------------------------|
🎉  Opening service default/wordpress in default browser...
👉  http://192.168.49.2:31251
This command will open WordPress in your default web browser, allowing you to complete the installation process.
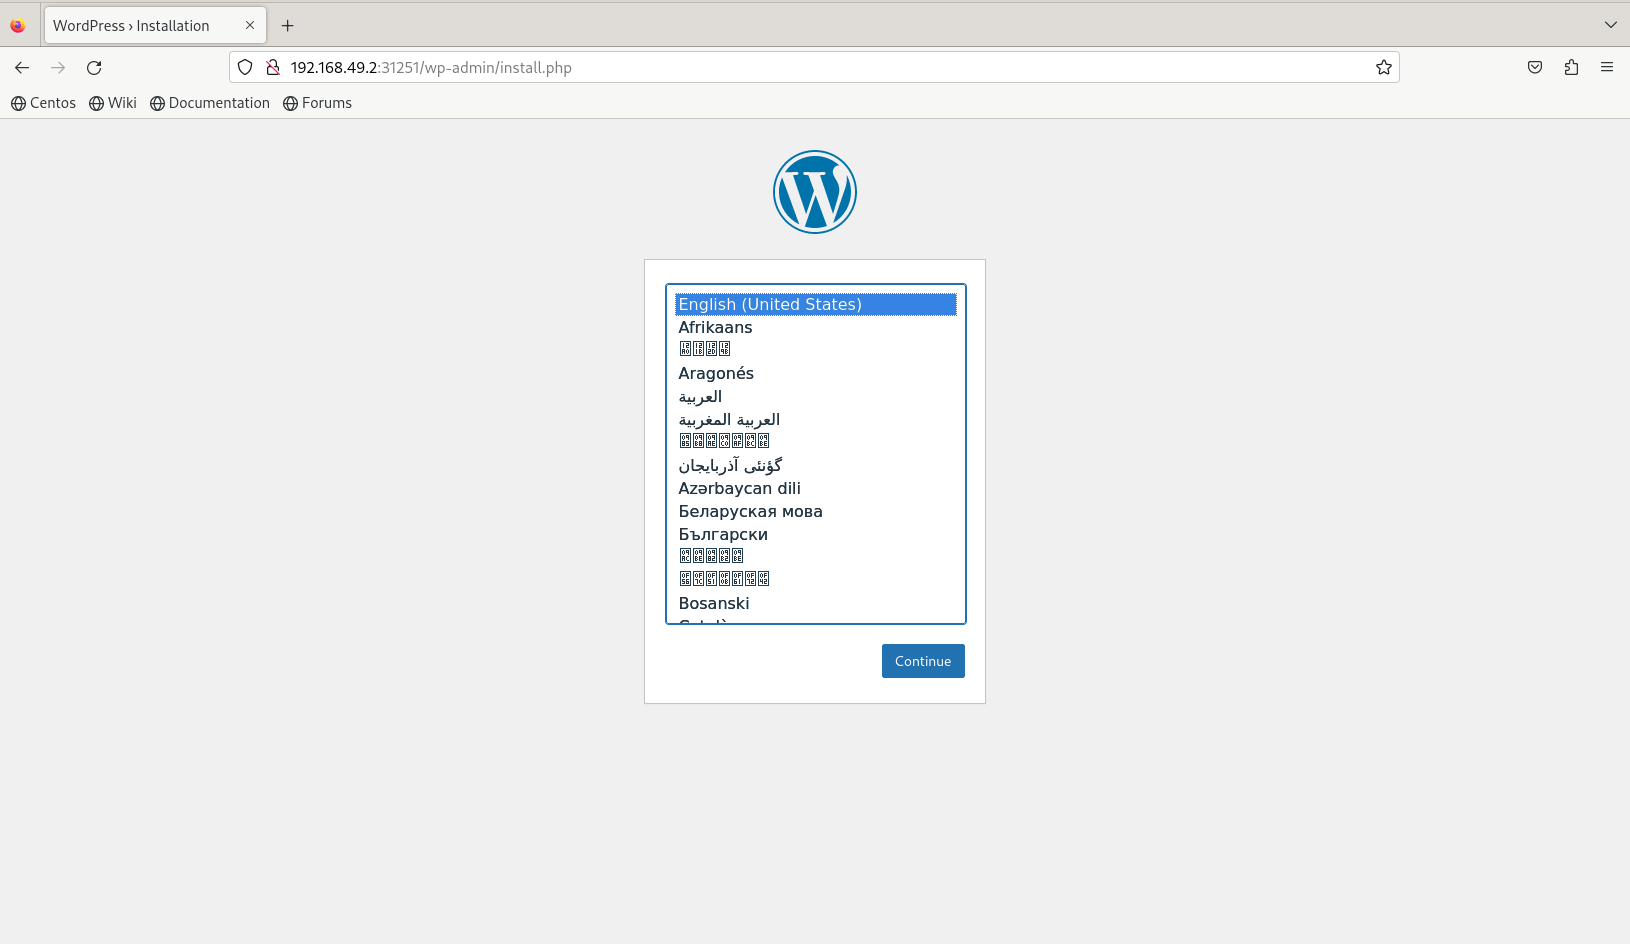
Photo by admingeek from Infotechys
Perfect! Our wordpress site is working as expected. In case you need to wipe the slate clean and start over with something else, run the following command to delete all deployments in your kustomization.yaml file:
$ kubectl delete -k ./
Congratulations! You’ve successfully deployed WordPress on Minikube. With this setup, you can now develop and test your WordPress sites locally using Kubernetes. Minikube provides an excellent environment for experimenting with containerized applications without the complexity of managing a full Kubernetes cluster.
Did you find this article useful? Your feedback is invaluable to us! Please feel free to share your thoughts in the comments section below.
Related Posts
In this tutorial, we will review the Kubernetes cluster install on CentOS8. This procedure will mirror our previous article about this subject. Install a Kubernetes
In this article, we will review how to install minikube-v1.32.0 on RHEL9. This is the most recent stable release as of the date of this
Are you looking to set up a Kubernetes development environment with Vagrant quickly and efficiently? Look no further! In this guide, we’ll walk through how