Commands
In this tutorial, you will learn the process involved with building a docker registry. As part of this process, we will set up a web


Learn how to deploy PostgreSQL database on Podman with this step-by-step guide. From installation to database setup, find out everything you need to know to run PostgreSQL containers efficiently.
In the world of modern application development and containerization, Podman has gained significant traction as a container management tool. It’s known for being a lightweight, daemon-less alternative to Docker, providing developers with an efficient platform for running containers.
If you’re looking to deploy a PostgreSQL database on Podman, you’ve come to the right place! This blog will guide you through the entire process, from setting up Podman on your system to configuring PostgreSQL as a containerized service.
Let’s dive into the details of how you can deploy and manage PostgreSQL databases using Podman, with a focus on ensuring smooth performance, scalability, and security.
Podman is an open-source container engine that allows you to build, manage, and run containers on Linux, Windows, and macOS. One of the main benefits of Podman is that it doesn’t require a central daemon like Docker. Each Podman container is independent, and you can use Podman without needing root privileges, making it a secure and flexible option for container management.
Unlike Docker, which requires a background daemon (the Docker Engine), Podman is designed with a rootless architecture that offers better security. Podman works seamlessly with the same command line interface (CLI) as Docker, making it easier for users familiar with Docker to switch over.
Before we dive into the actual deployment steps, let’s quickly examine why you might choose Podman for deploying PostgreSQL:
|
|
|
|
|
Step 1: Installing Podman |
Before you can deploy PostgreSQL on Podman, you need to install Podman on your system. Here’s how to do it on popular Linux distributions:
For Ubuntu/Debian: |
sudo apt update && sudo apt install -y podman
For CentOS/RHEL: |
sudo yum install -y podman # Older RHEL versions
sudo dnf install -y podman # RHEL/RPM-based flavors 8+ versions or higher
For Fedora: |
sudo dnf install -y podman
For macOS: |
Install Podman using Homebrew:
brew install podman
For Windows: |
Windows users can install Podman via the Windows Subsystem for Linux (WSL) or by using the Podman Desktop application. Once you’ve installed Podman, verify the installation by running:
podman --version
This should display the version of Podman installed on your system.
Step 2: Pull the PostgreSQL Container Image |
Now that Podman is installed, let’s pull the official PostgreSQL image from the container registry. PostgreSQL’s official Docker image is compatible with Podman, so you can use the following command to pull the image:
podman pull postgres
Select Docker unless you have a Red Hat Account:
					? Please select an image:
    registry.access.redhat.com/postgres:latest
    registry.redhat.io/postgres:latest
  ▸ docker.io/library/postgres:latest
This command will pull the latest official PostgreSQL container image, which is the most stable and secure version available.
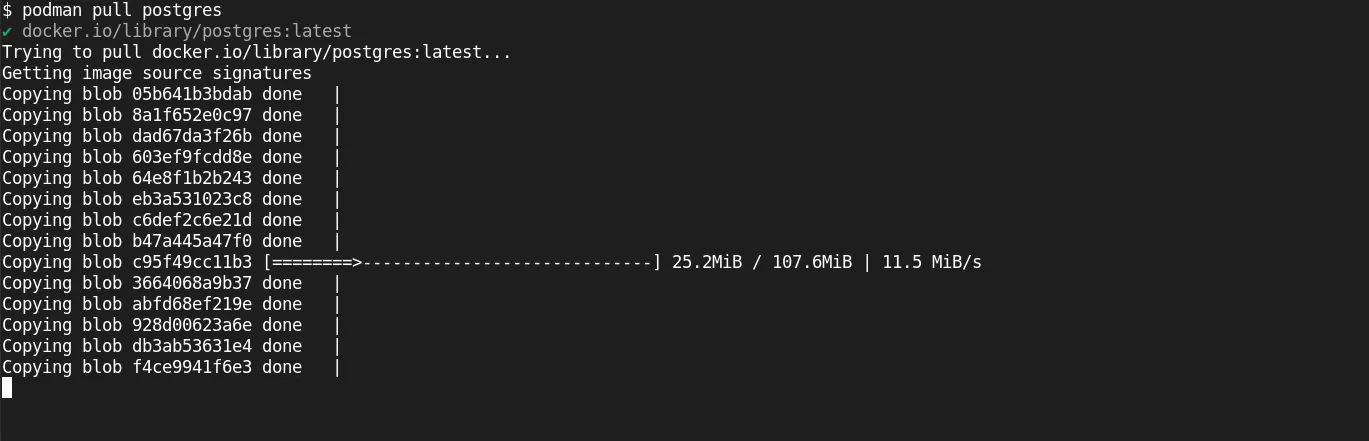
Photo by admingeek from Infotechys
Understanding the PostgreSQL Image |
The PostgreSQL container image comes pre-configured with the PostgreSQL database engine and some basic configurations. This image is customizable through environment variables to set the database name, user, and password, among other settings.
To configure PostgreSQL in your Podman container, you need to set up a few essential environment variables. These include:
|
|
|
Here’s an example command to start a PostgreSQL container with basic configuration:
					podman run -d \
  --name postgres-db \
  -e POSTGRES_DB=mydb \
  -e POSTGRES_USER=myuser \
  -e POSTGRES_PASSWORD=mypassword \
  -p 5432:5432 \
  postgres
Breakdown of the Command: |
|
|
|
|
|
|
After running the command, Podman will start the PostgreSQL container, and you can access it on your local machine at localhost:5432.
Now that your PostgreSQL container is running, you can connect to it from your local machine or any other client. You can use psql, PostgreSQL’s command-line interface, or any GUI tool like pgAdmin.
Example: Using |
If you have PostgreSQL installed locally, you can connect to the container like so:
psql -h localhost -U myuser -d mydb
You’ll be prompted to enter the password for myuser. Once logged in, you can execute SQL queries just like you would on any PostgreSQL instance.
One of the most crucial aspects of running databases in containers is data persistence. By default, data in a container is ephemeral, meaning it will be lost once the container is removed. To ensure that your PostgreSQL data persists, you need to mount a host directory or a volume to store the database files.
Here’s an updated command to start the PostgreSQL container with persistent storage:
					podman run -d \
  --name postgres-db \
  -e POSTGRES_DB=mydb \
  -e POSTGRES_USER=myuser \
  -e POSTGRES_PASSWORD=mypassword \
  -p 5432:5432 \
  -v /path/to/local/storage:/var/lib/postgresql/data \
  postgres
|
By doing this, you ensure that even if the container is removed, your database data remains intact on your host system.
If you need to scale PostgreSQL to handle more traffic or perform more complex operations, you can deploy multiple PostgreSQL instances or run additional services like load balancers or replication.
Podman supports multi-container setups through Pods, which allow you to group related containers together. You can create a Pod with PostgreSQL and an additional service like a replication container or a load balancer.
podman pod create --name pg-pod -p 5432:5432
podman run -d --pod pg-pod -e POSTGRES_DB=mydb -e POSTGRES_USER=myuser -e POSTGRES_PASSWORD=mypassword postgres
This command creates a Pod called pg-pod and runs the PostgreSQL container within it. You can add more containers to the Pod as needed.
To ensure that your PostgreSQL database is running smoothly, you can use Podman’s logging and monitoring features.
Viewing Container Logs: |
You can view the logs of a running container with the following command:
podman logs postgres-db
This will show you the output logs from the PostgreSQL container, which can be helpful for debugging or monitoring the database.
Viewing Container Stats: |
To view the resource usage statistics of your containers, run:
podman stats postgres-db
This provides real-time stats on memory, CPU usage, and network IO.
Deploying PostgreSQL on Podman is a great way to leverage the benefits of containerization while maintaining control over your database environment. Podman’s lightweight, daemon-less architecture, combined with the power of PostgreSQL, gives you a robust solution for managing your data.
With this guide, you now have a clear understanding of how to:
|
|
|
|
By following these steps, you can ensure that your PostgreSQL database runs securely and efficiently in a containerized environment, making it easier to manage and scale as your application grows.
In this tutorial, you will learn the process involved with building a docker registry. As part of this process, we will set up a web
Protecting your valuable data is crucial in the digital age, and one of the most important steps you can take is securing your PostgreSQL database
Learn how to install Podman on Ubuntu 24.04 Server with this comprehensive guide. Discover key features, essential commands, and troubleshooting tips to effectively manage your