Configure NTP on RHEL9 using Chrony

Configure NTP on RHEL9

In this article, we will review how to configure NTP on RHEL9 using chrony. We will focus on the server-side setup and finish with the client-side setup.

Table of Contents

Introduction

Before we begin, this article assumes that you already have running instances of RHEL9 or CentOS9 available. If not, you may reference the following articles for RHEL7 or CentOS8 installation procedures. Those installation procedures are similar in nature with a few minor differences and can be utilized for installing RHEL9 or CentOS9.

For this exercise, we will provision two virtual machines (VMs):

VM #1: node1.infotechys.example.com (server instance)

VM #2: node2.infotechys.example.com (client instance)

Configure NTP on RHEL9: Post Image

Image by Pixabay from Pexels

Starting with the Red Hat Enterprise Linux (RHEL) 7 release, chronyd became the default time service option and replaced ntpd. However, ntpd is still available for those environments that still require it. Chrony is just as easy to install and configure as ntp and some may even argue it’s easier. Some of its benefits include:

  • Better Response times: Responds better to rapid clock changes which virtual machines can benefit from as they typically have unstable timekeeping and struggle to keep the clock frequency stable.
  • Faster synchronization: Happens in minutes instead of hours which is especially beneficial to desktops and compute devices not running 24 hours a day. Chronyd synchronizes the system clock faster and with better accuracy than ntp.

Configure NTP on RHEL9: Server Setup

Firstly, check if the chrony package is installed on your machine. If not, install it. Also, ensure the chronyd service is not running. We will make some configuration changes before we start the service.

				
					# dnf install chrony
# systemctl status chronyd.service
○ chronyd.service - NTP client/server
Loaded: loaded (/usr/lib/systemd/system/chronyd.service)
Active: inactive (dead) since Sat 2022-08-06 22:00:00 EDT; 4s ago
Docs: man:chronyd(8)
man:chrony.conf(5)
Process: 757 ExecStart=/usr/sbin/chronyd $OPTIONS (code=exited, status=0/SUCCESS)
Main PID: 764 (code=exited, status=0/SUCCESS)
CPU: 121ms


Modifying the chrony configuration file

Using your favorite text editor, open the /etc/chrony.conf file and make the following changes.

				
					# vim /etc/chrony.conf


Comment out the existing server entry. By default, it will be set to the public servers from the pool.ntp.org project.

				
					# Use public servers from the pool.ntp.org project.
# Please consider joining the pool (https://www.pool.ntp.org/join.html).
# pool 2.rhel.pool.ntp.org iburst


Uncomment the allow <IP> section to allow client instances on your local network to connect to your time server. NOTE: If client instances reside on a different subnet or IP address range, you’ll need to specify it here (below). For this example, our client instances all reside on the 192.168.4.0/24 subnet.

				
					# Allow NTP client access from local network.
allow 192.168.4.0/24


Uncomment the local stratum entry. This allows your server to act as a time source. For the stratum setting, change its value to 3. The stratum hierachy ranges from 1 to 15 with 1 being the best or most reliable time source. Therefore, we are setting our time server to 3 because it’s a local setup for testing and learning purposes.

				
					# Serve time even if not synchronized to a time source.
local stratum 3


Starting and enabling the time server

After completing the configuration changes, save and exit the /etc/chrony.conf file and enable the chronyd service with the --now option so that it starts up and autostarts upon reboot.

				
					# systemctl enable --now chronyd.service
# systemctl status chronyd.service
● chronyd.service - NTP client/server
Loaded: loaded (/usr/lib/systemd/system/chronyd.service; enabled; vendor preset: enabled)
Active: active (running) since Sat 2022-08-06 23:09:38 EDT; 13s ago
Docs: man:chronyd(8)
man:chrony.conf(5)
Process: 1360 ExecStart=/usr/sbin/chronyd $OPTIONS (code=exited, status=0/SUCCESS)
Main PID: 1362 (chronyd)
Tasks: 1 (limit: 9122)
Memory: 716.0K
CPU: 36ms
CGroup: /system.slice/chronyd.service
└─1362 /usr/sbin/chronyd -F 2


Configuring the firewall for chronyd

Using the firewall-cmd command, allow network access for the ntp and ptp services.

				
					# firewall-cmd --permanent --add-service=ntp --add-service=ptp
success
# firewall-cmd --reload
success
# firewall-cmd --list-all
public (active)
target: default
icmp-block-inversion: no
interfaces: enp1s0
sources:
services: cockpit dhcpv6-client ntp ptp ssh
ports:
protocols:
forward: yes
masquerade: no
forward-ports:
source-ports:
icmp-blocks:
rich rules:


Configure NTP on RHEL9: Client Setup

The client-side setup also involves modifying the /etc/chrony.conf. Simply change the server entry to the fully-qualified domain name (FQDN) or IP address of your time server (node1.infotechys.example.com).

				
					# vim /etc/chrony.conf


Also, add the iburst option so that chronyd make an update of the first clock sooner.

				
					# Use public servers from the pool.ntp.org project.
# Please consider joining the pool (https://www.pool.ntp.org/join.html).
server node1.infotechys.example.com iburst


Then, restart the chronyd service.

				
					# systemctl restart chronyd.service


NOTE: Check to see if the chronyd service is enabled to autostart on reboot. If not, enable it with the following command: systemctl enable chronyd.service

Verifying chronyd status

To verify the client instance (node2) is syncing to node1 (time server instance), run the chronyc sources command with the -v option for verbose output.

Configure NTP on RHEL9: Verify time service

Photo by admingeek from Infotechys.com

Conclusion

We have successfully reviewed how to configure a time server and client using chrony on a RHEL9 machine. Was this article helpful to you? If so, leave us a comment and share!

Related Posts

Install CentOS8 on KVM
Commands
Install CentOS8 on KVM

In today’s tutorial, we will install CentOS8 on KVM. The install process is fairly straightforward and we will cover it here step-by-step. We will follow
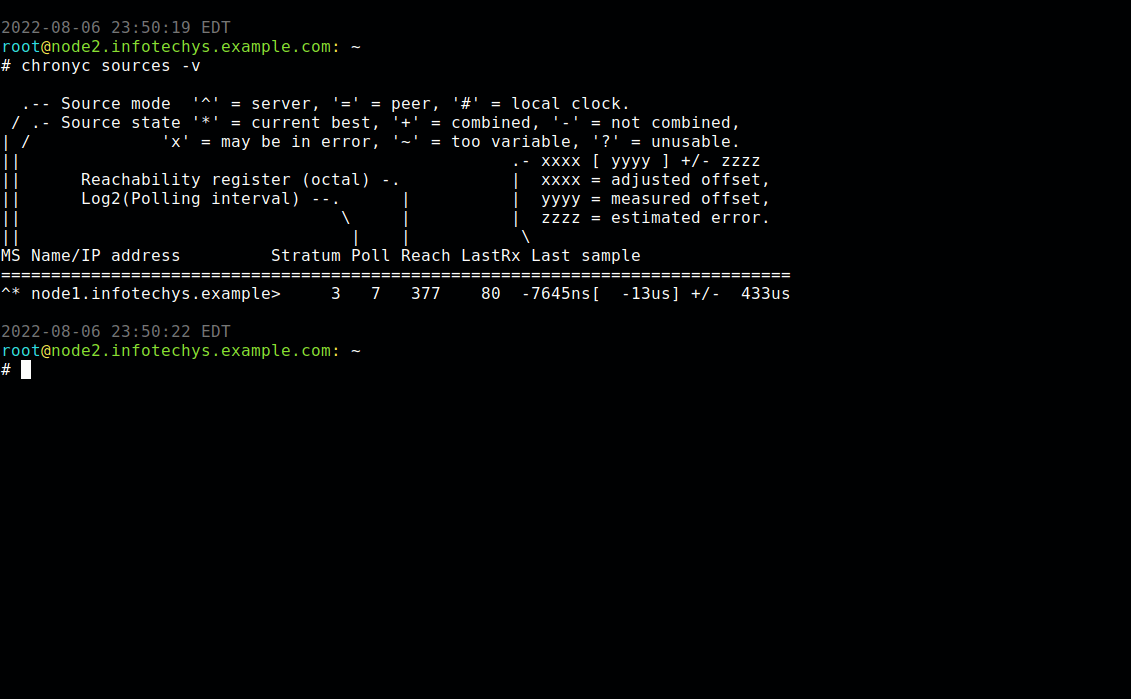
Read More »

Leave a Reply

Your email address will not be published. Required fields are marked *