
Coding
Learn how to use Ansible to automate the maintenance of a security warning banner in Zabbix. Step-by-step instructions, CLI examples, and best practices for ensuring

Learn how to implement full disk encryption on RHEL 9 or CentOS 9 for Zabbix running PostgreSQL database. This step-by-step guide helps secure your monitoring server with encryption.
Data security is crucial, especially when handling sensitive information such as monitoring data and configuration files. For businesses using Zabbix and PostgreSQL on RHEL 9 or CentOS 9, implementing Full Disk Encryption (FDE) also referred to as Database Encryption at rest is an essential step to protect data stored on the server.
In this guide, we’ll walk you through the process of setting up full disk encryption on an existing Zabbix server with a PostgreSQL database on RHEL 9 or CentOS 9. This process will safeguard your monitoring data by ensuring it remains encrypted even if the server is compromised physically.
Why Implement Full Disk Encryption? |
Implementing Full Disk Encryption offers multiple benefits, particularly for systems handling sensitive information like monitoring logs and configuration data. Here are some reasons why FDE is essential:
|
|
|
|
Before starting, ensure that you have the following:
|
Before applying full disk encryption, create a backup of your PostgreSQL database. Here are the commands for backing up PostgreSQL:
Create a directory for storing your database backup |
Become the root user. Then, create a directory for storing your database backup and navigate to it:
sudo -i
mkdir -p /var/lib/pgdb-backup && cd /var/lib/pgdb-backup
Stop the |
Stop the postgresql.service and run a status check to ensure it’s not running.
systemctl stop postgresql.service && systemctl status postgresql.service
					○ postgresql.service - PostgreSQL database server
     Loaded: loaded (/usr/lib/systemd/system/postgresql.service; enabled; preset: disabled)
     Active: inactive (dead) since Wed 2025-03-26 20:59:01 EDT; 5s ago
   Duration: 5d 1h 18min 23.409s
    Process: 848 ExecStartPre=/usr/libexec/postgresql-check-db-dir postgresql (code=exited, status=0/SUCCESS)
    Process: 872 ExecStart=/usr/bin/postmaster -D ${PGDATA} (code=exited, status=0/SUCCESS)
   Main PID: 872 (code=exited, status=0/SUCCESS)
        CPU: 1h 12min 34.018s
Copy the database files to the backup location |
Run the following command to copy the database files to the pgdb-backup directory:
rsync -Pavl /var/lib/pgsql/ .
💡In case you don’t have rsync installed, you can install it with the following command |
Delete the contents of /var/lib/pgsql.
rm -rvf /var/lib/pgsql/*
Ensure that your system has all the necessary packages installed for disk encryption. You will need tools such as cryptsetup:
sudo dnf install cryptsetup -y
You’ll want to partition the disk in a way that makes sense for your use case. If you plan to encrypt the whole disk, you will use parted or fdisk. In this example, we will create a 10GB partition from /dev/vda (which has a total size of 25GB), follow these steps:
Open the disk for editing |
sudo fdisk /dev/vdb
					Welcome to fdisk (util-linux 2.37.4).
Changes will remain in memory only, until you decide to write them.
Be careful before using the write command.

The device contains 'LVM2_member' signature and it will be removed by a write command. See fdisk(8) man page and --wipe option for more details.

Device does not contain a recognized partition table.
Created a new DOS disklabel with disk identifier 0x35b8a766.

Command (m for help):
Inside fdisk, follow these steps:
Press |
					Partition type
   p   primary (0 primary, 0 extended, 4 free)
   e   extended (container for logical partitions)
Select (default p):
Select |
Partition number (1-4, default 1):
Choose a partition number |
For example, select 3 if partitions /dev/vdb1 and /dev/vdb2 already exist. In this case they don’t so, we’ll go with the default and select 1.
First sector (2048-52428799, default 2048):
Set the first sector (press Enter to accept the default). |
Last sector, +/-sectors or +/-size{K,M,G,T,P} (2048-52428799, default 52428799): +10G
Enter |
					Command (m for help): w
The partition table has been altered.
Calling ioctl() to re-read partition table.
Syncing disks.
Press |
Done. The /dev/vdb1 partition is created and ready to be encrypted.
Use cryptsetup to encrypt the partition. Replace /dev/vdb1 with your actual partition name.
sudo cryptsetup luksFormat /dev/vdb1
					WARNING!
========
This will overwrite data on /dev/vdb1 irrevocably.

Are you sure? (Type 'yes' in capital letters): YES
Type ‘YES‘ in all CAPS and the Enter key to continue.
Enter passphrase for /dev/vdb1:
Verify passphrase:
You’ll be prompted to confirm and set a passphrase.
After setting up encryption, you need to open the encrypted partition and map it to a device.
sudo cryptsetup luksOpen /dev/vdb1 pgsql
Enter passphrase for /dev/vdb1:
This creates a device mapper device under /dev/mapper/pgsql.
Format the encrypted device with a file system (e.g., ext4 or xfs):
sudo mkfs.xfs /dev/mapper/pgsql
					meta-data=/dev/mapper/pgsql      isize=512    agcount=4, agsize=654336 blks
         =                       sectsz=512   attr=2, projid32bit=1
         =                       crc=1        finobt=1, sparse=1, rmapbt=0
         =                       reflink=1    bigtime=1 inobtcount=1 nrext64=0
data     =                       bsize=4096   blocks=2617344, imaxpct=25
         =                       sunit=0      swidth=0 blks
naming   =version 2              bsize=4096   ascii-ci=0, ftype=1
log      =internal log           bsize=4096   blocks=16384, version=2
         =                       sectsz=512   sunit=0 blks, lazy-count=1
realtime =none                   extsz=4096   blocks=0, rtextents=0
Now, mount the encrypted partition to a directory. We’re going to mount it to the /var/lib/pgsql directory (we emptied earlier):
sudo mount /dev/mapper/pgsql /var/lib/pgsql
/etc/fstab for Persistent MountingAdd the entry to /etc/fstab so the encrypted disk is automatically mounted on boot. Open /etc/fstab with your preferred editor.
sudo vim /etc/fstab
Add the following line (then, save and exit the file):
/dev/mapper/pgsql /var/lib/pgsql xfs defaults 0 1
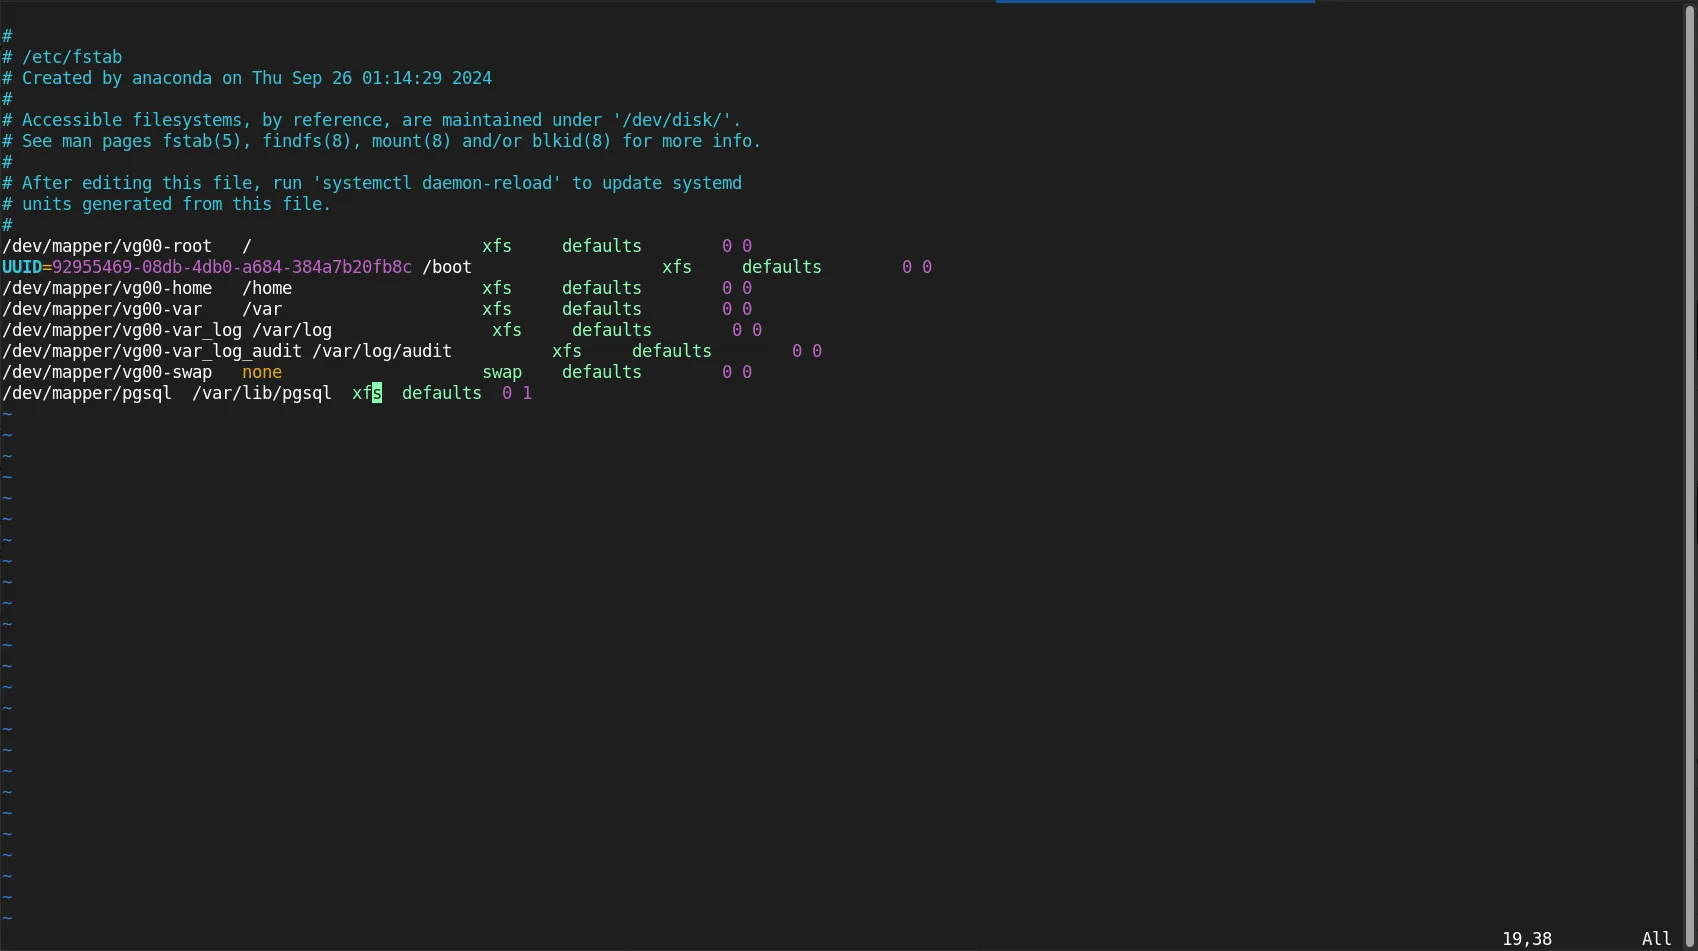
Photo by admingeek from Infotechys
/etc/crypttab FileTo ensure that the encrypted volume is opened at boot time, you will need to configure /etc/crypttab. This file tells the system how to open encrypted volumes.
sudo vim /etc/crypttab
Add the following line (then, save and exit the file):
pgsql /dev/vdb1 none luks
During the earlier backup process, we modified the SELinux context of the /var/lib/pgsql directory. To restore the correct context, run the following command:
sudo restorecon -Rv /var/lib/pgsql
Restart the PostgreSQL service and verify it’s running:
sudo systemctl restart postgresql.service && sudo systemctl status postgresql.service
					● postgresql.service - PostgreSQL database server
     Loaded: loaded (/usr/lib/systemd/system/postgresql.service; enabled; preset: disabled)
     Active: active (running) since Mon 2025-04-07 21:25:51 EDT; 1s ago
    Process: 454029 ExecStartPre=/usr/libexec/postgresql-check-db-dir postgresql (code=exited, status=0/SUCCESS)
   Main PID: 454034 (postmaster)
      Tasks: 11 (limit: 23149)
     Memory: 45.1M
        CPU: 164ms
     CGroup: /system.slice/postgresql.service
             ├─454034 /usr/bin/postmaster -D /var/lib/pgsql/data
             ├─454042 "postgres: logger "
             ├─454044 "postgres: checkpointer "
             ├─454045 "postgres: background writer "
             ├─454046 "postgres: walwriter "
             ├─454047 "postgres: autovacuum launcher "
             ├─454048 "postgres: stats collector "
             ├─454049 "postgres: logical replication launcher "
             ├─454055 "postgres: zabbix zabbix ::1(58058) idle"
             ├─454057 "postgres: zabbix zabbix ::1(58072) idle"
             └─454060 "postgres: zabbix zabbix ::1(58074) idle"

Apr 07 21:25:51 zbx-node1.dev.naijalabs.net systemd[1]: Starting PostgreSQL database server...
Apr 07 21:25:51 zbx-node1.dev.naijalabs.net postmaster[454034]: 2025-04-07 21:25:51.323 EDT [454034] LOG:  redirecting log output to logging collector process
Apr 07 21:25:51 zbx-node1.dev.naijalabs.net postmaster[454034]: 2025-04-07 21:25:51.323 EDT [454034] HINT:  Future log output will appear in directory "log".
Apr 07 21:25:51 zbx-node1.dev.naijalabs.net systemd[1]: Started PostgreSQL database server.
Finally, reboot your machine. You will be prompted during the reboot process to enter a passphrase for the /var/lib/pgsql partition before the login prompt.
sudo systemctl reboot
Setting up Automatic Decryption |
In certain scenarios, you may need to configure automatic decryption to avoid being prompted for a passphrase during system reboot. This can be achieved by securely storing the passphrase in a protected file and configuring GRUB to use it, enabling seamless, unattended boot without manual input. Follow these (3) additional steps to enable automatic decryption:
Open a hidden keyfile that will contain your passphrase:
sudo vim /etc/.cryptpass
Method #1: Enter your passphrase. Then, save and quit the file.
3h\4<0r8\swEf;XU
Method #2: You can also generate a keyfile using the dd command:
sudo dd if=/dev/urandom of=/etc/.cryptpass bs=64 count=1
Apply the appropriate permissions so read access is restricted to the root user:
sudo chmod 400 /etc/.cryptpass
Now, add the keyfile as an unlocking method:
sudo cryptsetup luksAddKey /dev/vdb1 /etc/.cryptpass
This adds the keyfile as an additional authentication method. You’ll be prompted for the passphrase you set earlier.
crypttab for Auto-UnlockingNext, modify the /etc/crypttab to automatically decrypt the encrypted /var/lib/pgsql (database) partition upon reboot:
sudo vim /etc/crypttab
Comment any existing entry and replace with the following:
pgsql /dev/vdb1 /etc/.cryptpass luks
Finally, reboot your machine. We’re done!
Implementing full disk encryption (FDE) for database partitions is a critical step in safeguarding sensitive data at rest. By encrypting the disk using LUKS and integrating a secure keyfile mechanism for automated decryption at boot, we strike a balance between robust security and operational efficiency. The use of /etc/.cryptpass—secured with strict file permissions—and proper configuration via crypttab ensures seamless integration into the system’s startup sequence without compromising protection.
This approach not only meets compliance requirements but also enhances the overall resilience of the database environment against unauthorized access. With encryption in place and auto-decryption properly configured and tested, the system is now well-prepared to support secure and reliable database operations in both development and production environments.
Learn how to use Ansible to automate the maintenance of a security warning banner in Zabbix. Step-by-step instructions, CLI examples, and best practices for ensuring

Automating Zabbix Installations Using Ansible simplifies the deployment and configuration of Zabbix, an open-source monitoring solution. This comprehensive guide provides step-by-step instructions, essential YAML configurations,

Learn how to automate adding hosts to Zabbix using Bash script. This comprehensive guide covers script functions, examples, and best practices to streamline your IT