
Commands
In this guide, we’ll take you through the step-by-step process of installing Docker on Fedora 38, ensuring you’re equipped to take advantage of its benefits

Learn how to install Docker on Ubuntu 24.04 with this step-by-step guide. Follow the instructions to set up Docker quickly and efficiently, ensuring your applications run consistently across different environments. Perfect for developers, system administrators, and DevOps engineers.
If you’re looking to install Docker on Ubuntu 24.04, you’ve come to the right place. Docker is an essential tool for developers, system administrators, and DevOps engineers. It simplifies the process of managing application containers, enabling you to develop, ship, and run applications consistently across different environments. This guide will walk you through the steps to install Docker on Ubuntu 24.04.
Before diving into the installation process, let’s briefly explore why Docker is so popular:
Consistency: Docker ensures that your application runs the same way, regardless of where it is deployed. Isolation: Each Docker container runs in its isolated environment, which helps prevent conflicts between different applications. Portability: Containers can be easily moved from one server to another. Efficiency: Docker uses fewer resources than traditional virtual machines. |
With these benefits in mind, let’s get started with the installation process.
Before you install Docker, ensure your system meets the following prerequisites:
sudo privilegesInstall Docker on Ubuntu 24.04: Step-by-Step Instructions |
First, update your system’s package index to ensure you have access to the latest updates and security patches.
sudo apt update -y && sudo apt upgrade -y
Next, install the necessary packages to allow apt to use repositories over HTTPS.
sudo apt install apt-transport-https ca-certificates curl software-properties-common -y
To ensure the authenticity of the Docker packages, add Docker’s official GPG key:
curl -fsSL https://download.docker.com/linux/ubuntu/gpg | sudo gpg --dearmor -o /usr/share/keyrings/docker-archive-keyring.gpg
Add the Docker repository to apt sources:
echo "deb [arch=amd64 signed-by=/usr/share/keyrings/docker-archive-keyring.gpg] https://download.docker.com/linux/ubuntu $(lsb_release -cs) stable" | sudo tee /etc/apt/sources.list.d/docker.list > /dev/null
Now, update the package database with the Docker packages from the newly added repository:
sudo apt update
Then, install Docker:
sudo apt install docker-ce docker-ce-cli containerd.io -y
					...omitted for brevity...
Setting up pigz (2.8-1) ...
Setting up docker-ce-rootless-extras (5:26.1.4-1~ubuntu.24.04~noble) ...
Setting up slirp4netns (1.2.1-1build2) ...
Setting up docker-ce (5:26.1.4-1~ubuntu.24.04~noble) ...
Created symlink /etc/systemd/system/multi-user.target.wants/docker.service → /usr/lib/systemd/system/docker.service.
Created symlink /etc/systemd/system/sockets.target.wants/docker.socket → /usr/lib/systemd/system/docker.socket.
Processing triggers for man-db (2.12.0-4build2) ...
Processing triggers for libc-bin (2.39-0ubuntu8.2) ...
After the installation is complete, verify that Docker is installed and running:
sudo systemctl status docker
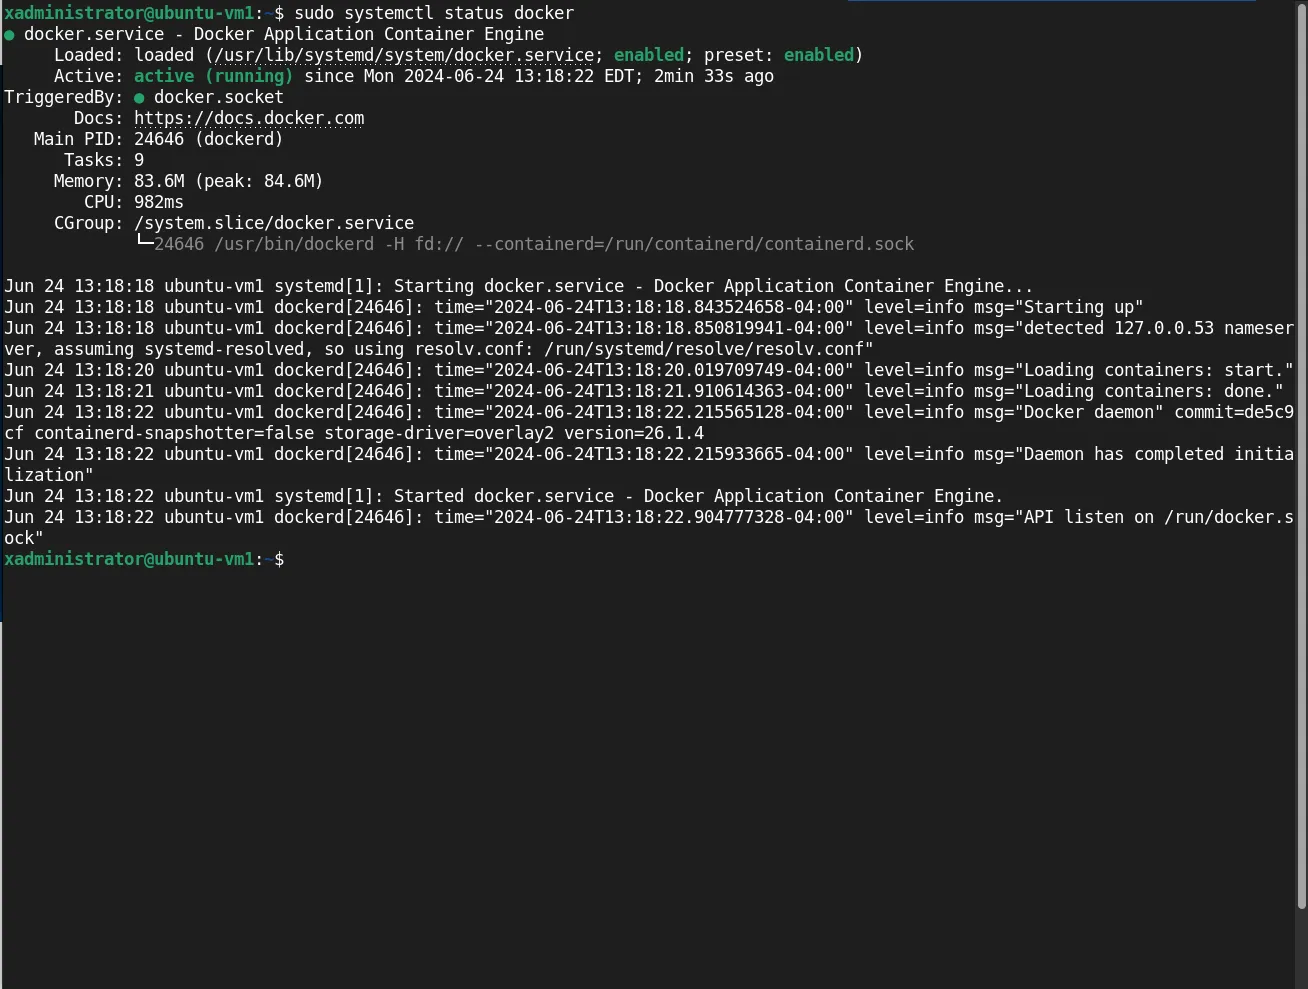
Photo by admingeek from Infotechys
You should see output indicating that Docker is active and running. Additionally, you can check the Docker version:
docker --version
Docker version 26.1.4, build 5650f9b
By default, Docker commands must be run as the root user or with sudo. To avoid typing sudo before every Docker command, add your user to the docker group:
sudo usermod -aG docker $USER
After running this command, log out and log back in to apply the changes. NOTE: When Docker is installed on Ubuntu 24.04, it is set to start automatically upon reboot. However, it is advisable to verify this configuration and restart your machine to ensure everything is working correctly.
sudo systemctl reboot
When your machine is back online, repeat Step #6 to verify docker is operational.
To confirm that Docker is installed correctly, run the hello-world image:
docker run hello-world
					...omitted for brevity...
Hello from Docker!
This message shows that your installation appears to be working correctly.

To generate this message, Docker took the following steps:
 1. The Docker client contacted the Docker daemon.
 2. The Docker daemon pulled the "hello-world" image from the Docker Hub.
    (amd64)
 3. The Docker daemon created a new container from that image which runs the
    executable that produces the output you are currently reading.
 4. The Docker daemon streamed that output to the Docker client, which sent it
    to your terminal.

To try something more ambitious, you can run an Ubuntu container with:
 $ docker run -it ubuntu bash

Share images, automate workflows, and more with a free Docker ID:
 https://hub.docker.com/

For more examples and ideas, visit:
 https://docs.docker.com/get-started/
If everything is set up correctly, you should see a message indicating that Docker is working.
If you encounter any issues during the installation, consider the following troubleshooting tips:
1. Check Service Status: Ensure the Docker service is active using sudo systemctl status docker. |
sudo systemctl status docker
| 2. Reinstall Docker: If problems persist, you can remove Docker: |
sudo apt remove docker-ce docker-ce-cli containerd.io
| Along with any associated docker directories: |
sudo rm -rvf /var/lib/docker && sudo rm -rvf /var/lib/containerd
| Then, reinstall docker: |
sudo apt install docker-ce docker-ce-cli containerd.io
3. Review Logs: Check Docker logs for any errors using sudo journalctl -u docker. |
sudo journalctl -u docker
					Jun 24 14:27:36 ubuntu-vm1 systemd[1]: Stopped docker.service - Docker Application Container Engine.
Jun 24 14:27:36 ubuntu-vm1 systemd[1]: docker.service: Consumed 1.309s CPU time, 109.1M memory peak, 0B memory swap peak.
Jun 24 14:27:36 ubuntu-vm1 systemd[1]: Starting docker.service - Docker Application Container Engine...
Jun 24 14:27:36 ubuntu-vm1 dockerd[2686]: time="2024-06-24T14:27:36.187522167-04:00" level=info msg="Starting up"
Jun 24 14:27:36 ubuntu-vm1 dockerd[2686]: time="2024-06-24T14:27:36.189339853-04:00" level=info msg="detected 127.0.0.53 nameserver, assuming syste>
Jun 24 14:27:36 ubuntu-vm1 dockerd[2686]: time="2024-06-24T14:27:36.864013079-04:00" level=info msg="[graphdriver] using prior storage driver: over>
Jun 24 14:27:36 ubuntu-vm1 dockerd[2686]: time="2024-06-24T14:27:36.866641629-04:00" level=info msg="Loading containers: start."
...omitted for brevity...
Installing Docker on Ubuntu 24.04 is a straightforward process. By following these steps, you can quickly get Docker up and running, allowing you to harness the power of containerization for your development and deployment needs.
Here’s a quick summary of the commands:
| Step | Command |
|---|---|
| Update System | sudo apt update && sudo apt upgrade -y |
| Install Dependencies | sudo apt install apt-transport-https ca-certificates curl software-properties-common -y |
| Add GPG Key | curl -fsSL https://download.docker.com/linux/ubuntu/gpg | sudo gpg --dearmor -o /usr/share/keyrings/docker-archive-keyring.gpg |
| Add Repository | echo "deb [arch=amd64 signed-by=/usr/share/keyrings/docker-archive-keyring.gpg] https://download.docker.com/linux/ubuntu $(lsb_release -cs) stable" | sudo tee /etc/apt/sources.list.d/docker.list > /dev/null |
| Install Docker | sudo apt update && sudo apt install docker-ce docker-ce-cli containerd.io -y |
| Verify Installation | sudo systemctl status docker && docker --version |
| Manage as Non-root User | sudo usermod -aG docker $USER |
| Test Installation | docker run hello-world |
With Docker installed, you are now ready to create, deploy, and manage containerized applications. Enjoy the flexibility and efficiency Docker brings to your workflow!
In this comprehensive guide, we’ve walked you through the steps to install Docker on Ubuntu 24.04. Docker is a powerful tool that revolutionizes the way applications are developed, deployed, and managed by providing consistency, isolation, portability, and efficiency. By following the steps outlined, you can set up Docker on your Ubuntu system with ease, allowing you to take full advantage of containerization.
From updating your system and installing dependencies to adding Docker’s GPG key and repository, and finally installing and verifying Docker, this guide covers all the necessary steps to get you up and running. Additionally, managing Docker as a non-root user enhances security and convenience.
With Docker installed, you can start creating, deploying, and managing your applications in a streamlined, efficient manner. Whether you’re developing a small app or managing a large-scale deployment, Docker provides the tools you need to succeed. Happy containerizing!
Did you find this article useful? Your feedback is invaluable to us! Please feel free to share your thoughts in the comments section below.
Related Posts
In this guide, we’ll take you through the step-by-step process of installing Docker on Fedora 38, ensuring you’re equipped to take advantage of its benefits

Troubleshooting made easy: Learn fixes and solutions for common Docker errors in this comprehensive guide. Enhance your container management skills and ensure seamless deployments. Table

In this tutorial, you will learn the process involved with building a docker registry. As part of this process, we will set up a web