
Commands
In this article, we will review installing and using Git on Linux machines. Besides minor differences in syntax, the install commands and procedures are similar

Configuring autofs in Linux is a straightforward task. This article will guide you through the process of setting up and enabling the autofs service.
As part of this process, we will discuss the difference between static and dynamic mount points and use a previous article “Create and Export an NFS server in Linux” as a reference and for demonstrative purposes.

Image by Christina Morillo from Pexels
This tutorial assumes you have a RHEL7 or CentOS7 machine running with root or sudo privileges to become root. Also, it helps to already have an NFS server and client setup with perhaps one or two exported shares.
Check if the nfs-utils package is installed on both the NFS server and client instances: rpm -qa | grep nfs-utils . If nfs-utils is not installed, run the following command to install it: yum -y install nfs-utils
Check if the nfs.service is started and enabled to autostart on reboot (only on the server instance, not required for the client instance): sudo systemctl status nfs.service to check if NFS service is running. If not, run the following to start it: sudo systemctl start nfs.service. The following command will ensure the NFS service is enabled to autostart on reboot: sudo systemctl enable nfs.service
sudo firewall-cmd --list-all if not, run the following commands (below) to allow the right firewall ports for NFS.
					$ sudo firewall-cmd --permanent --add-service=rpc-bind
$ sudo firewall-cmd --permanent --add-service=mountd
$ sudo firewall-cmd --permanent --add-service=nfs
$ sudo firewall-cmd --permanent --add-port=2049/tcp
$ sudo firewall-cmd --permanent --add-port=2049/udp
$ sudo firewall-cmd --reload
Simply put, static NFS shares (as the term suggests) are always available. Typically, entries are made in the /etc/fstab file to ensure the NFS share is mounted automatically after rebooting a machine. However, this is not considered best practice if bandwidth conservation and optimum performance are your organizational goals.
This is why dynamic NFS mounts are the industry standard. It allows NFS shares to be mounted automatically on an as-needed basis. The mount point or NFS share expires after a set period of time of not being accessed. This not only conserves bandwidth, it also improves overall performance when compared to static NFS mounts.
We are now ready to proceed with the autofs configuration. We will begin with the server-side and end with the client-side instance.
SSH into your server instance. VM1 is our server instance for this demonstration. Then, less or cat the contents of the /etc/exports file (shown in the image below). This is where we expect to find the NFS shares currently being exported to our client instance.

Photo by admingeek from Infotechys
We will use the SSM utility to create our new nfs share. The new logical volume called lv_nfs_auto_share will be 10GB in size. Run the following command (below):
					[admin@vm1 ~]$ sudo ssm create -s 10GB -n lv_nfs_auto_share --fstype xfs -p vg00 /dev/vda2 /nfs_auto_share
[sudo] password for admin:
Logical volume "lv_nfs_auto_share" created.
 Logical volume "lv_nfs_auto_share" created.
meta-data=/dev/vg00/lv_nfs_auto_share isize=512 agcount=4, agsize=655360 blks
= sectsz=512 attr=2, projid32bit=1
= crc=1 finobt=0, sparse=0
data = bsize=4096 blocks=2621440, imaxpct=25
= sunit=0 swidth=0 blks
naming =version 2 bsize=4096 ascii-ci=0 ftype=1
log =internal log bsize=4096 blocks=2560, version=2
= sectsz=512 sunit=0 blks, lazy-count=1
realtime =none extsz=4096 blocks=0, rtextents=0
Directory '/nfs_auto_share' does not exist! Create (Y/n/q) ? Y
df command and verify that our new share has been mounted. Next, we will ensure the /nfs_auto_share mount point persists on our server instance.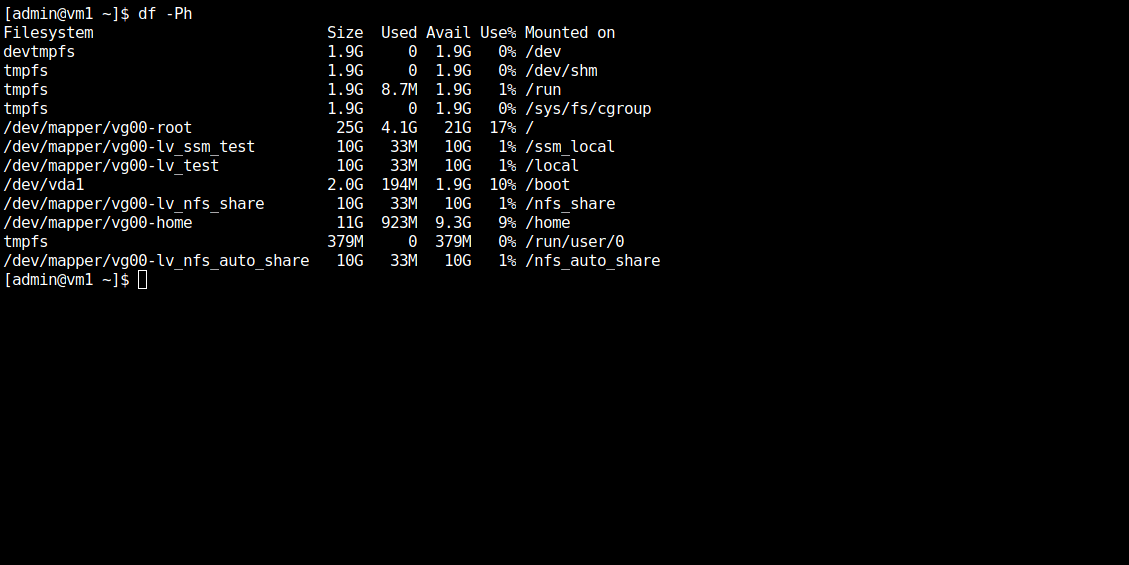
Photo by admingeek from Infotechys
Using your preferred text editor, open the /etc/fstab file and add the following entry (circled in the image below) to the file. Then, save and exit the file.
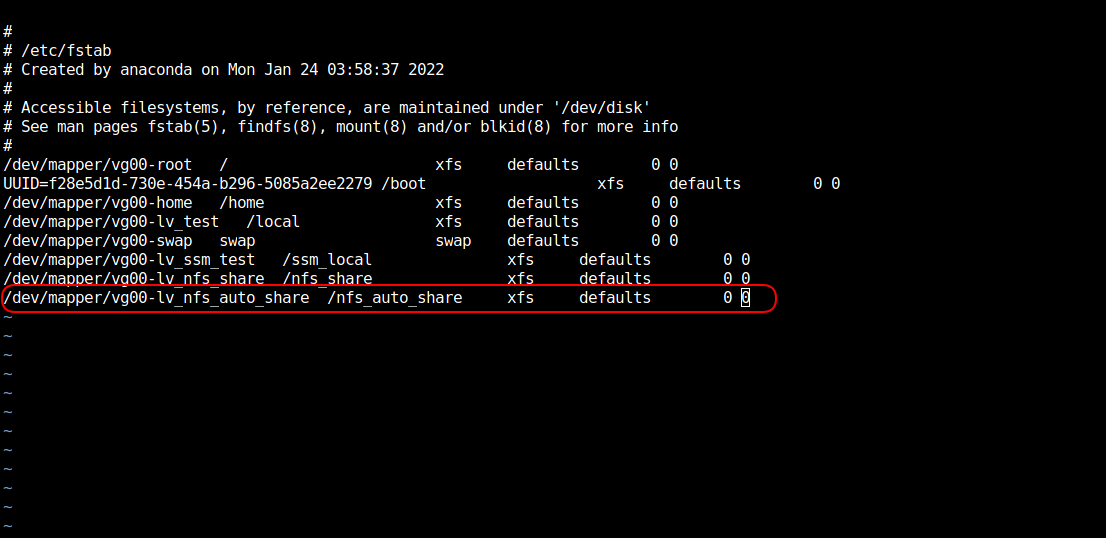
Photo by admingeek from Infotechys
					[admin@vm1 ~]$ cat /etc/exports
/nfs_auto_share 192.168.1.197(rw,sync)
					[admin@vm1 ~]$ sudo exportfs -va
[sudo] password for admin:
exporting 192.168.1.197:/nfs_auto_share
df command shows our static mount point /nfs_share and does not yet show the /nfs_auto_share mount we’ve just exported. The /nfs_share is static because it has an entry in our /etc/fstab file and remains persistent and visible even though we currently have no use for it.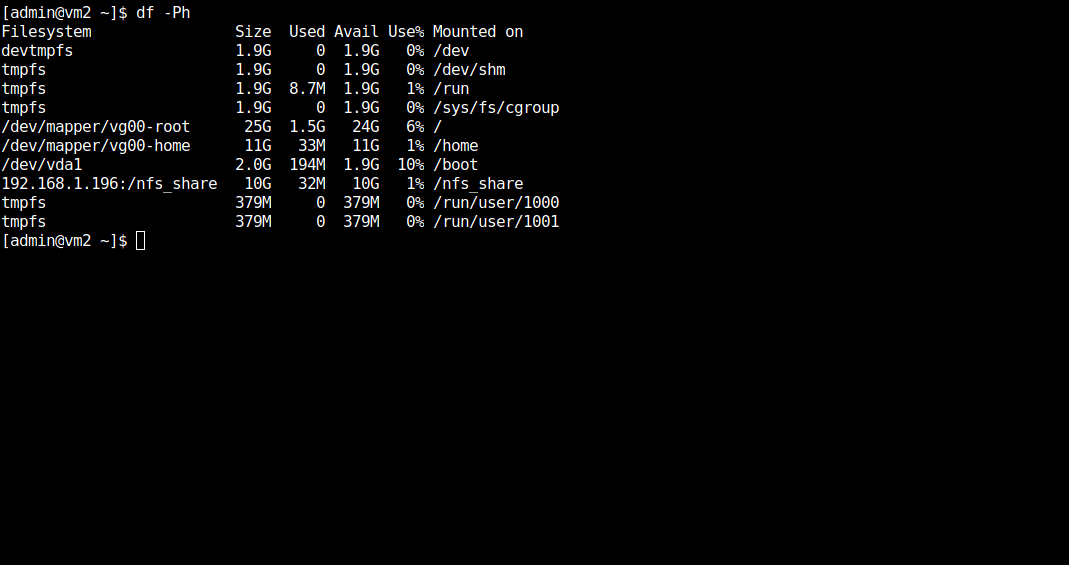
Photo by admingeek from Infotechys
Now let’s configure AutoFS on our client instance to enable the /nfs_auto_share.
Before we begin, let’s ensure the AutoFS service is installed, enabled, and running on our client instance.
sudo yum -y install autofs
					[admin@vm2 ~]$ sudo systemctl status autofs
● autofs.service - Automounts filesystems on demand
Loaded: loaded (/usr/lib/systemd/system/autofs.service; disabled; vendor preset: disabled)
Active: inactive (dead)
; or double ampersand && to run multiple commands at once on the command-line (CLI).
[admin@vm2 ~]$ sudo systemctl start autofs ; sudo systemctl enable autofs
					[admin@vm2 ~]$ sudo systemctl status autofs
● autofs.service - Automounts filesystems on demand
Loaded: loaded (/usr/lib/systemd/system/autofs.service; enabled; vendor preset: disabled)
Active: active (running) since Mon 2022-02-21 13:26:56 EST; 4s ago
Main PID: 2725 (automount)
CGroup: /system.slice/autofs.service
└─2725 /usr/sbin/automount --systemd-service --dont-check-daemon

Feb 21 13:26:56 vm2.dev.infotechys.com systemd[1]: Starting Automounts filesystems on demand...
Feb 21 13:26:56 vm2.dev.infotechys.com systemd[1]: Started Automounts filesystems on demand.
We are going to create two separate files as part of this procedure. One file (nfs_auto_share.autofs) will reside under the /etc/auto.master.d/ sub-directory and the other file (auto.nfs_auto_share) will reside under /etc.
Using your preferred text editor, cd into /etc/auto.master.d and create a file called nfs_auto_share.autofs.
Add the following entry (below) to the file. Then, save and exit the file.
/- /etc/auto.nfs_auto_share
The entry (above) points the AutoFS service to the location of the file (/etc/auto.nfs_auto_share) where the parameters of the /nfs_auto_share filesystem or mount point is defined.
Next, cd into /etc and create a file called auto.nfs_auto_share. Add the following entry (below) to that file.
/nfs_auto_share -rw,intr 192.168.1.196:/nfs_auto_share
The entry (above) defines the new share (nfs_auto_share) we want dynamically mounted on our client machine. We’ve also specified that we want it mounted with read and write (rw) permissions from our NFS server instance (NFS Server IP Address is 192.168.1.196). The interrupt (intr) mount option is a default setting and is used when we do not expect to damage critical data by manually interrupting an NFS request.
Finally, restart the AutoFS service so it can read the newly added configuration files.
					[admin@vm2 etc]$ sudo systemctl restart autofs && sudo systemctl status autofs
● autofs.service - Automounts filesystems on demand
Loaded: loaded (/usr/lib/systemd/system/autofs.service; enabled; vendor preset: disabled)
Active: active (running) since Mon 2022-02-21 14:15:25 EST; 3s ago
Main PID: 2882 (automount)
CGroup: /system.slice/autofs.service
└─2882 /usr/sbin/automount --systemd-service --dont-check-daemon
Feb 21 14:15:25 vm2.dev.infotechys.com systemd[1]: Starting Automounts filesystems on demand...
Feb 21 14:15:25 vm2.dev.infotechys.com systemd[1]: Started Automounts filesystems on demand.
You’ll notice that even after restarting the AutoFS service, the new /nfs_auto_share is still not visible (shown in the image below).
Photo by admingeek from Infotechys
This is to be expected as we are not currently using the share. However, we can verify that it exists by listing it: ls -l /nfs_auto_share . We can also cd into it and create a test file: touch test1.txt. Executing any one of these options will activate the /nfs_auto_share and make it visible using the df command (shown in the image below).
NOTE: If you cannot create a file under /nfs_auto_share, it is because of your ownership/permission settings. SSH into your server instance and change the permission setting using the following command (below). This will allow world read, write, and execute permissions on /nfs_auto_share.
[admin@vm1 ~]$ sudo chmod -R 1777 /nfs_auto_share
/nfs_auto_share directory shows its contents (below).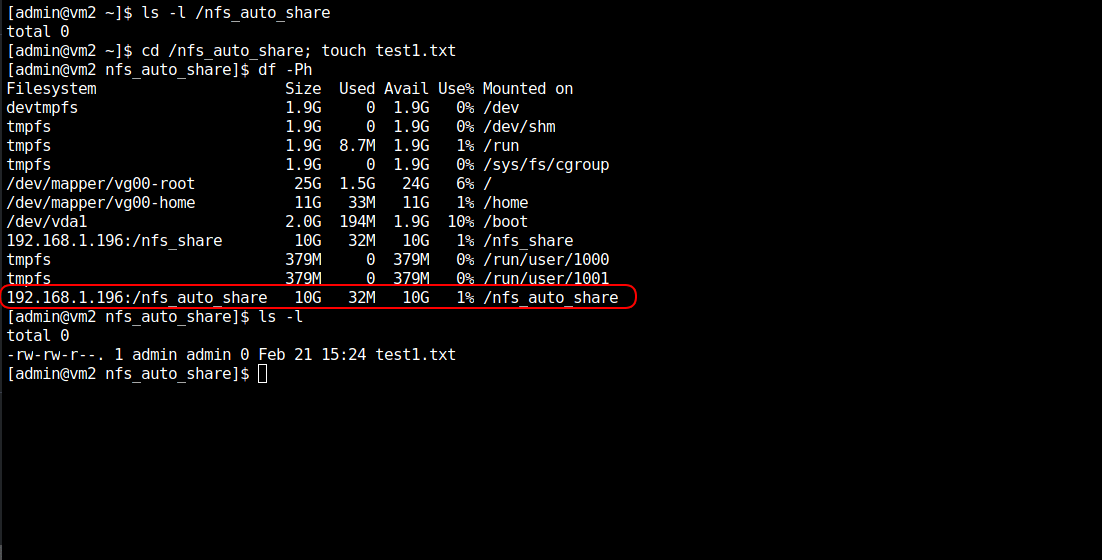
Photo by admingeek from Infotechys
Congratulations! You’ve successfully completed AutoFS configuration on your Linux machine. As part of this tutorial, we reviewed the difference between static and dynamic NFS mounts and configured AutoFS to mount a new share–created and exported from our NFS server instance.
Was this article helpful to you? If so, let us know in the comment section below. We’d love to hear from you!
Related Posts
In this article, we will review installing and using Git on Linux machines. Besides minor differences in syntax, the install commands and procedures are similar
NFS or Network File System is a commonly known method for network file sharing on Linux hosts. We will create and export an NFS server.

Table of Contents 🔈Introduction Redhat recently introduced the System Storage Manager (SSM), a unified user interface that allows uses to manage complicated systems in a