
This guide examines how to setup an HTTPS server using Podman, a containerization tool, thereby fortifying a secure and streamlined hosting environment for your web

Learn how to install HAProxy on RHEL 9 or CentOS 9 with our step-by-step guide. Enhance your web services’ performance and reliability using advanced load balancing techniques. Includes examples, configuration tips, and troubleshooting advice.
HAProxy (High Availability Proxy) is a reliable and versatile solution for load balancing and proxying. It is widely used to improve the performance and reliability of websites by distributing workloads across multiple servers. In this guide, we will walk you through the process of installing and configuring HAProxy on RHEL 9 or CentOS 9. By the end, you will have a fully functional HAProxy setup tailored to your needs.
Before diving into the installation process, ensure that you have the following prerequisites in place:
Lab Settings |
For demonstration purposes, we’ve configured our Linux nodes as follows:
| Hostnames | RAM (GB) | Cores | Operating System (OS) |
| haproxy.dev.naijalabs.net | 4 | 2 | Red Hat Enterprise Linux release 9.4 (Plow) |
| webserver1.dev.naijalabs.net | 4 | 2 | Red Hat Enterprise Linux release 9.4 (Plow) |
| webserver2.dev.naijalabs.net | 4 | 2 | CentOS Stream release 9 |
| webserver3.dev.naijalabs.net | 4 | 2 | CentOS Stream release 9 |
Copy and paste the following entries in the /etc/hosts file on each node (replace IP addresses and hostnames with your actual settings):
					# HAProxy Nodes
192.168.1.18	haproxy.dev.naijalabs.net    haproxy
192.168.1.223	webserver1.dev.naijalabs.net webserver1
192.168.1.225	webserver2.dev.naijalabs.net webserver2
192.168.1.228	webserver3.dev.naijalabs.net webserver3
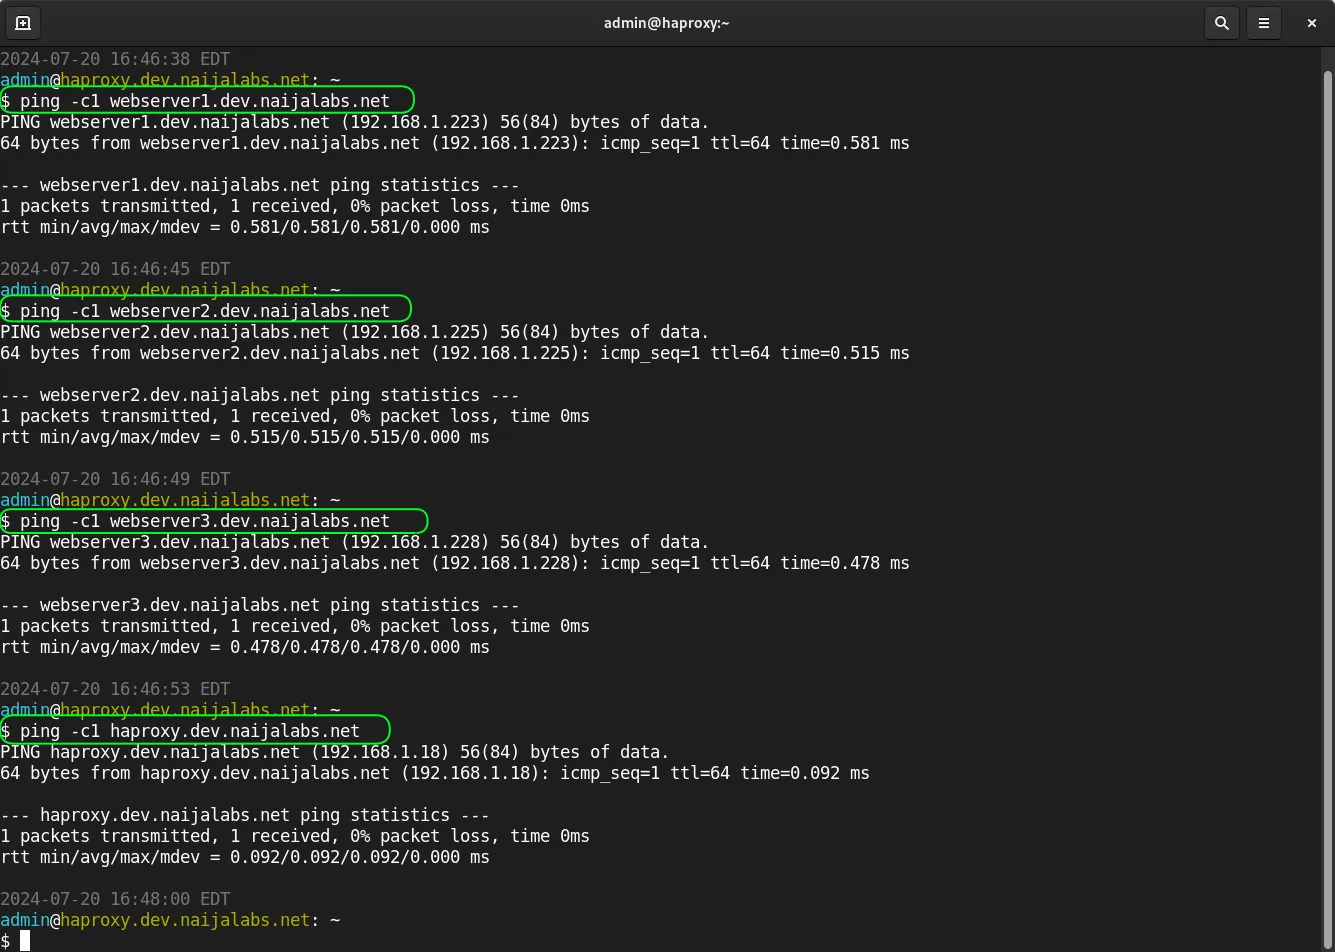
Photo by admingeek from Infotechys
Step 1: Update Your System |
The first step in setting up HAProxy is to ensure your system is up-to-date. This helps in avoiding compatibility issues and ensures you have the latest security patches.
sudo dnf update -y
Updating your system guarantees that all installed packages are current and your system is secure.
Step 2: Install HAProxy |
With your system updated, the next step is to install HAProxy on your load balancer (haproxy node). Fortunately, HAProxy is available in the default repositories of RHEL 9 and CentOS 9.
sudo dnf install haproxy -y
The -y flag automatically confirms the installation process.
Step 3: Configure HAProxy |
Once HAProxy is installed, it’s time to configure it. The primary configuration file for HAProxy is located at /etc/haproxy/haproxy.cfg.
Backup the Default Configuration |
Before making any changes, it’s good practice to create a backup of the default configuration file.
sudo cp /etc/haproxy/haproxy.cfg /etc/haproxy/haproxy.cfg.bak
Basic Configuration |
Open the configuration file with your preferred text editor. Here, we will use vim.
sudo vim /etc/haproxy/haproxy.cfg
Below is an example of a basic HAProxy configuration (given our lab settings):
					#---------------------------------------------------------------------
# Global settings
#---------------------------------------------------------------------
global
    # to have these messages end up in /var/log/haproxy.log you will
    # need to:
    #
    # 1) configure syslog to accept network log events.  This is done
    #    by adding the '-r' option to the SYSLOGD_OPTIONS in
    #    /etc/sysconfig/syslog
    #
    # 2) configure local2 events to go to the /var/log/haproxy.log
    #   file. A line like the following can be added to
    #   /etc/sysconfig/syslog
    #
    #    local2.*                       /var/log/haproxy.log
    #
    log         127.0.0.1 local2

    chroot      /var/lib/haproxy
    pidfile     /var/run/haproxy.pid
    maxconn     4000
    user        haproxy
    group       haproxy
    daemon

    # turn on stats unix socket
    stats socket /var/lib/haproxy/stats

    # utilize system-wide crypto-policies
    ssl-default-bind-ciphers PROFILE=SYSTEM
    ssl-default-server-ciphers PROFILE=SYSTEM

#---------------------------------------------------------------------
# common defaults that all the 'listen' and 'backend' sections will
# use if not designated in their block
#---------------------------------------------------------------------
defaults
    mode                    http
    log                     global
    option                  httplog
    option                  dontlognull
    option http-server-close
    option forwardfor       except 127.0.0.0/8
    option                  redispatch
    retries                 3
    timeout http-request    10s
    timeout queue           1m
    timeout connect         10s
    timeout client          1m
    timeout server          1m
    timeout http-keep-alive 10s
    timeout check           10s
    maxconn                 3000

#---------------------------------------------------------------------
# main frontend which proxys to the backends
#---------------------------------------------------------------------

frontend http_front
    bind *:80
    stats uri /haproxy?stats
    default_backend http_back

#---------------------------------------------------------------------
# round robin balancing between the various backends
#---------------------------------------------------------------------

backend http_back
    balance roundrobin
    server webserver1 192.168.1.223:80 check
    server webserver2 192.168.1.225:80 check
    server webserver3 192.168.1.228:80 check
Explanation of Configuration |
Let’s break down the provided HAProxy configuration file step by step to explain its components and settings (to skip this section and continue with the install, click here).
Global Settings |
The global section defines settings that apply to the entire HAProxy instance. Here’s what each directive does:
					#---------------------------------------------------------------------
# Global settings
#---------------------------------------------------------------------
global
Logging Configuration |
					    # to have these messages end up in /var/log/haproxy.log you will
# need to:
#
# 1) configure syslog to accept network log events.  This is done
#    by adding the '-r' option to the SYSLOGD_OPTIONS in
#    /etc/sysconfig/syslog
#
# 2) configure local2 events to go to the /var/log/haproxy.log
#   file. A line like the following can be added to
#   /etc/sysconfig/syslog
#
#    local2.*                       /var/log/haproxy.log
#
log         127.0.0.1 local2
This line configures HAProxy to log messages to the syslog server running on the localhost (127.0.0.1) using the local2 facility. This facility can be directed to specific log files, such as /var/log/haproxy.log, by adjusting syslog settings.
The comments above suggest steps to ensure that HAProxy logs are properly recorded:
-r to SYSLOGD_OPTIONS in /etc/sysconfig/syslog.local2 logs to the specified log file:
local2.* /var/log/haproxy.log
Chroot Directory |
chroot /var/lib/haproxy
/var/lib/haproxy). This enhances security by limiting the filesystem access HAProxy has.PID File |
pidfile /var/run/haproxy.pid
Maximum Connections |
maxconn 4000
User and Group |
					user        haproxy
group       haproxy
haproxy user and group, providing a layer of security by preventing HAProxy from running with root privileges.Daemon Mode |
daemon
Stats Socket |
stats socket /var/lib/haproxy/stats
SSL Default Ciphers |
					ssl-default-bind-ciphers PROFILE=SYSTEM
ssl-default-server-ciphers PROFILE=SYSTEM
PROFILE=SYSTEM option indicates that it should use the system-wide crypto policies for cipher selection.Defaults Section |
The defaults section provides a way to set common parameters that can be used in all other sections unless overridden. This helps maintain consistency across different configurations.
					#---------------------------------------------------------------------
# common defaults that all the 'listen' and 'backend' sections will
# use if not designated in their block
#---------------------------------------------------------------------
defaults
Mode |
mode http
Logging |
log global
HTTP Logging Options |
					option                  httplog
option                  dontlognull
httplog enables detailed logging for HTTP requests.dontlognull prevents logging of connection attempts that are closed without any HTTP data.HTTP Server Close Option |
option http-server-close
Forwarding Options |
option forwardfor except 127.0.0.0/8
X-Forwarded-For header to the requests, allowing the backend servers to see the original client IP address. The exception except 127.0.0.0/8 ensures that this header is not added for localhost connections.Redispatch |
option redispatch
Retries |
retries 3
Timeouts |
					timeout http-request    10s
timeout queue           1m
timeout connect         10s
timeout client          1m
timeout server          1m
timeout http-keep-alive 10s
timeout check           10s
Maximum Connections |
maxconn 3000
Frontend Section |
The frontend section defines how incoming traffic is handled and routed to the backend servers.
					#---------------------------------------------------------------------
# main frontend which proxys to the backends
#---------------------------------------------------------------------

frontend http_front
    bind *:80
    stats uri /haproxy?stats
    default_backend http_back
Bind Directive |
bind *:80
Stats URI |
stats uri /haproxy?stats
/haproxy?stats), providing real-time insights into the HAProxy’s performance.Default Backend |
default_backend http_back
http_back backend section unless specified otherwise.Backend Section |
The backend section defines how requests are distributed among the servers listed.
					#---------------------------------------------------------------------
# round robin balancing between the various backends
#---------------------------------------------------------------------

backend http_back
    balance roundrobin
    server webserver1 192.168.1.223:80 check
    server webserver2 192.168.1.225:80 check
    server webserver3 192.168.1.228:80 check
Load Balancing Method |
balance roundrobin
Server Definitions |
					server webserver1 192.168.1.223:80 check
server webserver2 192.168.1.225:80 check
server webserver3 192.168.1.228:80 check
check parameter enables health checks on these servers, ensuring HAProxy only sends traffic to healthy servers.This HAProxy configuration file sets up a robust load balancing system with extensive logging and monitoring capabilities. It defines global settings that affect all aspects of HAProxy’s behavior, establishes common defaults for connections, and specifies how incoming requests should be routed to multiple backend servers using a round-robin approach. The configuration prioritizes security, reliability, and ease of monitoring, making it suitable for handling web traffic effectively.
Step 4: SELinux Settings |
Now, let’s set a rule that enables HAProxy to establish outbound connections to any remote server by setting the SELinux boolean haproxy_connect_any to true. The -P flag ensures that this change is persistent across system reboots.
sudo setsebool -P haproxy_connect_any 1
Step 5: Start and Enable HAProxy |
After configuring HAProxy, start the service and enable it to run at boot.
sudo systemctl enable --now haproxy
Created symlink /etc/systemd/system/multi-user.target.wants/haproxy.service → /usr/lib/systemd/system/haproxy.service.
Verify the status of HAProxy to ensure it’s running correctly.
sudo systemctl status haproxy
					● haproxy.service - HAProxy Load Balancer
     Loaded: loaded (/usr/lib/systemd/system/haproxy.service; enabled; preset: disabled)
     Active: active (running) since Sat 2024-07-20 18:57:40 EDT; 1h 36min ago
    Process: 1793 ExecStartPre=/usr/sbin/haproxy -f $CONFIG -f $CFGDIR -c -q $OPTIONS (code=exited, status=0/SUCCESS)
   Main PID: 1795 (haproxy)
      Tasks: 3 (limit: 23170)
     Memory: 4.1M
        CPU: 2.816s
     CGroup: /system.slice/haproxy.service
             ├─1795 /usr/sbin/haproxy -Ws -f /etc/haproxy/haproxy.cfg -f /etc/haproxy/conf.d -p /run/haproxy.pid
             └─1797 /usr/sbin/haproxy -Ws -f /etc/haproxy/haproxy.cfg -f /etc/haproxy/conf.d -p /run/haproxy.pid

Jul 20 18:57:40 haproxy.dev.naijalabs.net systemd[1]: Started HAProxy Load Balancer.
Jul 20 18:57:40 haproxy.dev.naijalabs.net haproxy[1797]: [WARNING]  (1797) : Server http_back/webserver1 is DOWN, reason: Layer4 connection problem, info: "No route to host",>
Jul 20 18:57:41 haproxy.dev.naijalabs.net haproxy[1797]: [WARNING]  (1797) : Server http_back/webserver2 is DOWN, reason: Layer4 connection problem, info: "No route to host",>
Jul 20 18:57:42 haproxy.dev.naijalabs.net haproxy[1797]: [WARNING]  (1797) : Server http_back/webserver3 is DOWN, reason: Layer4 connection problem, info: "No route to host",>
...omitted for brevity...
Notice the WARNING message: This is to be expected since we have not set up our web server instances yet.
Step 6: Open Firewall Ports |
If your server has a firewall enabled, you’ll need to open the necessary ports for HAProxy. By default, HAProxy listens on port 80 for HTTP traffic.
sudo firewall-cmd --permanent --add-port=80/tcp
sudo firewall-cmd --reload
So far, we have configured HAProxy to function as a load balancer, distributing the workload across the web servers using the round-robin algorithm. The next step is to set up the web servers.
Step 1: Install Apache |
First, let’s install Apache on each server (in our scenario, webservers1, 2, and 3):
sudo dnf install httpd -y
Next, start and enable httpd on each server:
sudo systemctl enable --now httpd
Then, open port 80 to allow HTTP traffic on each server:
sudo firewall-cmd --permanent --add-port=80/tcp && sudo firewall-cmd --reload
Step 2: Configure the Webservers |
With Apache installed and running on our webservers, we can proceed to the next step and configure each instance by creating an index.html file.
sudo vim /var/www/html/index.html
Copy and paste following entries into the file (on webserver1):
					<!DOCTYPE html>
<html lang="en">
<head>
    <meta charset="UTF-8">
    <meta name="viewport" content="width=device-width, initial-scale=1.0">
    <title>Login Page</title>

</head>
<body>
    <div class="container">
        <h2>Webserver1 Login</h2>
        <form action="login.php" method="POST">
            <label for="username">Username:</label>
            <input type="text" id="username" name="username" required>
            <label for="password">Password:</label>
            <input type="password" id="password" name="password" required>
            <input type="submit" value="Login">
        </form>
    </div>
</body>
</html>
Repeat on webserver2:
					<!DOCTYPE html>
<html lang="en">
<head>
    <meta charset="UTF-8">
    <meta name="viewport" content="width=device-width, initial-scale=1.0">
    <title>Login Page</title>

</head>
<body>
    <div class="container">
        <h2>Webserver2 Login</h2>
        <form action="login.php" method="POST">
            <label for="username">Username:</label>
            <input type="text" id="username" name="username" required>
            <label for="password">Password:</label>
            <input type="password" id="password" name="password" required>
            <input type="submit" value="Login">
        </form>
    </div>
</body>
</html>
Then, repeat once more on webserver3:
					<!DOCTYPE html>
<html lang="en">
<head>
    <meta charset="UTF-8">
    <meta name="viewport" content="width=device-width, initial-scale=1.0">
    <title>Login Page</title>

</head>
<body>
    <div class="container">
        <h2>Webserver3 Login</h2>
        <form action="login.php" method="POST">
            <label for="username">Username:</label>
            <input type="text" id="username" name="username" required>
            <label for="password">Password:</label>
            <input type="password" id="password" name="password" required>
            <input type="submit" value="Login">
        </form>
    </div>
</body>
</html>
This html code will display a basic non-functioning login page. Restart httpd on each server:
sudo systemctl restart httpd
Now, let’s revisit our haproxy server and run a status check:
sudo systemctl status haproxy
					...
Jul 21 05:27:59 haproxy.dev.naijalabs.net haproxy[1797]: [WARNING]  (1797) : Server http_back/webserver1 is UP, reason: Layer4 check passed, check duration: 0ms. 1 active and>
Jul 21 05:30:05 haproxy.dev.naijalabs.net haproxy[1797]: [WARNING]  (1797) : Server http_back/webserver2 is UP, reason: Layer4 check passed, check duration: 0ms. 2 active and>
Jul 21 05:34:03 haproxy.dev.naijalabs.net haproxy[1797]: [WARNING]  (1797) : Server http_back/webserver3 is UP, reason: Layer4 check passed, check duration: 0ms. 3 active and
You’ll notice that all backend webservers are UP or online.
Step 3: Test HAProxy |
The final step is to test if the load balancer is functioning correctly. To do this, visit the load balancer’s IP address or http://192.168.1.18 in our example:

Photo by admingeek from Infotechys
Initially, you should see the login page for webserver1.

Photo by admingeek from Infotechys
Each time you refresh the page, you will be redirected to anyone of the backend web servers.

Photo by admingeek from Infotechys
Now that you have a basic HAProxy setup, you might want to explore more advanced configurations. Here are a few examples:
Load Balancing Algorithms |
HAProxy supports various load balancing algorithms such as roundrobin, leastconn, and source. Modify your backend configuration to use the desired algorithm.
					backend http_back
    balance leastconn
    server webserver1 192.168.1.223:80 check
    server webserver2 192.168.1.225:80 check
    server webserver3 192.168.1.228:80 check
SSL Termination |
To handle HTTPS traffic, you need to configure SSL termination. First, install the necessary SSL package.
sudo dnf install haproxy-ssl -y
Then, update your configuration to include SSL termination.
					frontend https_front
    bind *:443 ssl crt /etc/haproxy/ssl/haproxy.pem
    default_backend https_back

backend https_back
    balance roundrobin
    server webserver1 192.168.1.223:443 check ssl verify none
    server webserver2 192.168.1.225:443 check ssl verify none
    server webserver3 192.168.1.228:443 check ssl verify none
Make sure you have your SSL certificate and key combined in the /etc/haproxy/ssl/haproxy.pem file.
Monitoring and Management |
HAProxy provides a built-in statistics page that can be very useful for monitoring and managing your load balancer. To enable the stats page, ensure you have the following lines in your frontend configuration.
					frontend http_front
    bind *:80
    stats enable
    stats uri /haproxy?stats
    stats auth admin:password
    default_backend http_back
You can access the stats page by navigating to http://haproxy-server-ip-address/haproxy?stats or http://192.168.1.18/haproxy?stats in our example:
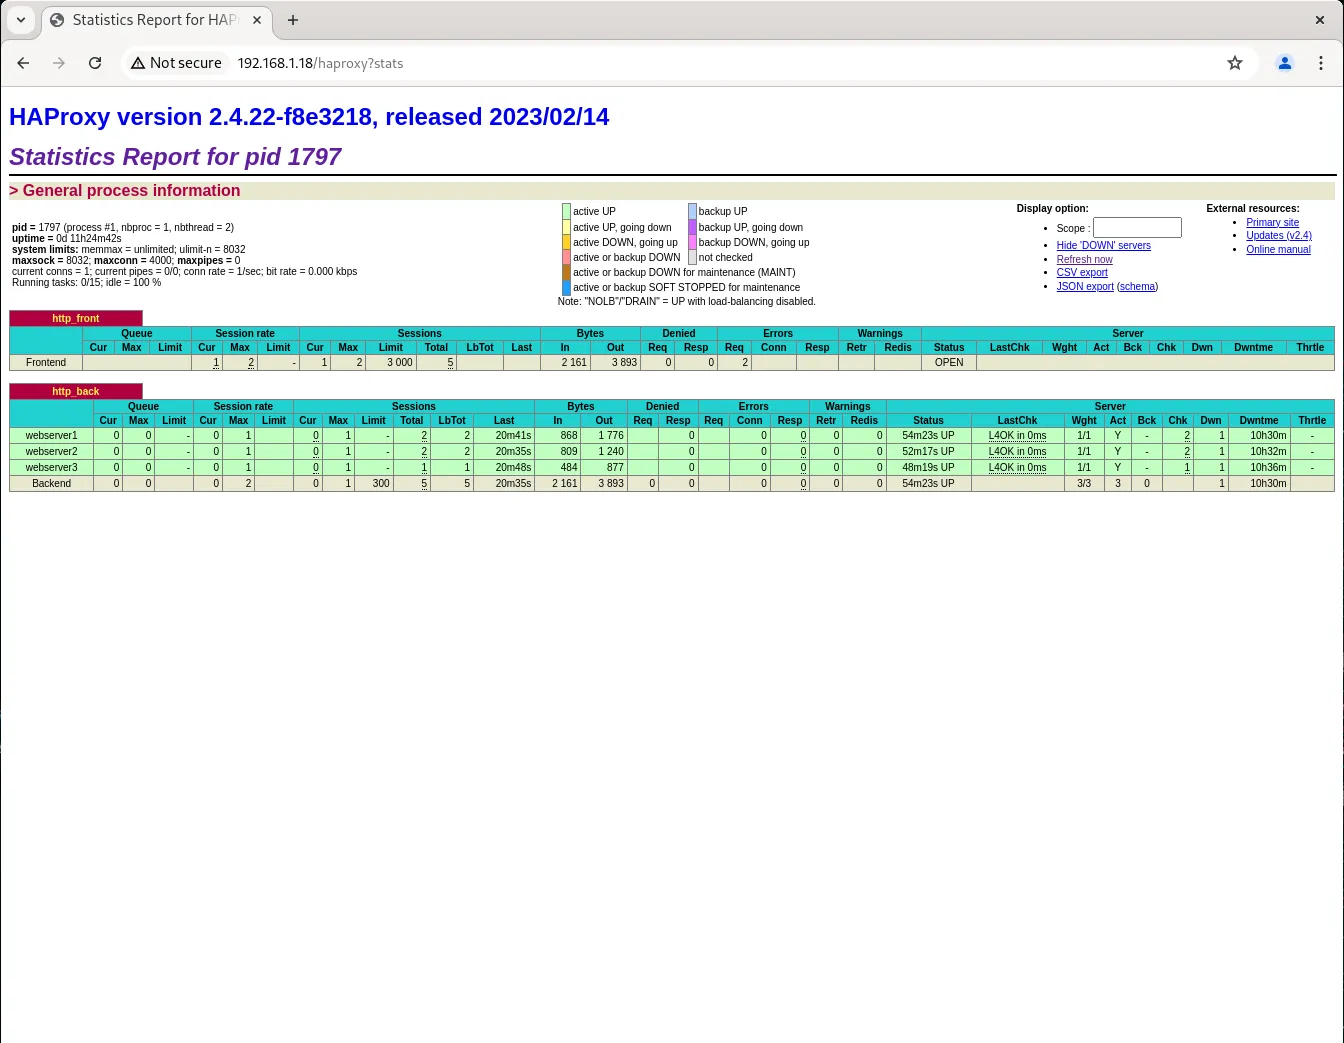
Photo by admingeek from Infotechys
Troubleshooting |
If you encounter issues with your HAProxy setup, here are a few troubleshooting tips:
Check Logs: HAProxy logs are invaluable for diagnosing problems. You can find them in /var/log/haproxy.log.
Configuration Test: Before restarting HAProxy, always test your configuration with the following command:
sudo haproxy -c -f /etc/haproxy/haproxy.cfg
systemctl status haproxy to check the status of the HAProxy service.Setting up HAProxy on RHEL 9 or CentOS 9 is a straightforward process that significantly enhances the performance and reliability of your web services. By following this guide, you have learned how to install HAProxy, configure it for basic and advanced scenarios, and monitor its performance. As you become more familiar with HAProxy, you can explore additional features and customizations to further optimize your load balancing setup. Whether you are managing a small website or a large enterprise application, HAProxy provides the scalability and reliability needed to ensure smooth operation.
Did you find this article useful? Your feedback is invaluable to us! Please feel free to share your thoughts in the comments section below.
Related Posts

This guide examines how to setup an HTTPS server using Podman, a containerization tool, thereby fortifying a secure and streamlined hosting environment for your web

In this comprehensive guide, we’ll explore how to master virtual hosting management using Podman and HAProxy, enabling you to streamline your web infrastructure, achieve optimal

In this comprehensive guide, we’ll delve into the intricacies of Squid Proxy and HAProxy, shedding light on their differences, use cases, and features. Table of
