In this article, we’ll show you how to quickly add multiple IP addresses using NMCLI, a powerful command-line tool for configuring network settings on RHEL8/9

In this blog post, we’ll delve into 12 tried-and-tested methods to find your IP address in Linux, equipping you with the knowledge to effortlessly navigate networking tasks and troubleshoot connectivity issues.
In the Linux ecosystem, having the ability to quickly locate your IP address is invaluable for various networking tasks, troubleshooting, and system administration. Whether you’re setting up a server, configuring network settings, or diagnosing connectivity issues, knowing how to find your IP address from the command line can streamline your workflow.
Access to a Linux-based operating system: Make sure you have a Linux distribution installed on your system. These methods are compatible with popular distributions such as Ubuntu, Red Hat, CentOS, Debian, Fedora, and others.
Basic familiarity with the Linux command line: While some methods may involve graphical interfaces, most of the techniques covered in this guide rely on command-line utilities. A basic understanding of navigating and executing commands in the terminal will be beneficial.
Administrative privileges (optional): Depending on your system configuration and the commands used, you may need administrative privileges (root or sudo access) to execute certain commands or access certain system files. If you encounter permission errors, consider running the commands with elevated privileges.
By ensuring these prerequisites are met, you’ll be well-prepared to explore the various methods for discovering your IP address in Linux outlined in this guide. For this demostration, we’ll use a CentOS9 virtual machine. Let’s dive in!
The classic ifconfig command is a reliable way to display network interface information, including IP addresses.
$ ifconfig
					eth0: flags=4163<UP,BROADCAST,RUNNING,MULTICAST>  mtu 1500
        inet 192.168.1.223  netmask 255.255.255.0  broadcast 192.168.1.255
        inet6 fe80::5054:ff:fe4c:59de  prefixlen 64  scopeid 0x20<link>
        inet6 2600:4040:206c:ea00:5054:ff:fe4c:59de  prefixlen 64  scopeid 0x0<global>
        ether 52:54:00:4c:59:de  txqueuelen 1000  (Ethernet)
        RX packets 1200  bytes 125615 (122.6 KiB)
        RX errors 0  dropped 0  overruns 0  frame 0
        TX packets 1098  bytes 155148 (151.5 KiB)
        TX errors 0  dropped 0 overruns 0  carrier 0  collisions 0

lo: flags=73<UP,LOOPBACK,RUNNING>  mtu 65536
        inet 127.0.0.1  netmask 255.0.0.0
        inet6 ::1  prefixlen 128  scopeid 0x10<host>
        loop  txqueuelen 1000  (Local Loopback)
        RX packets 0  bytes 0 (0.0 B)
        RX errors 0  dropped 0  overruns 0  frame 0
        TX packets 0  bytes 0 (0.0 B)
        TX errors 0  dropped 0 overruns 0  carrier 0  collisions 0
Typically, this command displays your private IP address. Specifically, it belongs to the IPv4 private address range defined by RFC 1918, which is reserved for use within private networks and is not routable on the public internet. These private IP addresses are commonly used for local area network (LAN) configurations within homes, businesses, and organizations. They enable devices within the same network to communicate with each other without being directly accessible from outside the network.
The ip command provides more extensive networking information and has become the modern replacement for ifconfig.
$ ip addr show
					1: lo: <LOOPBACK,UP,LOWER_UP> mtu 65536 qdisc noqueue state UNKNOWN group default qlen 1000
    link/loopback 00:00:00:00:00:00 brd 00:00:00:00:00:00
    inet 127.0.0.1/8 scope host lo
       valid_lft forever preferred_lft forever
    inet6 ::1/128 scope host
       valid_lft forever preferred_lft forever
2: enp1s0: <BROADCAST,MULTICAST,UP,LOWER_UP> mtu 1500 qdisc fq_codel state UP group default qlen 1000
    link/ether 52:54:00:4c:59:de brd ff:ff:ff:ff:ff:ff
    inet 192.168.1.223/24 brd 192.168.1.255 scope global dynamic noprefixroute enp1s0
       valid_lft 50540sec preferred_lft 50540sec
    inet6 2600:4040:206c:ea00:5054:ff:fe4c:59de/64 scope global dynamic noprefixroute
       valid_lft 7177sec preferred_lft 7177sec
    inet6 fe80::5054:ff:fe4c:59de/64 scope link noprefixroute
       valid_lft forever preferred_lft forever
The hostname command coupled with the -I option can swiftly reveal your private IPv4 and IPv6 addresses.
					$ hostname -I
192.168.1.223 2600:4040:206c:ea00:5054:ff:fe4c:59de
The nmcli (NetworkManager Command-Line Interface) tool is commonly used for managing network connections and can display IP address information.
$ nmcli dev show
					GENERAL.DEVICE:                         enp1s0
GENERAL.TYPE:                           ethernet
GENERAL.HWADDR:                         52:54:00:4C:59:DE
GENERAL.MTU:                            1500
GENERAL.STATE:                          100 (connected)
GENERAL.CONNECTION:                     enp1s0
GENERAL.CON-PATH:                       /org/freedesktop/NetworkManager/ActiveConnection/2
WIRED-PROPERTIES.CARRIER:               on
IP4.ADDRESS[1]:                         192.168.1.223/24
IP4.GATEWAY:                            192.168.1.1
IP4.ROUTE[1]:                           dst = 192.168.1.0/24, nh = 0.0.0.0, mt = 100
IP4.ROUTE[2]:                           dst = 0.0.0.0/0, nh = 192.168.1.1, mt = 100
IP4.DNS[1]:                             192.168.1.1
IP4.DOMAIN[1]:                          test.infotechys.com
IP6.ADDRESS[1]:                         2600:4040:206c:ea00:5054:ff:fe4c:59de/64
IP6.ADDRESS[2]:                         fe80::5054:ff:fe4c:59de/64
IP6.GATEWAY:                            fe80::56b7:bdff:fe1c:c61b
IP6.ROUTE[1]:                           dst = fe80::/64, nh = ::, mt = 1024
IP6.ROUTE[2]:                           dst = 2600:4040:206c:ea00::/64, nh = ::, mt = 100
IP6.ROUTE[3]:                           dst = 2600:4040:206c:ea00::/56, nh = fe80::56b7:bdff:fe1c:c61b, mt = 100
IP6.ROUTE[4]:                           dst = ::/0, nh = fe80::56b7:bdff:fe1c:c61b, mt = 100
IP6.DNS[1]:                             2600:4040:206c:ea00::1
The ss command, used for socket statistics, can also list IP addresses associated with network connections.
$ ss -tulpn
					Netid          State           Recv-Q          Send-Q                                        Local Address:Port                      Peer Address:Port          Process
udp            UNCONN          0               0                                                   0.0.0.0:4000                           0.0.0.0:*
udp            UNCONN          8448            0                                             192.168.1.223:5353                           0.0.0.0:*
udp            UNCONN          0               0                                                   0.0.0.0:5353                           0.0.0.0:*
udp            UNCONN          0               0                                                   0.0.0.0:5353                           0.0.0.0:*
udp            UNCONN          0               0                                                   0.0.0.0:38593                          0.0.0.0:*
udp            UNCONN          0               0                                                   0.0.0.0:39163                          0.0.0.0:*
udp            UNCONN          0               0                                                   0.0.0.0:40546                          0.0.0.0:*
udp            UNCONN          0               0                                                 127.0.0.1:323                            0.0.0.0:*
udp            UNCONN          0               0                                                      [::]:4000                              [::]:*
udp            UNCONN          0               0                                                      [::]:5353                              [::]:*
udp            UNCONN          0               0                                                      [::]:49449                             [::]:*
udp            UNCONN          0               0                                                     [::1]:323                               [::]:*
udp            UNCONN          0               0                          [fe80::5054:ff:fe4c:59de]%enp1s0:546                               [::]:*
The dig command, primarily used for querying DNS servers, can be utilized to retrieve your public IP address from external services.
$ dig ANY +short @ns1-1.akamaitech.net ANY whoami.akamai.net
					;; Warning, extra type option
97.107.141.141
The curl command combined with online IP lookup services can swiftly fetch your public IP address. We will review three of the commonly used curl commands.
$ curl -s https://checkip.amazonaws.com
97.107.141.141
This curl command (below) displays your public IPv6 address:
$ curl ifconfig.me
2600:4040:206c:ea00:5054:ff:fe4c:59de
Running the same command with the -4 option provides your public IPv4 address
$ curl -4 ifconfig.me
97.107.141.141
Icanhazip.com is another commonly used online service. By executing the commands below, you can retrieve your public IPv4 and IPv6 addresses using the -4 and -6 options, respectively:
$ curl -4 https://icanhazip.com/
97.107.141.141
$ curl -6 https://icanhazip.com/
2600:4040:206c:ea00:5054:ff:fe4c:59de
Similarly, the wget command can be used to fetch your public IP address from online services
$ wget -qO- -4 ifconfig.me
97.107.141.141
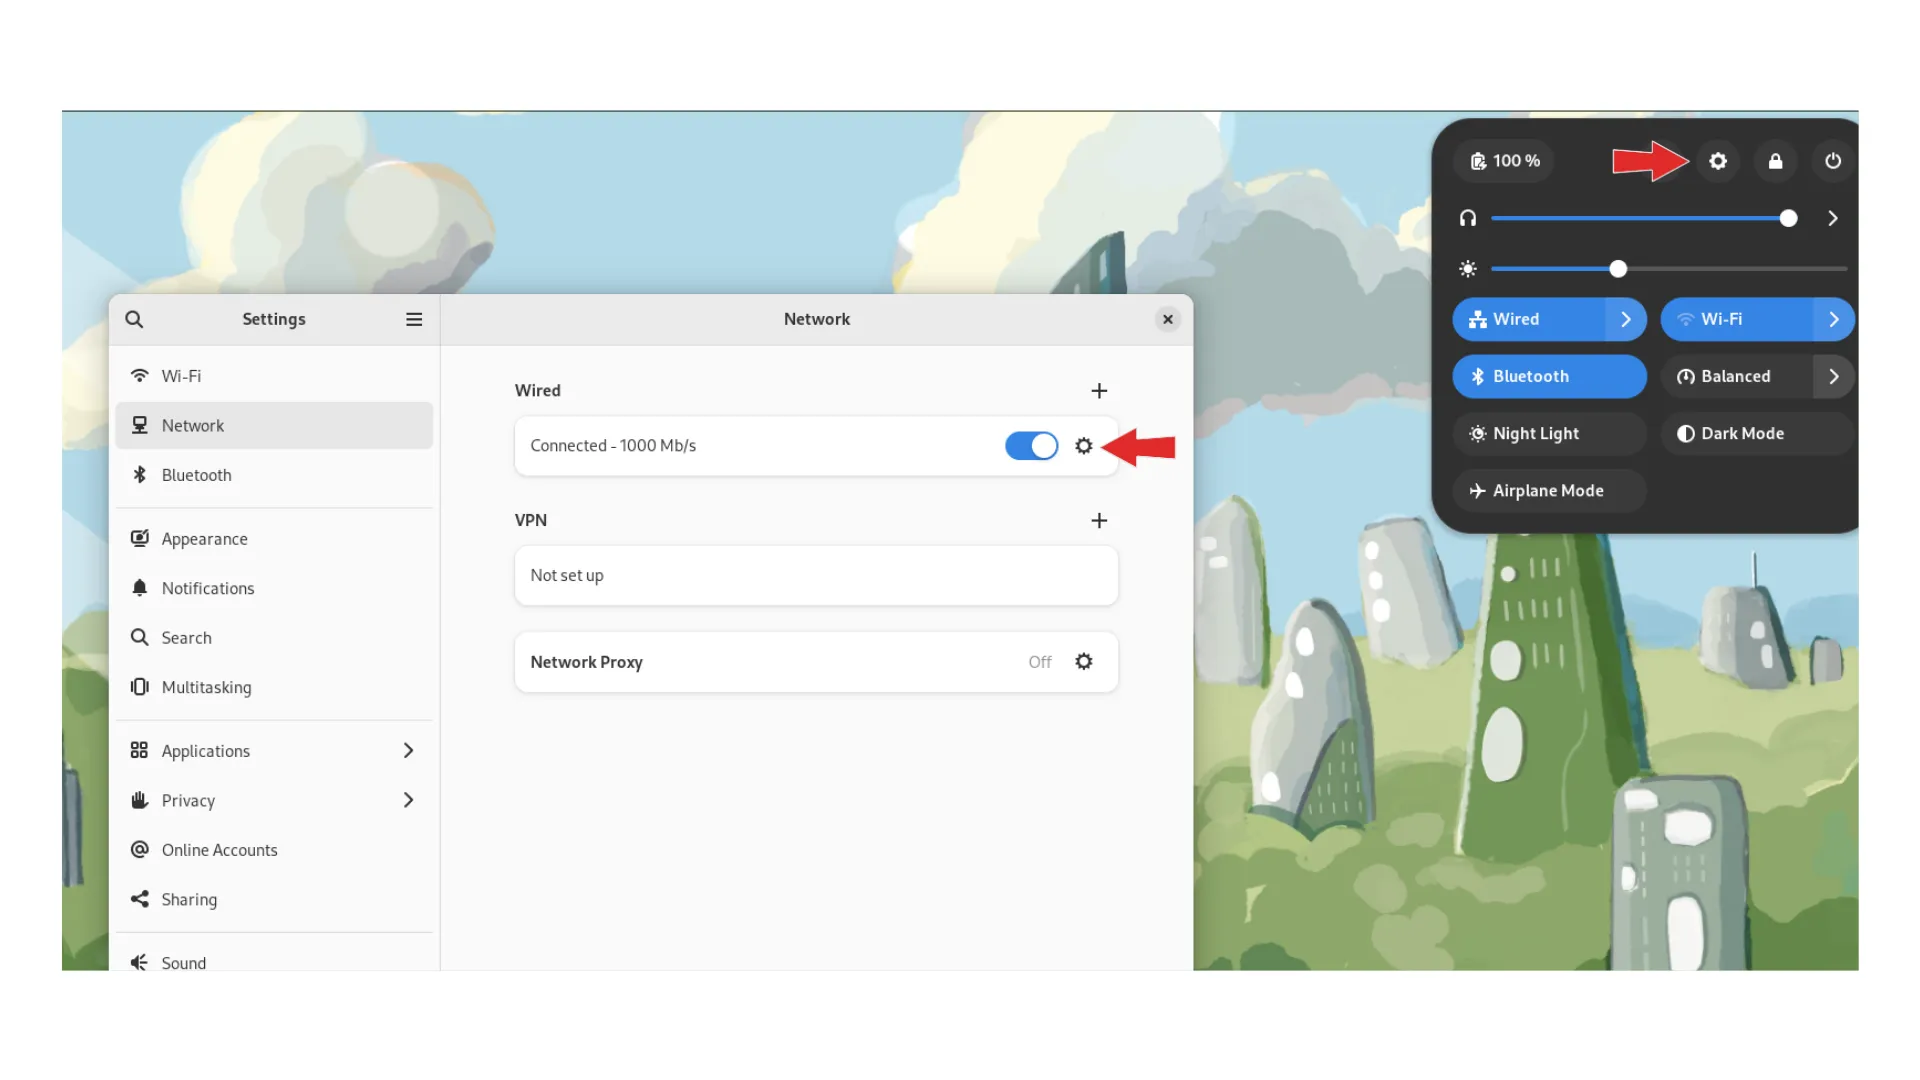
Lastly, graphical network settings interfaces like NetworkManager or System Settings in desktop environments provide an intuitive way to view and configure network connections, including IP addresses.

Photo by admingeek from Infotechys
Learning how to use these 12 methods to find your IP address helps you become better at managing and fixing network settings. This means you can make sure your internet connection works well and your computer runs smoothly. Whether you like typing commands or using point-and-click tools, Linux gives you lots of ways to do it. By learning these techniques, you’ll be able to handle network stuff easily and quickly in Linux.
Did you find this article useful? Your feedback is invaluable to us! Please feel free to share your thoughts in the comments section below.
Related Posts

In this article, we’ll show you how to quickly add multiple IP addresses using NMCLI, a powerful command-line tool for configuring network settings on RHEL8/9

In this article, we will review how to change DNS settings using nmcli. In RHEL7 and CentOS7, modifying the ifcfg scripts or /etc/resolv.conf files directly

Discover the convenient and efficient way to change IPv4 addresses on your Linux machine using the nmcli utility, and take control of your network settings
