
Commands
Table of Contents 🔈Introduction Redhat recently introduced the System Storage Manager (SSM), a unified user interface that allows uses to manage complicated systems in a


This article will guide you through the essential steps of creating, editing, backing up, and restoring a GPG key pair, empowering you with the knowledge to enhance the security of your digital communications and data.
In today’s world, where cybersecurity is becoming more of the focus, learning how to create and manage a GPG key pair is becoming increasingly important. In this article, we will learn how to create, edit, backup, and restore a GPG key pair.

Photo by Nikita Belokhonov from Pexels
GNU Privacy Guard, also known as GnuPG or GPG, is a popular file encryption tool that replaced Symantec’s Pretty Good Privacy or PGP. In addition to file encryption capability, GPG can also be used to sign Git commits, and better secure a password management software or database for example.
This tutorial assumes you have a PC or virtual instance running with root or sudo privileges to become root (preferably the latter). We will cover how to create and maintain GPG key pairs on both rpm-based (e.g. RHEL7 or CentOS7) and Debian-based (e.g. Ubuntu) distributions.
Before we begin, check if GPG is already installed on your machine by running the following command (illustrated below):
If GPG is already installed on your machine, skip the Installing GnuPG or GPG section and follow the procedure for creating GPG key pairs on your preferred distribution.
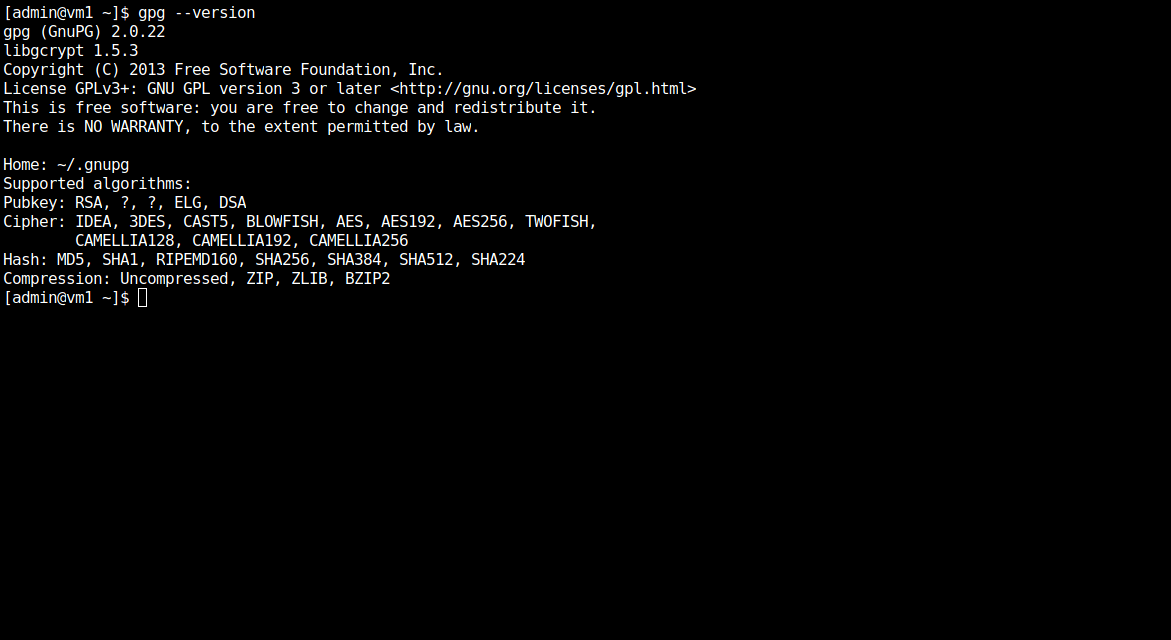
Photo by admingeek from Infotechys
Installing the GPG package is a fairly easy process as it can be installed from the command line (CLI). Run the following commands (below) as it applies to your Linux distribution. For this demonstration, we’ll be using a CentOS7 virtual machine.
[admin@vm1 ~]$ sudo yum -y install gnupg
[admin@vm1 ~]$ sudo dnf -y install gnupg
[admin@vm1 ~]$ sudo apt install gnupg -y
Before we proceed, let’s execute the following command (below) to check for and display a list of GPG keys on our machine. We don’t expect to see a list of GPG keys displayed to our terminal because we haven’t created any yet.
Instead, running the gpg --list-keys command will initialize GPG in your home directory.
					[admin@vm1 ~]$ gpg --list-keys
gpg: directory '/home/admin/.gnupg' created
gpg: keybox '/home/admin/.gnupg/pubring.kbx' created
gpg: /home/admin/.gnupg/trustdb.gpg: trustdb created
In order to generate a key pair successfully, we must consider the following. Firstly, we need to ensure that we are executing the right command. For example, the command for generating a GPG key pair on RHEL7 or CentOS7 is gpg --gen-key.
On Ubuntu, the command is different and executed with gpg --full-generate-key. Therefore, it is important that we ensure we are executing the right command on the appropriate machine. The commands for generating GPG key pairs will vary depending on the version of GnuPG that’s installed.
So, how do we determine what command to run on our machine? Enter the following command (below) to find the answer.
					[admin@vm2 ~]$ gpg --help | grep generate
--gen-key generate a new key pair
--gen-revoke generate a revocation certificate
As you can see (above), the --gen-key option is passed to the gpg command on our Linux (CentOS7 in this case) machine, to generate the new key. Now that we know which command to run, let’s begin.
Run the following command (below) to begin creating the new key.
					[admin@vm2 ~]$ gpg --gen-key
gpg (GnuPG) 2.0.22; Copyright (C) 2013 Free Software Foundation, Inc.
This is free software: you are free to change and redistribute it.
There is NO WARRANTY, to the extent permitted by law.
gpg: keyring `/home/admin/.gnupg/secring.gpg' created
Please select what kind of key you want:
(1) RSA and RSA (default)
(2) DSA and Elgamal
(3) DSA (sign only)
(4) RSA (sign only)
Your selection?
Hit the Enter Key to choose the default “(1) RSA and RSA (default)” option and proceed to the GPG Key Pair Procedure section of this post.
Run the following command (below) to generate the new key.
					[admin@ubuntu-vm1 ~]$ gpg --full-generate-key
gpg (GnuPG) 2.2.19; Copyright (C) 2019 Free Software Foundation, Inc.
This is free software: you are free to change and redistribute it.
There is NO WARRANTY, to the extent permitted by law.
Please select what kind of key you want:
(1) RSA and RSA (default)
(2) DSA and Elgamal
(3) DSA (sign only)
(4) RSA (sign only)
(14) Existing key from card
Your selection?
Hit the Enter Key to choose the default “(1) RSA and RSA (default)” option and proceed to the GPG Key Pair Procedure section of this post.
					RSA keys may be between 1024 and 4096 bits long.
What keysize do you want? (3072) 4096
Enter the 4096-bit keysize and hit the Enter Key to ensure you have the strongest encryption.
					Requested keysize is 4096 bits
Please specify how long the key should be valid.
0 = key does not expire
<n> = key expires in n days
<n>w = key expires in n weeks
<n>m = key expires in n months
<n>y = key expires in n years
Key is valid for? (0) 1y
Enter 1y which means the GPG key expires in a year. From a best practice standpoint, it is always a good idea to set an expiration date for your GPG key pair because it is good know that if your device gets compromised, your key is set to eventually expire. This puts a time limit on your overall exposure.
					Key expires at Thu 23 Feb 2023 07:59:48 PM UTC
Is this correct? (y/N) y
Confirm your selection (Hit the y key and press Enter key to continue)
					GnuPG needs to construct a user ID to identify your key.
Real name: infotechystaff
Email address: infotechystaff@gmail.com
Comment: infotechys GPG key pair
Next, enter your name, email address, and some comments and hit the Enter key to continue.
					You selected this USER-ID:
"infotechystaff (infotechys GPG key pair) <infotechystaff@gmail.com>"
Change (N)ame, (C)omment, (E)mail or (O)kay/(Q)uit? O
Press the O key + Enter to confirm everything looks ok and continue.
Next, you will be presented with a prompt to enter a passphrase (shown in the image below) to protect your new key. Make sure to choose a passphrase the you can remember off head. Then, hit the Enter key to continue and start generating the GPG key pair.

Photo by admingeek from Infotechys
We need to generate a lot of random bytes. It is a good idea to perform some other action (type on the keyboard, move the mouse, utilize the disks) during the prime generation; this gives the random number generator a better chance to gain enough entropy. We need to generate a lot of random bytes. It is a good idea to perform some other action (type on the keyboard, move the mouse, utilize the disks) during the prime generation; this gives the random number generator a better chance to gain enough entropy.
					gpg: key 71752E82FCF95433 marked as ultimately trusted
gpg: directory '/home/admin/.gnupg/openpgp-revocs.d' created
gpg: revocation certificate stored as '/home/admin/.gnupg/openpgp-revocs.d/0D2A972A185A17533031F9E571752E82FCF95433.rev'
public and secret key created and signed.

pub rsa4096 2022-02-23 [SC] [expires: 2023-02-23]
0D2A972A185A17533031F9E571752E82FCF95433
uid infotechystaff (infotechys GPG key pair) <infotechystaff@gmail.com>
sub rsa4096 2022-02-23 [E] [expires: 2023-02-23]
We’re Done! GPG key pair generation is complete. Go ahead and list the keys again to verify everything is looks as expected (below).
					$ gpg --list-keys
gpg: checking the trustdb
gpg: marginals needed: 3 completes needed: 1 trust model: pgp
gpg: depth: 0 valid: 1 signed: 0 trust: 0-, 0q, 0n, 0m, 0f, 1u
gpg: next trustdb check due at 2023-02-23
/home/admin/.gnupg/pubring.kbx
---------------------------------------
pub rsa4096 2022-02-23 [SC] [expires: 2023-02-23]
0D2A972A185A17533031F9E571752E82FCF95433
uid [ultimate] infotechystaff (infotechys GPG key pair) <infotechystaff@gmail.com>
sub rsa4096 2022-02-23 [E] [expires: 2023-02-23]
To edit the GPG key, simply execute the following command (below) and pass the same email address you used in generating your key.
					$ gpg --edit-key infotechystaff@gmail.com
gpg (GnuPG) 2.0.22; Copyright (C) 2013 Free Software Foundation, Inc.
This is free software: you are free to change and redistribute it.
There is NO WARRANTY, to the extent permitted by law.

Secret key is available.
pub 4096R/D57E7A74 created: 2022-02-24 expires: 2023-02-24 usage: SC
trust: ultimate validity: ultimate
sub 4096R/C9C05870 created: 2022-02-24 expires: 2023-02-24 usage: E
[ultimate] (1). infotechystaff (infotechys GPG key pair) <infotechystaff@gmail.com>

gpg> list
Type list at the prompt and hit Enter to continue and list the keys. The keys are indexed incrementally starting from 0.
NOTE: Although, we should only expect to see one key listed on our terminal, it is good practice to run a list to ensure we are editing the right key. Circumstances in the future may require that we create additional sub keys, so it is always prudent to check first.
					gpg> list

pub 4096R/D57E7A74 created: 2022-02-24 expires: 2023-02-24 usage: SC
trust: ultimate validity: ultimate
sub 4096R/C9C05870 created: 2022-02-24 expires: 2023-02-24 usage: E
[ultimate] (1). infotechystaff (infotechys GPG key pair) <infotechystaff@gmail.com>

gpg> list
Let’s say we wanted to modify the expiration date of our key pair. Run the following command (s) (below) to change it for its one year expiration to two years.
First, enter key 0 and the Enter key to select the first entry of the key pair. Then, enter expire and the Enter key to continue.
					gpg> key 0

pub 4096R/D57E7A74 created: 2022-02-24 expires: 2023-02-24 usage: SC
trust: ultimate validity: ultimate
sub 4096R/C9C05870 created: 2022-02-24 expires: 2023-02-24 usage: E
[ultimate] (1). infotechystaff (infotechys GPG key pair) <infotechystaff@gmail.com>

gpg> expire
Make the change by entering 2y and hit the Enter key. Confirm your selection (y) and hit the Enter key again to continue.
					Key is valid for? (0) 2y
Key expires at Sat 24 Feb 2024 04:26:28 AM EST
Is this correct? (y/N) y
You will be prompted to enter your passphrase again in order to complete the change.
					You need a passphrase to unlock the secret key for
user: "infotechystaff (infotechys GPG key pair) <infotechystaff@gmail.com>"
4096-bit RSA key, ID D57E7A74, created 2022-02-24
Repeat the same steps for the second (sub key) entry (key 1)
Congratulations! You’ve successfully changed the expiration dates for your key pair. Type in save + Enter key to exit the gpg prompt.
					pub 4096R/D57E7A74 created: 2022-02-24 expires: 2024-02-24 usage: SC
trust: ultimate validity: ultimate
sub* 4096R/C9C05870 created: 2022-02-24 expires: 2024-02-24 usage: E
[ultimate] (1). infotechystaff (infotechys GPG key pair) <infotechystaff@gmail.com>

gpg>
Backing up your GPG keys is fairly simple. It involves zipping the entire hidden .gnupg directory and storing it on a separate device like an external flash drive for example. We will use tar, a Linux archiving utility, to zip up our GnuPG directory.
To restore your GPG keys, simply copy the GnuPG tar file or zip file in place and extract its contents. The images below illustrate this process step-by-step.

Photo by admingeek from Infotechys
Since we’re demonstrating how to restore GPG keys to another machine, we’ll copy the gnupg.tar.gz file to vm4-dev-infotechys (a RHEL7 virtual machine). This is a new instance of RHEL7 and we want to transfer and utilize our keys on this machine.
					[admin@vm2 ~]$ scp gnupg.tar.gz admin@vm4:~/
admin@vm4's password:
gnupg.tar.gz                                                           100% 9708          6.0/MB/s        0:00

Photo by admingeek from Infotechys
As you can see (below), the GPG keys are restored and now available on the new RHEL7 instance (vm4-dev-infotechys).
					[admin@vm4-dev-infotechys ~]$ gpg --list-keys
/home/admin/.gnupg/pubring.gpg
------------------------------
pub 4096R/D57E7A74 2022-02-24 [expires 2024-02-24]
uid                infotechystaff (infotechys GPG key pair) infotechystaff@gmail.com
sub 4096R/C9C05870 2022-02-24 [expires 2024-02-24]

[admin@vm4-dev-infotechys ~]
man gpg from the command line (CLI) or visit the gnupg.org website for more information.Related Posts
Table of Contents 🔈Introduction Redhat recently introduced the System Storage Manager (SSM), a unified user interface that allows uses to manage complicated systems in a

Table of Contents Introduction According to the Linux manual pages (man yum), there are 35 standard YUM commands. That number increases to the hundreds when
In this article, we will review the most commonly used RPM commands in Linux. These commands play a pivotal role in package management, allowing users