
Commands
In this tutorial, you will learn the process involved with building a docker registry. As part of this process, we will set up a web

Are you looking to set up a Kubernetes development environment with Vagrant quickly and efficiently? Look no further! In this guide, we’ll walk through how to configure a Vagrantfile to create a virtual machine with CentOS 9, Docker, Kubernetes tools, and more. Let’s dive in!
Are you eager to dive into Kubernetes development but find the setup process daunting? Fear not! In this comprehensive guide, we’ll walk you through the configuration of a Vagrantfile, enabling you to swiftly establish a Kubernetes development environment on your machine. By leveraging Vagrant, CentOS 9, and a handful of essential tools, you’ll be ready to tackle Kubernetes projects with confidence.
Before we get started, ensure you have the following prerequisites:
Vagrant: Make sure Vagrant is installed on your system. You can download it from the official Vagrant website and follow the installation instructions for your operating system.
Virtualization Software: Install VirtualBox or another virtualization provider supported by Vagrant. VirtualBox is recommended for this guide.
Basic Command Line Skills: Familiarize yourself with basic command line operations as we’ll be executing shell commands within the virtual machine.
Let’s review the Vagrantfile below. It installs minikube on a CentOS9 Virtual machine:
					# -*- mode: ruby -*-
# vi: set ft=ruby :

Vagrant.configure("2") do |config|
  config.vm.box = "generic-x64/centos9s"
  config.ssh.forward_agent = true
  config.ssh.forward_x11 = true

  config.vm.network "public_network", type: "dhcp"

  config.vm.provider "virtualbox" do |vb|
    vb.memory = "4096" # 4GB RAM
    vb.cpus = 2        # 2 CPU cores
  end

  config.vm.provision "shell", inline: <<-SHELL
    # Install necessary dependencies
    sudo yum install -y wget

    # Install Docker
    curl -fsSL https://get.docker.com | sudo sh
    sudo systemctl start docker
    sudo systemctl enable docker

    # Add the Vagrant user to the Docker group
    sudo usermod -aG docker vagrant

    # Install kubectl
    sudo curl -LO https://storage.googleapis.com/kubernetes-release/release/$(curl -s https://storage.googleapis.com/kubernetes-release/release/stable.txt)/bin/linux/amd64/kubectl
    sudo chmod +x kubectl
    sudo mv kubectl /usr/local/bin/

    # Install conntrack
    sudo yum install -y conntrack

    # Install kvm2 drivers
    sudo yum install -y qemu-kvm libvirt ruby-devel gcc

    # Install crictl
    sudo curl -LO https://github.com/kubernetes-sigs/cri-tools/releases/download/v1.22.0/crictl-v1.22.0-linux-amd64.tar.gz
    sudo tar -C /usr/local/bin -xzvf crictl-v1.22.0-linux-amd64.tar.gz
    sudo rm crictl-v1.22.0-linux-amd64.tar.gz

    # Install Minikube
    curl -LO https://storage.googleapis.com/minikube/releases/latest/minikube-latest.x86_64.rpm
    sudo rpm -ivh minikube-latest.x86_64.rpm

  SHELL
end
Let’s break down each line of the provided Vagrantfile:
# -*- mode: ruby -*-: This line is a comment indicating the mode of the file. It specifies that the file is in Ruby mode.
# vi: set ft=ruby : Another comment specifying Vim editor settings to recognize the file as Ruby syntax.
Vagrant.configure("2") do |config|: Begins the Vagrant configuration block, specifying version 2 of Vagrant. It passes a block to the configure method with a variable config to hold configuration settings.
config.vm.box = "generic-x64/centos9s": Sets the base box for the virtual machine to “generic-x64/centos9s”, which is a CentOS 9 base box.
config.ssh.forward_agent = true: Enables SSH agent forwarding, allowing the SSH agent on the host to be used within the virtual machine.
config.ssh.forward_x11 = true: Enables X11 forwarding over SSH, allowing graphical applications to be displayed on the host machine.
config.vm.network "public_network", type: "dhcp": Configures a public network interface with DHCP, allowing the virtual machine to obtain an IP address from the network’s DHCP server.
config.vm.provider "virtualbox" do |vb|: Begins the provider-specific configuration block for VirtualBox, passing a block with a variable vb to hold provider-specific settings.
vb.memory = "4096": Sets the amount of memory for the virtual machine to 4GB (4096 MB).
vb.cpus = 2: Sets the number of CPU cores for the virtual machine to 2.
config.vm.provision "shell", inline: <<-SHELL ... SHELL: Specifies shell provisioning, which executes shell commands within the virtual machine. The inline option allows shell commands to be specified directly within the Vagrantfile using a heredoc (<<-SHELL ... SHELL).
The following lines within the SHELL heredoc block install various dependencies and tools within the virtual machine:
end: Ends the Vagrant configuration block.
Overall, this Vagrantfile sets up a CentOS 9 virtual machine with Docker, Kubernetes tools, and other necessary dependencies for Kubernetes development.
Enter the following command to launch a virtual machine (VM) using the Vagrantfile:
$ vagrant up
Vagrant will begin the process of setting up a CentOS9 VM with Kubernetes components (e.g. Kubectl, Crictl, Conntrack) along with minikube installed:
					Bringing machine 'default' up with 'virtualbox' provider...
==> default: Importing base box 'generic-x64/centos9s'...
==> default: Matching MAC address for NAT networking...
==> default: Checking if box 'generic-x64/centos9s' version '4.3.10' is up to date...
==> default: A newer version of the box 'generic-x64/centos9s' for provider 'virtualbox' is
==> default: available! You currently have version '4.3.10'. The latest is version
==> default: '4.3.12'. Run `vagrant box update` to update.
==> default: Setting the name of the VM: mkube_default_1706724685935_77174
==> default: Clearing any previously set network interfaces...
==> default: Preparing network interfaces based on configuration...
    default: Adapter 1: nat
    default: Adapter 2: bridged
==> default: Forwarding ports...
    default: 22 (guest) => 2222 (host) (adapter 1)
==> default: Running 'pre-boot' VM customizations...
==> default: Booting VM...
==> default: Waiting for machine to boot. This may take a few minutes...
    default: SSH address: 127.0.0.1:2222
    default: SSH username: vagrant
    default: SSH auth method: private key
    default:
    default: Vagrant insecure key detected. Vagrant will automatically replace
    default: this with a newly generated keypair for better security.
... output ommitted ...
    default:   xkeyboard-config-2.33-2.el9.noarch
    default:   yajl-2.1.0-22.el9.x86_64
    default:
    default: Complete!
    default:   % Total    % Received % Xferd  Average Speed   Time    Time     Time  Current
    default:                                  Dload  Upload   Total   Spent    Left  Speed
  0     0    0     0    0     0      0      0 --:--:-- --:--:-- --:--:--     0
100 17.8M  100 17.8M    0     0  10.2M      0  0:00:01  0:00:01 --:--:-- 16.5M
    default: crictl
    default:   % Total    % Received % Xferd  Average Speed   Time    Time     Time  Current
    default:                                  Dload  Upload   Total   Spent    Left  Speed
100 19.3M  100 19.3M    0     0   9.8M      0  0:00:01  0:00:01 --:--:--  9.8M
    default: Verifying...                          ########################################
    default: Preparing...                          ########################################
    default: Updating / installing...
    default: minikube-1.32.0-0                     ########################################
After the VM build process completes, access the VM via SSH with the following command:
					$ vagrant ssh
[vagrant@centos9s ~]$ minikube version
minikube version: v1.32.0
commit: 8220a6eb95f0a4d75f7f2d7b14cef975f050512d
As you can see, Minikube version (1.32.0) was installed successfully on your virtual machine.
Now that Minikube is installed, you’re ready to launch it with a simple command (minikube start) and dive into utilizing it for your testing and development requirements.
					[vagrant@centos9s ~]$ minikube start
😄  minikube v1.32.0 on Centos 9 (vbox/amd64)
✨  Automatically selected the docker driver. Other choices: none, ssh
📌  Using Docker driver with root privileges
👍  Starting control plane node minikube in cluster minikube
🚜  Pulling base image ...
💾  Downloading Kubernetes v1.28.3 preload ...
    > preloaded-images-k8s-v18-v1...:  403.35 MiB / 403.35 MiB  100.00% 10.78 M
    > gcr.io/k8s-minikube/kicbase...:  453.90 MiB / 453.90 MiB  100.00% 7.50 Mi
🔥  Creating docker container (CPUs=2, Memory=2200MB) ...
🐳  Preparing Kubernetes v1.28.3 on Docker 24.0.7 ...
    ▪ Generating certificates and keys ...
    ▪ Booting up control plane ...
    ▪ Configuring RBAC rules ...
🔗  Configuring bridge CNI (Container Networking Interface) ...
    ▪ Using image gcr.io/k8s-minikube/storage-provisioner:v5
🔎  Verifying Kubernetes components...
🌟  Enabled addons: default-storageclass, storage-provisioner
🏄  Done! kubectl is now configured to use "minikube" cluster and "default" namespace by default
Sufficient System Resources:
Virtualization Software:
Kubernetes Tools:
Network Configuration:
Optional: Container Runtime:
By ensuring these prerequisites are met, you’ll be well-prepared to deploy and manage a Kubernetes Cluster for your development and testing needs.
					$ git clone https://github.com/techiescamp/vagrant-kubeadm-kubernetes
Cloning into 'vagrant-kubeadm-kubernetes'...
remote: Enumerating objects: 559, done.
remote: Counting objects: 100% (324/324), done.
remote: Compressing objects: 100% (130/130), done.
remote: Total 559 (delta 267), reused 201 (delta 194), pack-reused 235
Receiving objects: 100% (559/559), 171.79 KiB | 4.64 MiB/s, done.
Resolving deltas: 100% (314/314), done.
Now cd into the vagrant-kubeadm-kubernetes directory and execute the vagrant up command to initiate the Kubernetes Cluster build.
					$ cd vagrant-kubeadm-kubernetes
[admin@rhel9-vm1 vagrant-kubeadm-kubernetes]$ vagrant up

Bringing machine 'master' up with 'virtualbox' provider...
Bringing machine 'node01' up with 'virtualbox' provider...
If you encounter an error (shown below):
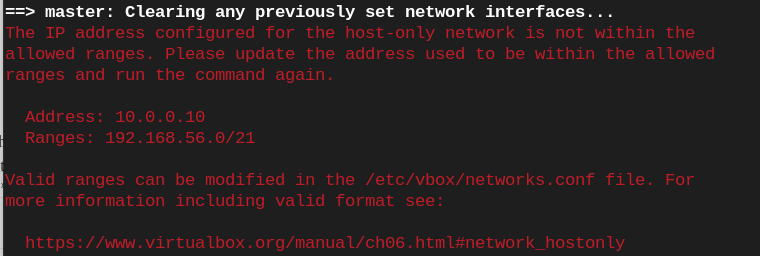
Photo by admingeek from Infotechys
You can modify the /etc/vbox/networks.conf file with the following entry:
* 0.0.0.0/0 ::/0
The entry * 0.0.0.0/0 ::/0 in the /etc/vbox/networks.conf file specifies a wildcard rule for all IP addresses and IPv6 addresses.
0.0.0.0/0: This represents the IPv4 wildcard address, meaning any IP address.::/0: This represents the IPv6 wildcard address, meaning any IPv6 address.Together, this entry essentially allows all IP traffic, both IPv4 and IPv6, to pass through the VirtualBox networking configurations without any restrictions. It’s a broad rule that permits all communication regardless of the specific IP address.
					Bringing machine 'master' up with 'virtualbox' provider...
Bringing machine 'node01' up with 'virtualbox' provider...
==> master: Box 'bento/ubuntu-22.04' could not be found. Attempting to find and install...
    master: Box Provider: virtualbox
    master: Box Version: >= 0
==> master: Loading metadata for box 'bento/ubuntu-22.04'
    master: URL: https://vagrantcloud.com/api/v2/vagrant/bento/ubuntu-22.04
==> master: Adding box 'bento/ubuntu-22.04' (v202401.31.0) for provider: virtualbox (amd64)
    master: Downloading: https://vagrantcloud.com/bento/boxes/ubuntu-22.04/versions/202401.31.0/providers/virtualbox/amd64/vagrant.box
...output ommitted ...
    node01: namespace/kubernetes-dashboard configured
    node01: serviceaccount/kubernetes-dashboard created
    node01: service/kubernetes-dashboard created
    node01: secret/kubernetes-dashboard-certs created
    node01: secret/kubernetes-dashboard-csrf created
    node01: secret/kubernetes-dashboard-key-holder created
    node01: configmap/kubernetes-dashboard-settings created
    node01: role.rbac.authorization.k8s.io/kubernetes-dashboard created
    node01: clusterrole.rbac.authorization.k8s.io/kubernetes-dashboard created
    node01: rolebinding.rbac.authorization.k8s.io/kubernetes-dashboard created
    node01: clusterrolebinding.rbac.authorization.k8s.io/kubernetes-dashboard created
    node01: deployment.apps/kubernetes-dashboard created
    node01: service/dashboard-metrics-scraper created
    node01: deployment.apps/dashboard-metrics-scraper created
    node01: + sudo -i -u vagrant kubectl -n kubernetes-dashboard get secret/admin-user -o 'go-template={{.data.token | base64decode}}'
    node01: The following token was also saved to: configs/token
    node01: + echo 'The following token was also saved to: configs/token'
    node01: + cat /vagrant/configs/token
    node01: eyJhbGciOiJSUzI1NiIsImtpZCI6IlNKUldwMGVBbTRnS19JNWVBdmM0Q3RmM1RNOWktcDdTazVIRDVpODZYTzAifQ.eyJpc3MiOiJrdWJlcm5ldGVzL3NlcnZpY2VhY2NvdW50Iiwia3ViZXJuZXRlcy5pby9zZXJ2aWNlYWNjb3VudC9uYW1lc3BhY2UiOiJrdWJlcm5ldGVzLWRhc2hib2FyZCIsImt1YmVybmV0ZXMuaW8vc2VydmljZWFjY291bnQvc2VjcmV0Lm5hbWUiOiJhZG1pbi11c2VyIiwia3ViZXJuZXRlcy5pby9zZXJ2aWNlYWNjb3VudC9zZXJ2aWNlLWFjY291bnQubmFtZSI6ImFkbWluLXVzZXIiLCJrdWJlcm5ldGVzLmlvL3NlcnZpY2VhY2NvdW50L3NlcnZpY2UtYWNjb3VudC51aWQiOiIzNTMxZjg5OS01ODcyLTQxNzEtOTdhOC1lZTZiNjFlNmViOTUiLCJzdWIiOiJzeXN0ZW06c2VydmljZWFjY291bnQ6a3ViZXJuZXRlcy1kYXNoYm9hcmQ6YWRtaW4tdXNlciJ9.b2RIOHFz5iF9jTk5hRC-19rlRZyCFHjq4pUqB5HNQfLOgVttMLxiC0kYZjlbFU5-LGpnWOm2hJjiBVaz_FVXqTeU-3uHC2vR0erkEqZA7F_J3EP0NIbATehHMmTOMoso7DAeXbzzJloAdj_cy3SnDgHtuTZDTdBixyD6JL5kdbiccmJNsrOM57CPt-gCk0tdwX3BpSMD-Z5TEulzVQs_50_VgY8b3j6SAHWHk3SRwJSatWZmPVD6ewDM-yEvJbSfJyxYY1Q8uSYBlPBVnFjQX9fd5qAq6yZOCvqxUd3jPghzZaRP0TplOQh1J7jM1kYCyvD8h3DjKbnRd5Q9zOVR0Q
    node01: Use it to log in at:
    node01: http://localhost:8001/api/v1/namespaces/kubernetes-dashboard/services/https:kubernetes-dashboard:/proxy/#/overview?namespace=kubernetes-dashboard
    node01:
    node01: + echo '
    node01: Use it to log in at:
    node01: http://localhost:8001/api/v1/namespaces/kubernetes-dashboard/services/https:kubernetes-dashboard:/proxy/#/overview?namespace=kubernetes-dashboard
    node01: '

[admin@rhel9-vm1 vagrant-kubeadm-kubernetes]$
Upon a successful completion of the Kubernetes Cluster build, SSH to the master instance and run the following commands to confirm functionality:
[admin@rhel9-vm1 vagrant-kubeadm-kubernetes]$ vagrant ssh master
					Welcome to Ubuntu 22.04.3 LTS (GNU/Linux 5.15.0-92-generic x86_64)

 * Documentation:  https://help.ubuntu.com
 * Management:     https://landscape.canonical.com
 * Support:        https://ubuntu.com/pro

  System information as of Tue Jan 30 06:27:57 AM UTC 2024

  System load:  1.27099609375      Processes:               157
  Usage of /:   16.4% of 30.34GB   Users logged in:         0
  Memory usage: 10%                IPv4 address for enp0s3: 10.0.2.15
  Swap usage:   0%


This system is built by the Bento project by Chef Software
More information can be found at https://github.com/chef/bento

vagrant@master-node:~$
vagrant@master-node:~$ kubectl get nodes
					NAME            STATUS   ROLES           AGE     VERSION
master-node     Ready    control-plane   9m56s   v1.28.2
worker-node01   Ready    worker          2m36s   v1.28.2
You can also list all the kube-system pods and ensure they are in a healthy running state with the following command:
vagrant@master-node:~$ kubectl get po -n kube-system
					NAME                                       READY   STATUS    RESTARTS      AGE
calico-kube-controllers-74d5f9d7bb-5cr66   1/1     Running   0             18m
calico-node-ckdgl                          1/1     Running   0             11m
calico-node-hcdmk                          1/1     Running   0             18m
coredns-5dd5756b68-9hpgq                   1/1     Running   0             18m
coredns-5dd5756b68-r82vd                   1/1     Running   0             18m
etcd-master-node                           1/1     Running   0             18m
kube-apiserver-master-node                 1/1     Running   0             18m
kube-controller-manager-master-node        1/1     Running   1 (17m ago)   18m
kube-proxy-2cclz                           1/1     Running   0             18m
kube-proxy-878hw                           1/1     Running   0             11m
kube-scheduler-master-node                 1/1     Running   1 (17m ago)   18m
metrics-server-69fb86cf66-snsv5            1/1     Running   0             18m
To execute an nginx deployment on the cluster for instance, open a file called nginx.yaml and add the following entries:
					apiVersion: apps/v1
kind: Deployment
metadata:
  name: nginx-deployment
spec:
  replicas: 3
  selector:
    matchLabels:
      app: nginx
  template:
    metadata:
      labels:
        app: nginx
    spec:
      containers:
      - name: nginx
        image: nginx:latest
        ports:
        - containerPort: 80
---
apiVersion: v1
kind: Service
metadata:
  name: nginx-service
spec:
  selector:
    app: nginx
  ports:
  - protocol: TCP
    port: 80
    targetPort: 80
  type: LoadBalancer
This YAML defines two Kubernetes resources:
Deployment: Specifies the desired state for managing Nginx pods. It ensures that a specified number of Nginx pods (replicas) are running at any given time.
replicas: Specifies the desired number of Nginx pods (in this case, 3).selector: Defines how the Deployment identifies which pods it manages.template: Defines the pod template used to create new pods.metadata.labels: Labels assigned to the pods.spec.containers: Specifies the container(s) running in the pod.name: Name of the container.image: Docker image to use for the container (here, nginx:latest).ports: Specifies the ports the container exposes.Service: Exposes the Nginx Deployment to the external world by creating a Kubernetes Service.
selector: Specifies which pods the service should target.ports: Specifies the ports the service should expose.port: Port exposed by the service.targetPort: Port on the pods the service should forward traffic to.type: Specifies the type of service. Here, LoadBalancer ensures an external IP is provisioned to access the Nginx service.You can save this YAML configuration to a file and deploy it to your Kubernetes cluster using the following command:
vagrant@master-node:~$ kubectl apply -f nginx.yaml
					deployment.apps/nginx-deployment created
service/nginx-service created
Enter the following kubectl command to verify nginx was successfully deployed:
vagrant@master-node:~$ kubectl get pods
					NAME                                READY   STATUS    RESTARTS   AGE
nginx-deployment-7c79c4bf97-6flwj   1/1     Running   0          27m
nginx-deployment-7c79c4bf97-7b2fz   1/1     Running   0          27m
nginx-deployment-7c79c4bf97-x77s2   1/1     Running   0          27m
By following the steps outlined in this guide and utilizing the provided Vagrantfile configuration, you’ve successfully set up a robust Kubernetes development environment. With RHEL9 or CentOS9, Docker, kubectl, and other essential tools at your disposal, you’re well-equipped to embark on your Kubernetes journey.
Did you find this article useful? Your feedback is invaluable to us! Please feel free to share your thoughts in the comments section below.
Related Posts
In this tutorial, you will learn the process involved with building a docker registry. As part of this process, we will set up a web
In today’s article, we will review the step-by-step process involved with a Kubernetes cluster install on Ubuntu server version 20.04. However, this procedure will work

In this article, we will review how to install minikube-v1.32.0 on RHEL9. This is the most recent stable release as of the date of this