Commands
Secure your Apache web server on RHEL 9 or CentOS Stream 9 with a hardened TLS configuration. Learn how to enable TLS 1.2/1.3, enforce strong

Learn how to enable, write, and configure SELinux policy modules for custom applications. Includes step-by-step instructions, file context management, CLI examples, and best practices for secure deployments.
Security-Enhanced Linux (SELinux) is one of the most robust mandatory access control (MAC) frameworks available in modern Linux distributions. It enforces strict boundaries between processes, files, and system resources—significantly reducing the risk of privilege escalation and unauthorized access.
However, organizations often deploy custom applications that require unique permissions not covered by default SELinux policies. The good news: SELinux provides a flexible system for writing, enabling, and configuring policy modules tailored to your custom workloads.
This guide walks you through everything you need to know about creating, enabling, and managing SELinux policy modules for custom applications—whether you’re securing an enterprise stack or a homegrown microservice. You’ll find step-by-step instructions, tables for quick reference, and practical CLI examples you can apply immediately.
SELinux enforces “least privilege” for every process on the system. But custom applications—especially in-house tools or containerized workloads—often behave differently from standard packages. Without proper SELinux rules, these workloads may:
|
|
|
|
Configuring policy modules is the cleanest way to address these issues while maintaining a secure posture. Unlike simply switching SELinux to permissive mode or setting file contexts manually, custom modules:
|
|
|
|
Policy modules are packaged sets of SELinux rules that extend or modify the base system policy. They include:
| Component | Description |
|---|---|
.te file | Type Enforcement rules (core logic of what’s allowed) |
.fc file | File context specifications for directories and files |
.if file | Optional interfaces for reusable rules |
.mod file | Compiled module used before final packaging |
.pp file | Binary policy package that SELinux installs |
Most administrators interact only with .te and .pp files. A typical workflow looks like this:
Capture audit denials -> Create or modify a
.tepolicy file -> Compile the module -> Package it into a.ppfile -> Install and enable the module -> Test and refine
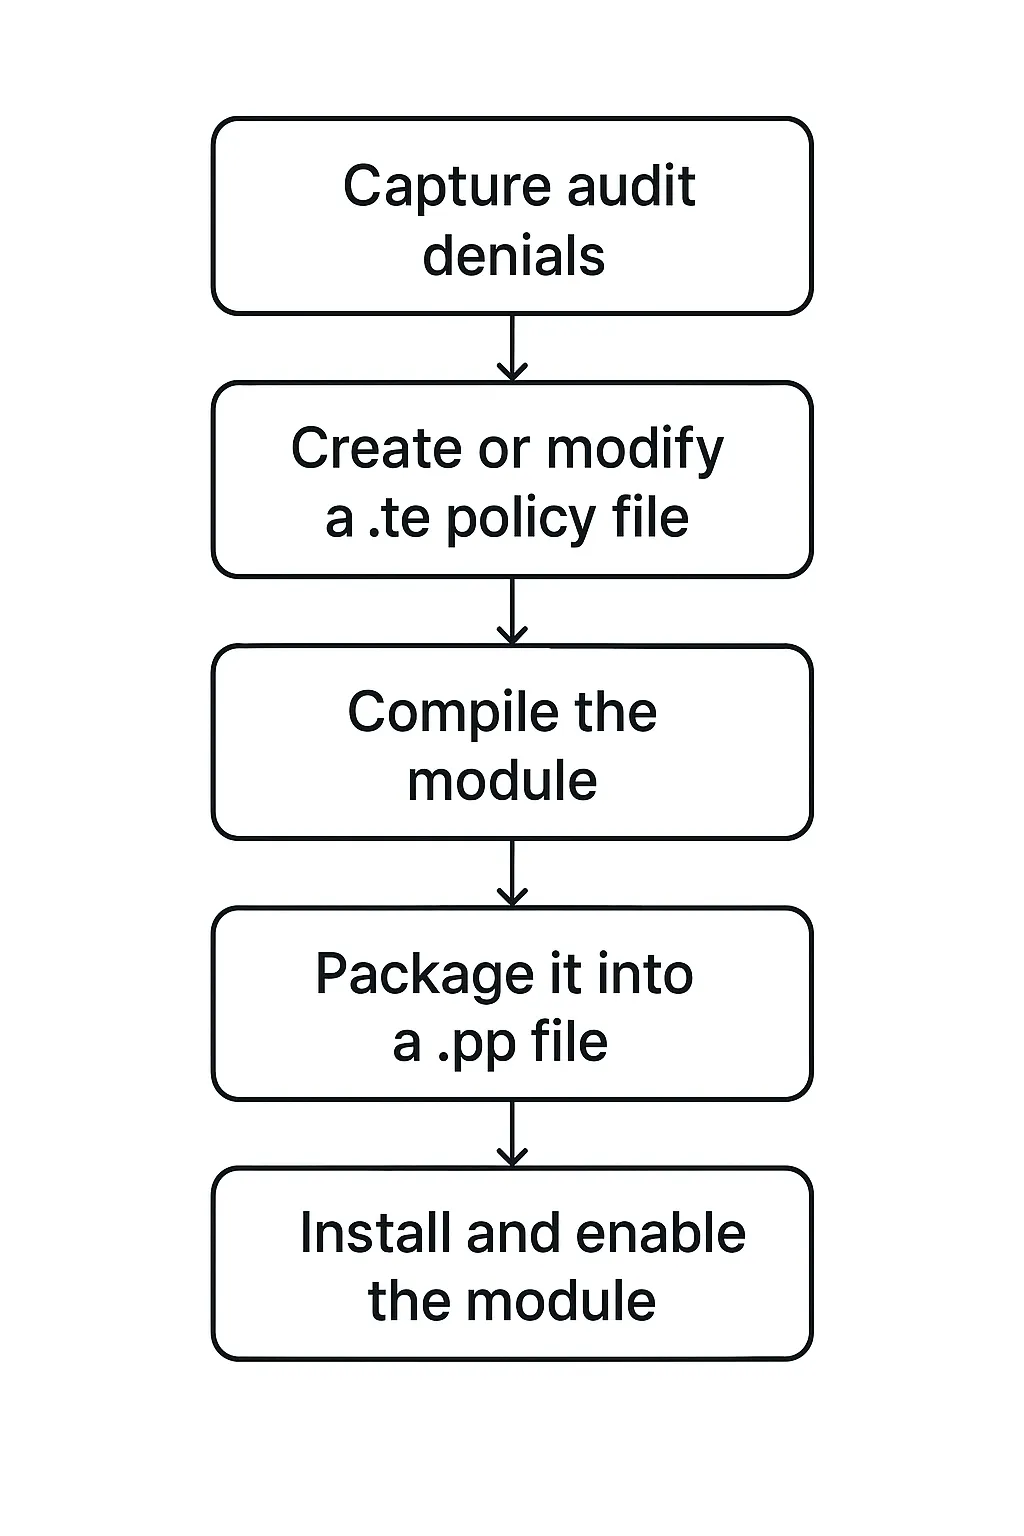
Photo by admingeek from Infotechys
Before beginning, ensure the following tools are installed:
sudo dnf install policycoreutils policycoreutils-python-utils selinux-policy-devel -y
					# or on Debian-based:
sudo apt install policycoreutils selinux-basics selinux-policy-dev -y
Confirm SELinux is in enforcing or permissive mode:
getenforce
If it reports Disabled, enable SELinux first by editing /etc/selinux/config.
Your first step in designing a policy module is identifying what SELinux is blocking.
▶️ Check audit logs |
sudo ausearch -m avc -ts recent
Or read directly:
sudo less /var/log/audit/audit.log
You’ll find entries resembling:
avc: denied { read } for pid=2412 comm="myapp" name="config.yaml" dev="sda1" ino=12345 scontext=system_u:system_r:myapp_t:s0 tcontext=unconfined_u:object_r:etc_t:s0 tclass=file
▶️ Use sealert for human-friendly diagnostics |
sudo sealert -a /var/log/audit/audit.log
This tool often provides suggestions for file contexts or policy rules.
audit2allow to Generate a Base Policyaudit2allow can take audit denials and convert them into policy rule suggestions.
▶️ Generate a policy template |
sudo audit2allow -M myapp < /var/log/audit/audit.log
This generates:
|
|
|
Review the .te file carefully. For example:
cat myapp.te
Example output:
					module myapp 1.0;

require {
    type etc_t;
    type myapp_t;
    class file read;
}

#============= myapp_t ==============
allow myapp_t etc_t:file read;
💡Important note: Never blindly install policy modules. Ensure rules are specific and minimal. |
Once you’ve validated the .te file:
sudo semodule -i myapp.pp
Confirm installation:
sudo semodule -l | grep myapp
Now restart or test your application to confirm expected behavior.
While audit2allow is useful, writing your own .te file gives you more control and prevents over-permissive rules.
▶️ Example: Creating a minimal custom policy |
Create a file named myapp.te:
					module myapp 1.1;

require {
    type myapp_t;
    type var_log_t;
    class file { read write append };
}

# Allow custom app to write to its log directory
allow myapp_t var_log_t:file { read write append };
▶️ Compile and build |
checkmodule -M -m -o myapp.mod myapp.te
semodule_package -o myapp.pp -m myapp.mod
sudo semodule -i myapp.pp
SELinux must correctly label application files and directories. Without proper labeling, even correctly written policy modules won’t work.
▶️ View current contexts |
ls -Z /opt/myapp
▶️ Assign a new context |
Example: Your app stores configs in /opt/myapp/config. Add a persistent rule:
sudo semanage fcontext -a -t myapp_etc_t "/opt/myapp/config(/.*)?"
Apply the new labels:
sudo restorecon -Rv /opt/myapp/config
▶️ File context quick reference table |
| Goal | SELinux Tool | Example |
|---|---|---|
| Add a new label | semanage fcontext -a | Add custom type to config dir |
| Modify existing label | semanage fcontext -m | Change label for logs |
| Remove rule | semanage fcontext -d | Delete custom context rule |
| Apply labels | restorecon -R | Restore contexts recursively |
For SELinux to apply your rules, the application’s process must run under the correct domain (type).
There are three common ways to do this:
▶️ Using systemd service files |
Add this to your service unit:
					[Service]
SELinuxContext=system_u:system_r:myapp_t:s0
Reload systemd:
sudo systemctl daemon-reload
sudo systemctl restart myapp
▶️ Using file transitions |
A transition rule automatically labels the process when it starts. Example .te addition:
type_transition init_t myapp_exec_t:process myapp_t;
▶️ Using |
runcon system_u:system_r:myapp_t:s0 /opt/myapp/bin/myapp
After deploying the module:
▶️ Check for new denials |
sudo ausearch -m avc -ts recent
If new issues appear, refine your .te file accordingly.
▶️ Disable a module temporarily |
sudo semodule -d myapp
▶️ Remove it entirely |
sudo semodule -r myapp
▶️ Keep modules in version control |
Place .te and .fc files in a Git repository to maintain a secure and auditable development lifecycle.
🔧 Issue 1: Policies seem correct but the app still fails |
Run:
sudo restorecon -R /opt/myapp
Mislabelled files cause most SELinux issues.
🔧 Issue 2: System logs flood with denials |
Confirm correct domain:
ps -eZ | grep myapp
🔧 Issue 3: Permissive mode hides misconfigurations |
Ensure SELinux is enforcing:
sudo setenforce 1
To keep your SELinux policy environment clean and secure:
✅ Do |
|
|
|
|
|
❌ Don’t |
|
|
|
|
Below is a full example for a hypothetical application named myapp that needs to:
|
|
|
✅ Create file contexts |
sudo semanage fcontext -a -t myapp_etc_t "/opt/myapp/config.yaml"
sudo semanage fcontext -a -t myapp_log_t "/var/log/myapp(/.*)?"
restorecon -Rv /opt/myapp /var/log/myapp
✅ Create policy file |
myapp.te:
					module myapp 1.2;

require {
    type myapp_t;
    type myapp_etc_t;
    type myapp_log_t;
    class file { read write append open };
    class tcp_socket name_bind;
}

allow myapp_t myapp_etc_t:file { read open };
allow myapp_t myapp_log_t:file { write append open };
allow myapp_t self:tcp_socket name_bind;
✅ Compile and install |
checkmodule -M -m -o myapp.mod myapp.te
semodule_package -o myapp.pp -m myapp.mod
sudo semodule -i myapp.pp
✅ Test and validate |
sudo ausearch -m avc -ts recent
If the logs show no denials, your policy module is ready for production.
Configuring SELinux policy modules for custom applications is one of the most effective ways to balance tight security with operational flexibility. By understanding how to analyze denials, write .te rules, manage file contexts, and deploy modules, you can ensure each application runs safely within its own controlled domain.
With proper structure, testing, and version control, SELinux becomes not a barrier—but a powerful guardian of both system integrity and application stability.
Did you find this article helpful? Your feedback is invaluable to us! Feel free to share this post with those who may benefit, and let us know your thoughts in the comments section below.
Secure your Apache web server on RHEL 9 or CentOS Stream 9 with a hardened TLS configuration. Learn how to enable TLS 1.2/1.3, enforce strong

Learn how to manage SELinux contexts on RHEL 9 and CentOS 9 for improved security. This guide covers SELinux contexts, CLI commands, troubleshooting, and best
As a Linux professional, you know the importance of protecting your system and data from cyber attacks – learn how to do just that with